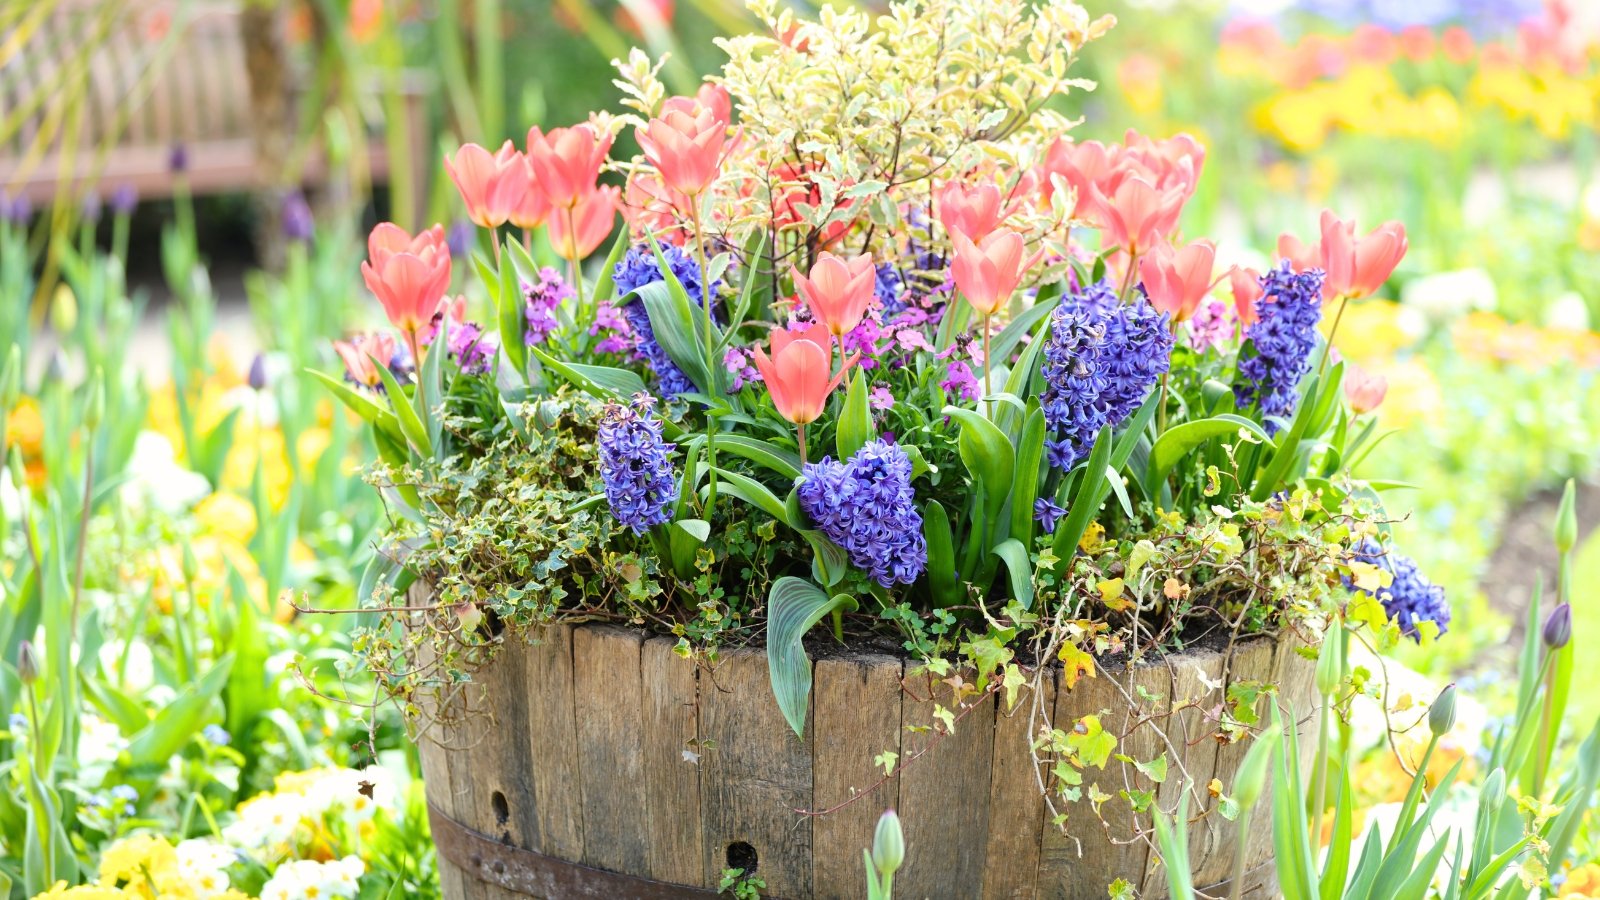
Spring Bulb Pot Combos for Vibrant Pots
Spring Bulb Pot Combos for Vibrant Pots: Foundational Concepts and Planning
At BloomHaven.com, we celebrate how color and form transform small spaces, especially when you start with spring bulb pot combos. In 2026, container gardening remains a popular trend, and bold pairings of tulips, daffodils, hyacinths, and early bloomers can fill a patio with continuous bloom. The idea is not simply to cram bulbs into a pot; it is to design a mini-garden that blooms in waves, attracts pollinators, and resists common problems like soggy roots and crowding. In this introductory section, we’ll lay the foundation: understanding growing conditions, choosing the right containers and soil, and planning color and bloom timelines. You’ll learn how to map a planting calendar, select compatible bulbs, and create combinations that thrive in pots and deliver eye-catching impact from early spring through late spring. With practical tips and clear steps, you’ll be ready to translate vision into vibrant pots.
Spring Bulb Pot Combos for Vibrant Pots: Foundational Concepts and Planning
Foundational concepts for spring bulb pot combos center on creating predictable, repeatable success in the unique environment of a container. Pots expose bulbs to rapid shifts in temperature, moisture, and light, so planning ahead is essential. Start with a simple framework: assess the site, choose containers that support healthy root growth, and select bulbs that share compatible bloom windows. Layering, color cohesion, and the right mix of textures turn a functional planter into a living work of art. Crucially, the most striking spring displays come from deliberate combinations rather than chance plantings.
Light, drainage, and soil essentials for spring bulb pot combos
Light availability drives how boldly a bloom will perform in a pot. Most spring bulbs prefer bright light and cool temperatures, but their tolerance for sun varies by species. In addition, drainage is non-negotiable in container plantings; bulbs tolerate damp roots poorly, so every pot should have drainage holes and a well-draining mix. A practical, scalable potting mix is two parts quality potting soil, one part compost or well-rotted mulch, and one part perlite or coarse sand. To further optimize drainage, add a shallow layer of gravel near the bottom or use pots with raised elevations or holes at the base. Therefore, you set up a container environment that supports strong root systems and clean water flow, which reduces rot and disease risk.
Strong drainage also supports healthier foliage and longer display periods. When light is abundant but soil stays too wet, roots suffocate and bulbs fail to reach their full bloom potential. For containers in windy or hot microclimates, consider lighter colors and reflective surfaces to reduce heat buildup, and group pots with similar sun exposure to prevent mis-matched moisture needs. In short, the right light and drainage are the quiet engines behind vibrant pots.
Color planning within spring bulb pot combos
Color theory guides the aesthetic rather than merely the palette. Use a cohesive scheme—analogous hues (colors next to each other on the wheel) for calm, harmonious displays—or complementary pairings (colors opposite each other) for high drama. When arranging spring bulb pot combos, plan bloom timing in tiers: early-season bulbs (crocus, crocus-like varieties, snowdrops), mid-season bulbs (daffodils, tulips in mixed textures), and late-season accents (alliums, fritillarias). This sequencing creates a living color story across weeks, encouraging pollinators to linger. To maintain visual interest beyond bloom, incorporate foliage textures—soft grasses, variegated leaves, and sculptural stems—that persist while flowers fade.
Planning your spring bulb pot combos: site, pot, and soil
Site selection defines the scope of your project. Assess exposure to sun, wind, and temperature swings, then map your microclimates. Choose pots that fit the space and climate: tall, deep containers for tulips and hyacinths; broad, shallow bowls for crocuses and smaller bulbs. Weight matters for stability in windy locations, and material choice influences moisture retention and seasonal durability. A well-considered soil strategy combines drainage with nutrition: a light base mix enriched with slow-release fertilizer tailored for bulbs supports bloom longevity. Plan color and bloom timing around the container’s capacity to support multiple bulbs with adequate spacing, so roots aren’t crowded and water moves freely.
Checklist for pot selection and setup:
- Deep enough containers to accommodate bulb roots and a root-friendly mulch layer
- Adequate drainage holes and optional fabric liners to prevent soil loss
- Weight considerations for balcony or patio placements
- Material choices balancing heat retention and aesthetics
- Soil mix tuned for quick drainage yet sufficient nutrients
- Spacing guidelines to avoid crowding and ensure each bulb has room to grow
Pot sizing and typologies for spring bulb pot combos emphasize variety. A tall pot yields vertical interest; a wide, shallow bowl invites mass displays and easier access for maintenance. Mix heights within a single display to create depth and vantage points from different angles. In addition, pairing different textures—glossy leaves with matte petals—adds dimension. When selecting pots, also consider the off-season storage you’ll need and whether you’ll be rotating displays year after year.
Soil mixes and drainage strategies for spring bulb pot combos build on the basics. Layer bulbs with a shallow mulch above the root zone to deter moisture fluctuations, and use a light top-dressing to keep bulbs visible and accessible for care. If you live in a climate with cold snaps, you might wrap pots or group them together to reduce heat loss. Regular inspection for signs of root rot, spider mites, or snails helps you catch problems early, preserving the display’s vitality. Crucially, keep a simple watering routine tuned to your specific mix and plant density; over-watering remains the most common failure in container bulb displays.
Timing, layering, and ongoing care for spring bulb pot combos
Timing is everything in container plantings. Start with a plan for vertical layering: tallest varieties at the back or center, mid-height in the middle, and compact varieties at the edge. This arrangement ensures visibility from multiple angles and reduces the chance of blooms being blocked by foliage. In addition, layering supports efficient water use and soil aeration. Plan for bloom wave sequencing by staggering planting dates or using varieties with overlapping flowering windows so the display remains dynamic. For care, establish a routine: water deeply when the top inch of soil feels dry, rotate pots to maintain even light exposure, and monitor for pests. Fertilize lightly at planting and again as blooms ramp up to sustain color intensity. Therefore, you create a sustained, vibrant spring display rather than a brief flash of color.
Seasonal bloom timing and annual maintenance are the ongoing chapters of success. Maintain a simple calendar that logs variety names, bloom windows, and any year-to-year adjustments. Some bulbs naturalize well in pots, while others require replacement after a couple of seasons. When blooms fade, decide whether to lift and store the bulbs, replant with fresh stock, or switch color stories for the next season. In addition, consider pollinator-friendly companions like creeping thyme or low-growing salvias to keep the display attractive to beneficial insects throughout spring. Finally, store stored bulbs in a cool, dry place during the off-season and reintroduce them when conditions align. This disciplined approach reduces guesswork and extends the life of your container garden.
Resource and inspiration for spring bulb pot combos
Finding credible guidance matters as you design for containers. For a trusted reference on bulb care and container gardening, visit Royal Horticultural Society’s bulbs guide, which covers bulbs suitable for pots, soil considerations, and seasonal care tips. In addition, consult extension services and local nurseries for climate-specific guidance; these sources help tailor your plans to your microclimate and container options. You’ll also discover seasonal design ideas, color palettes, and maintenance checklists that align with 2026 Pinterest trends like cabbage crush, wildflowers, peonies, and pollinator plants.
In Part 2: Selecting Bulb Varieties and Color Schemes for Container Plantings, we’ll zoom in on choosing the right varieties, balancing color stories, and coordinating bloom windows to keep your pots fresh and dynamic all season long.
Spring Bulb Pot Combos in Practice: Step-by-Step Planting and Setup
In this practice-focused guide, you’ll translate the theory of spring bulb pot combos into actionable steps you can complete over a single weekend. The aim is to deliver vibrant pots with color that lasts, while keeping care simple and sustainable. By following these steps, you’ll create arrangements that perform in containers—from compact balcony pots to larger patio planters—throughout the early spring season of 2026.
First, you’ll see how to choose spring bulb pot combos that work well in containers, then you’ll move through the concrete steps of layering, planting depth, and placement. Finally, you’ll learn how to water, feed, and adjust for the inevitable shifts in light and temperature. Throughout, the emphasis is on practical action, not theory alone. Specifically, each step is designed to be repeatable, so you can create multiple pots with confidence.
Choosing spring bulb pot combos that perform well in containers
The most reliable spring bulb pot combos balance bloom times, bulb sizes, and colors. Start with a core group of bulbs that share similar chilling requirements and root depth. For example, pair early bloomers such as crocus or grape hyacinth with mid-season tulips or daffodils. The result is a layered display that comes alive in waves, giving you sustained color across several weeks. Furthermore, choose varieties that are naturally sturdy in pots and tolerate the occasional dry spell better than delicate field-planted types. If you want fragrance, incorporate a scented tulip or paper-white narcissus into the mix.
Make color planning a priority. You can aim for a cohesive palette—soft pinks with creams and blues—or go bold with high-contrast combos like chartreuse foliage with purple blooms. Consider pot size and viewing angle as you select varieties. Smaller pots benefit from compact varieties with slim root systems, while larger containers can accommodate taller stems and dramatic blooms. In addition, think about pollinators. Planting a few nectar-rich varieties like alliums or early tulips will invite helpful insects into your space. For further reference on bulb varieties, consult reliable sources such as the RHS Bulbs Guide. RHS Bulbs Guide.
Container selection and spacing for spring bulb pot combos
Container choice sets the stage. Choose pots with drainage holes and a wide rim to help you create a robust root zone. A 12- to 14-inch wide pot can accommodate eight to twelve bulbs depending on the species. Taller varieties deserve slightly deeper soil and a bit more space. You’ll want a gentle arc of sightlines when you view the pot from the front, so place taller bulbs toward the back or center if you’re arranging in a circular pot. Spacing matters. Bulbs should have enough room to push leaves upward without rubbing against neighbors, yet not so far apart that the pot feels empty. By thinking through spacing now, you’ll reduce the risk of crowded roots and leggy stems later.
Always check drainage. If your pot sits on a balcony or deck, elevate it slightly with pot feet or a tray to prevent waterlogging. Good drainage ensures healthy roots and minimizes rot risks. A well-chosen container, careful spacing, and mindful drainage set the foundation for successful spring bulb pot combos.
Soil, drainage, and potting mix for spring bulb pot combos
Soil is the living medium that carries your bulbs from dormancy to bloom. Use a light, well-draining potting mix rather than heavy garden soil. A practical blend is three parts good potting soil, one part perlite or coarse sand, and one part aged compost or finely milled organic matter. This mix holds essential moisture without becoming compacted, which helps bulbs establish roots quickly. Add a bottom drainage layer of small stones or coarse gravel to further enhance drainage. This layer prevents the soil from clogging the drainage holes and keeps roots happy. When you fill the pot, press the soil lightly to avoid air pockets, then leave a small space at the rim for watering.
Depth is critical for spring bulb pot combos. Plant each bulb at a depth of roughly two to three times its height. For example, a 2-inch-high bulb should sit about 4–6 inches deep. If you’re planting in layers, place the deepest bulbs first, then the shallower ones on top. For height variety, stagger the tops of the bulbs so you can see a garden-style display from every angle once the blooms arrive. Keep the soil surface about 1 inch below the rim to allow for watering without overflow.
Step-by-step planting for spring bulb pot combos
With containers prepped, begin by laying a shallow layer of soil over the drainage material. Place the deepest bulbs first, arranging them in gentle curves rather than rigid rows. This natural arrangement helps emulate a garden bed and creates a fuller appearance as shoots emerge. After positioning the deepest bulbs, add another layer of soil and place mid-depth bulbs, followed by the shallow bulbs near the top. The goal is to create a layered effect that reveals varying bloom times across the season. Finally, cover with a final layer of soil so the tips just peek above the surface, and firm the soil with your fingers to remove air pockets.
As you position each bulb, point the shoot upward and ensure the root end sits in contact with the soil. If you’re mixing different bulb types, consider the bloom height you’ll enjoy from your viewing position. You may also decorate the soil surface with a light dusting of decorative grit or small pebbles to help suppress moisture loss and create a finished look. When you’re done, water gently to settle the soil and start the rooting process.
Depth and spacing guidelines for spring bulb pot combos
Remember that depth is a function of bulb size. In practice, smaller bulbs like crocus or grape hyacinth go about two to three inches deep in a 4–6 inch pot, while larger bulbs such as tulips and daffodils go deeper, typically four to six inches depending on their height. Spacing should prevent crowding; a good rule is to leave about the bulb’s width of space between neighbors. This approach minimizes root competition and reduces the risk of rotting due to poor air flow. It also helps different bloomers reach the light at their scheduled times, so you enjoy multiple color surges rather than a single flush.
Watering, feeding, and care through bloom season
Watering is a balancing act. After planting, water thoroughly to settle the soil but avoid soggy conditions. Then monitor moisture regularly. The top inch of soil should feel just barely dry before you water again. In containers, the soil dries faster than in ground beds, so you may need to water more frequently during warm spells. If you’re using a slow-release fertilizer, apply it at a light rate at planting, or follow package directions for bulbs. Specifically, a light annual boost as bloom approaches can encourage sturdier stems and richer color without encouraging foliage growth at the expense of blooms.
Light and temperature set the pace. Place containers where they receive bright, indirect light for most of the day if kept indoors, or full sun if outdoors. If your climate experiences late-season freezes, you may need to move pots under cover during the coldest spells. Maintain even moisture; avoid letting soils dry out completely or become waterlogged. And in a practical tip: rotate pots every week or two to ensure even development and prevent leaning toward a single light source.
Monitoring is essential. Look for signs of stress such as yellowing leaves or soft, squishy bulbs. If you detect rot, remove affected bulbs and adjust watering and drainage immediately. Clean tools between pots to prevent the spread of disease. With proper care, your spring bulb pot combos will reward you with continuous color through the season and into early summer.
Light, temperature, and placement for spring bulb pot combos
Where you place pots matters as bloom times approach. Outdoors, a sheltered patio or balcony that gets morning sun and afternoon shade helps prevent heat stress on delicate blooms. Indoors, near a bright window but not directly under a hot radiator works well. If your site experiences strong winds, provide a windbreak to protect tall stems. In all cases, ensure that the pots remain stable and protected from accidental tipping. Positioning influences flowering habit as well as the visual impact of the color palette you chose.
Common mistakes and troubleshooting for spring bulb pot combos
Common missteps include overwatering, crowding, and ignoring drainage. Bulbs rot quickly in poorly drained pots, so ensure that the soil never stays soggy. Crowding leads to cramped roots and spindly stems; if this happens, gently replant with more space or divide into additional containers. Under-watering under heat can cause bulbs to produce weak shoots and a short bloom period. If you notice stunted growth or pale foliage, assess both moisture and nutrient supply. Adjust the watering schedule and consider a light feeding with a balanced bulb fertilizer to support steady growth.
Health checks pay off. Keep an eye on signs of pests, especially in sheltered indoor spaces where fungus gnats can become an issue. Remove any debris on the soil surface to discourage pests, and consider a light organic mulch if surface moisture is a concern. Finally, remember that not every pot will perform identically. Microclimates, sunlight variability, and container material all influence outcomes. The key is to observe, adjust, and repeat with confidence.
Pollinator-friendly additions for spring bulb pot combos
Boost your garden’s ecological value by including pollinator-friendly varieties within your spring bulb pot combos. Group bulbs with nectar-rich blooms and keep a few leaves and stems intact after flowering to feed pollinators as they emerge. For example, you might mix early daffodils with grape hyacinths and a handful of short, nectar-rich species to create a busy, buzzing display. Such combinations attract bees and butterflies, which in turn support the broader garden ecosystem.
If you’re curious about optimal pollinator-friendly practices, a reliable resource such as the RHS Bulbs Guide offers detailed planting guidance and variety recommendations. RHS Bulbs Guide provides essential context for choosing varieties that support pollinators while delivering striking color in containers.
Preparing for off-season and reuse of spring bulb pot combos
After the blooms fade, don’t abandon the pots. Remove spent foliage only after the foliage has naturally withered, as the leaves still photosynthesize to replenish the bulb’s energy for the next season. If you prefer to store the bulbs for replanting, gently lift them from the soil and brush off excess earth. Dry them in a cool, shaded location for several days before storing in a breathable bag or paper container. When it’s time to replant, inspect each bulb for firmness and signs of rot; discard any that are soft or moldy. Reuse the same pots if they are still structurally sound, cleaning them thoroughly to remove any residual soil and prevent disease transfer. If you choose to refresh the soil, start anew with a light, quick-draining mix to support the next cycle of bulbs.
In short, spring bulb pot combos are not a set-and-forget project. They reward careful preparation, mindful layering, and timely care. With the right container, soil, depth, and lighting, your pots will deliver color in waves, from early spring through late spring.
Looking ahead, Part 3 will guide you through Seasonal Transitions and Color Schemes for Spring Bulb Pots, where we refine palettes, explore design moods, and map out color progressions to maximize visual impact across weeks of bloom.
Advanced Strategies and Final Guidance for Spring Bulb Pot Combos
As we close this guide, the focus shifts from basics to mastery. Advanced strategies for spring bulb pot combos empower you to design displays that stay vibrant, even as conditions shift. You’ll learn to push color stories, optimize growth cycles, and simplify aftercare so your pots look intentional from early spring through late bloom. Ultimately, these techniques translate to fewer compromises between aesthetics and practicality, and more opportunities for blooms to shine in every container.
Refining Color Stories: Thematic Palettes and Bloom Timelines
Color is the soul of a pot. When you choreograph palettes with layered timing, you create a dynamic procession of blooms rather than a single flush of color. This section helps you craft coherent, magazine-worthy displays with spring bulb pot combos that feel designed rather than accidental.
Seasonal Timing and Staggered Blooms
Plan bulbs with different flowering windows. Early Tulips, mid-season Narcissi, and late Alliums or alliums-like forms can be combined in a single pot if you space their bulbs appropriately. For consistency, reserve the center for taller varieties and place dwarf or mound-form bulbs at the edges. This not only adds height variation but also ensures continuous color as one group fades.
Use a simple timing framework: aim for three bloom waves across a 6–10 week window. Adjust by selecting varieties with overlapping but distinct bloom periods. If you want a longer display, stagger planting dates by 1–2 weeks within the same pot batch. In practice, this means you’ll see successive flushes rather than a single peak.
Texture and Foliage Partners
Texture matters as much as color. Pair glossy-leaved varieties with fine-textured foliage to create visual contrast. Mix plants that reach different heights to sculpt the pot’s silhouette. For example, combine a tall tulip with a mid-height daffodil and a low, variegated foliage plant. This approach makes even a relatively small pot feel full and intentional.
In addition, consider foliage complements that persist after bloom. Grasses or evergreen perennials can provide structure when bulbs finish. This gives you a more finished look and reduces the “empty pot” feeling in early spring.
Container and Soil Architecture: Achieving Drama Without Waste
Container choice and soil architecture dictate how resilient spring bulb pot combos become across cool and warm days. The right combination minimizes root stress, improves bloom performance, and reduces maintenance headaches.
Choosing Pots by Size and Drainage Needs
Start with a plan for root space. Bulbs require adequate depth; a pot that’s too shallow can shorten bloom life. As a rule of thumb, select a container depth that accommodates at least 1.5–2 times the mature bulb height. If you’re stacking multiple bulb layers, ensure separate drainage paths so water doesn’t pool at the root crown.
Drainage is non-negotiable. Choose pots with drainage holes large enough to prevent soil from staying waterlogged after rain or heavy watering. If you’re using decorative indoor pots without drainage, place a breathable liner or plastic inner pot with holes inside the container to maintain healthy roots.
Soil Mix Ratios and Layering for Root Health
A well-structured soil profile supports robust roots and cleaner maintenance. Use a loamy, well-draining mix with a light organic component. A typical ratio is three parts potting mix to one part perlite or pumice for aeration. Layering matters too: start with a gritty bottom layer to improve drainage, add a thin root-safe base, and finish with the bulk of the mix around the bulbs. This arrangement promotes even moisture movement and reduces rot risk.
To maximize presentation, consider a shallow decorative layer on the top that remains visually appealing even when foliage dominates. A few bright, dwarf trailing species on the surface can draw the eye without crowding the bulbs beneath.
For practical, field-tested guidance on soil and potting, see this Almanac guide to planting bulbs in pots.
Care Routine Mastery: Water, Light, and Feeding at Scale
Season-long success hinges on a steady, smart care routine. Advanced care means anticipating needs rather than reacting to symptoms. A disciplined program reduces stress on bulbs and makes your displays reliably vibrant.
Watering Regimens for Pots in Cool Spring Weather
Spring weather is fickle. Early in the season, pots can dry out quickly on warm days but stay damp during cool weeks. Check moisture by weight or with a simple finger test. Water thoroughly when the top inch of soil dries, ensuring runoff from drainage holes. Avoid waterlogging—excess moisture can cause rot and stem blight. In cool spells, water less frequently but ensure deep penetration to reach the bulb’s root zone.
Automated irrigation can help, but calibrate it to seasonal shifts. A gentle, deep soak every 5–7 days during peak growth often works well for mixed bulb configurations.
Fertilization and Micronutrient Scheduling
Bulbs store nutrients, but pot culture benefits from a light, steady feeding. Use a balanced, water-soluble fertilizer at half strength every 4–6 weeks from planting through the first flush of blooms. Switch to a phosphorus-rich mix just before bloom to support flower set and coloration. After flowering, resume light feeding to support foliage and bulb recovery, then taper as the season ends.
Micronutrients matter too. A small addition of magnesium and iron at key times reduces yellowing and improves leaf vigor. Always follow label directions and avoid fertilizer burn by diluting properly in small pots.
Season Extension and Longevity: Aftercare and Reflowering
Proper post-bloom care extends the life of your spring bulb pot combos and improves chances of reflowering in subsequent seasons. A clear aftercare plan helps you maximize display time and reuse bulbs effectively.
Post-Bloom Care to Rejuvenate Bulbs
As blooms fade, leave the foliage intact while it’s still green. The leaves photosynthesize and replenish nutrient stores for the next season. If foliage begins to brown, trim only dead parts and avoid removing healthy leaves early. Do not waterlogging once the blooms stop; reduce watering gradually to minimize bulb stress.
Consider a light feed for another 2–4 weeks after flowering, then stop. By the time pots are dormant, your bulbs are ready to rest until next season’s cycle begins.
Storing Bulbs for Next Season
If you pull bulbs for storage, cure them in a dry, airy location for a week or two. Then clean off soil, inspect for rot, and store in a breathable bag or box in a cool, dry place. Keep varieties with similar dormancy needs together to simplify next season’s planting schedule. When you reuse bulbs, you can layer them differently to refresh color and form each year.
Pollinator and Wildlife Considerations
Spring bulb pot combos can delight pollinators while shaping your garden’s ecological footprint. Thoughtful selections support bees, butterflies, and other beneficial insects, creating a thriving micro-ecosystem in containers near windows, decks, or balconies.
Choosing Nectar-Rich Species
Prioritize species with accessible nectar and pollen. Hybrid tulips with soft petals and generous nectar, early-pudding narcissi, and certain alliums are excellent for pollinators. Mix varieties that bloom at different times to maintain a steady food source as pollinator populations cycle through the season.
In this practice, you’re not just decorating; you’re supporting urban biodiversity. Even a small pot can become a friendly habitat with the right combinations.
Scent and Attractiveness Factors
scent can boost the perceived value of your pots. Choose lightly aromatic varieties for outdoor displays, where fragrance can be enjoyed from a porch or walkway. For indoor setups, avoid overpowering perfumes that may irritate sensitive guests. Balance fragrance with color and form to craft a holistic sensory experience.
Troubleshooting and Quick Fixes
Even well-planned pot displays encounter hiccups. The key is to diagnose quickly and adjust with simple, effective fixes. This section offers practical responses to common problems so you can keep blooms thriving.
Common Issues: Legginess, Poor Flowering, Rot, Pests
- Limp or leggy stems: Increase light exposure gradually, rotate pots weekly, or relocate to a brighter spot for a few hours daily.
- Weak blooms or premature fading: Check for nutrient deficiencies and adjust fertilization; ensure proper spacing to avoid crowding.
- Rot or mushy bulbs: Improve drainage, reduce watering, and remove affected bulbs promptly to prevent spread.
- Pests: Use organic pest control where possible, such as hand removal or a gentle soap solution. For persistent issues, isolate infested pots to protect healthy plants.
When diagnosing problems, start with the simplest cause—water, light, or drainage—and adjust from there. Often, a small change in placement or watering routine yields the biggest gains in vigor.
Putting It All Together: A 6-Week Pot Plan Template
To help you apply these ideas, here is a compact planning template you can adapt. It’s designed to keep focus on spring bulb pot combos while aligning with bloom timing and care routines.
Plant selection and pot setup. Layer drainage, place tallest varieties center, tallest on the back if facing the viewer, with shorter ones around the edge. - Week 3–4: Begin light feeding; monitor moisture and adjust watering as temperatures rise or fall.
- Week 5–6: Peak bloom. Rotate pots to avoid sun scorch and maintain even color exposure. Remove spent flowers to encourage foliage development.
- Post-bloom: Transition to foliage maintenance, then reduce watering and plan storage or replanting for next season.
Adapt this template to your climate, container sizes, and preferred palette. The result is a repeatable, scalable system for creating striking spring displays with spring bulb pot combos.
Final Guidance and Next Steps
Now that you have advanced strategies and practical guidance, it’s time to implement with confidence. Start by selecting a small batch of bulbs with overlapping bloom windows and test a two-pot mini-collection. Observe how color, height, and foliage interplay as the season unfolds. Refine your approach by noting which combinations perform best in your microclimate and container style.
Consistency matters. Build a library of go-to plant pairings, pot choices, and care routines that align with your space and aesthetic. As you gain experience, you’ll be able to scale up while keeping quality and simplicity at the forefront.
Remember to consider pollinator-friendly options to maximize ecological value. A well-planned mix not only delights the eye but also supports local gardens and backyard biodiversity.
To stay inspired and informed, follow BloomHaven’s seasonal guides and trend roundups. If you’re ready to dive deeper, bookmark this post as a reference for designing vibrant pots year after year. The discipline you apply today with spring bulb pot combos will pay off in more persistent color and healthier bulbs for seasons to come.
Conclusion
In summary, practical mastery of spring bulb pot combos combines design rigor with horticultural care. By refining color stories, optimizing containers and soil, and orchestrating a smart care routine, you create containers that perform across the full spectrum of early spring to late bloom. The strategies above help you plan for staggered flowering, maintain soil health, and support pollinators—without sacrificing style. If you want to make a lasting impact, start implementing these advanced strategies in your next pot project and watch as your spring display becomes a reliable, high-impact feature in your garden or balcony. spring bulb pot combos are your gateway to vivid, low-maintenance container displays that delight visitors and wildlife alike.