Pressed Flower Frame DIY Tutorial: Create a Gorgeous Frame
Foundational Guide to Creating a Pressed Flower Frame: Tools, Trends, and Prep
Welcome to BloomHaven’s Foundational Guide to the pressed flower frame, a timeless craft that blends nature’s beauty with personal storytelling. A pressed flower frame captures a moment in bloom, preserving color and texture for decades. In this guide, you’ll discover why the pressed flower frame remains a favorite DIY project in 2026, what tools you need, and how to prep for flawless results. By the end, you’ll have a clear path from first kit to polished frame ready for gifting or display.
As with any high-quality craft, success starts with intention. You’ll choose blooms that hold color, plan a layout that reflects your room or mood, and prepare a workspace that stays tidy under pressure. This article focuses on the foundations: essential tools, current design trends driving inspiration, and practical prep steps you can implement this season. Whether you’re new to pressed petals or returning to a favorite hobby, this foundational guide sets you up for confident, repeatable results.
Tools you need for a pressed flower frame
Gathering the right tools is the first step to a flawless pressed flower frame. The goal is to protect delicate botanicals while giving you precise control over placement and mounting. Start with a clean, well-lit surface, a non-slip mat, and a steady hand. When you invest in quality tools, you’ll enjoy cleaner edges, less breakage, and a frame that lasts for generations.
At minimum, you’ll want a flower press, absorbent paper, parchment or blotting sheets, fine-tipped tweezers, and acid-free mounting adhesive. A soft brush helps you lift fragile petals without crushing them, and a metal ruler assists with straight lines when you trim leaves or petals. Keep spare blades or an exacto for trimming small pieces, and stock up on archival glass and acid-free mats to protect color over time. In addition, consider a lightbox or daylight lamp to inspect colors and veins clearly, especially when working with pale botanicals that can look washed out in artificial lighting.
To help you stay organized, create a dedicated work tray for pressed botanicals and keep a small jar of isopropyl alcohol for quick cleanup of sticky residue on hands or tools. If you plan to seal your frame, consider a UV-protective glass to minimize color shift from sunlight. For beginners, a simple clamp frame with a neutral mat is perfectly adequate; advanced hobbyists may opt for a cotton-wrapped frame, a deep-set space for three-dimensional effects, or a double-glass design for depth. For more on practical pressing techniques, see a trusted guide like How to press flowers from The Spruce.
Trends shaping pressed flower frame designs in 2026
The world of floral framing moves with color, texture, and planter styles. In 2026, Pinterest trends steer many DIY projects toward luminous palettes, tactile surfaces, and nature-forward compositions. You’ll notice a rise in cabbage crush-inspired textures, airy wildflowers, lush peonies, and pollinator-friendly plant choices. These trends aren’t just pretty; they influence material choices, layout decisions, and framing solutions that photograph well in feeds and portfolios.
Visual trends lean toward understated elegance. Expect pale, washed blues and greens paired with warm neutrals, plus pops of coral, sunlit yellow, and dusty rose. For structure, designers blend organic layouts with simple grids, letting each pressed flower frame breathe. Texture is achieved with pressed leaves, fern fronds, and seed pods that catch light differently from petals. The result is a frame that feels contemporary, garden-inspired, and highly shareable on social platforms.
Designers also explore sustainable packaging and display options. Recycled paper mats, FSC-certified frames, and glass that resists yellowing are becoming standard. If you’re preparing to shoot your work for Pinterest or a gallery wall, consider how the frame sits in natural light and how color tones photograph under different bulbs. For inspiration, explore seasonal palettes that echo your garden or local flora, and keep a running board of favorite blooms to press when wildflowers are abundant. In 2026, cabbage-crush textures and peony-forward arrangements are particularly popular for those seeking a lush, romantic look that still reads clean on camera.
Prep steps before framing
Preparation is your best friend when working with delicate blooms. Great framing starts in the garden, but it continues in the studio. Start by selecting a frame size that suits your intended display, and plan your layout before pressing. A well-planned layout saves time and reduces the risk of overlapping petals that look crowded once mounted. Take photos of your planned arrangement before pressing to guide placement later.
Choosing the right frame and glass matters almost as much as the blooms themselves. Archival, acid-free materials help preserve color. If the display will be touched or handled frequently, consider a UV-resistant glass to minimize fading from sunlight. Different depths create different opportunities; shallow frames press the eye toward the bloom, while deeper frames allow for a little three-dimensional arrangement. Test-fit a few stems in a mock layout to confirm balance and avoid surprises when the actual pressing is complete.
Next, curate your flower selection. Look for blooms at their peak color with sturdy structures—think daisies, bachelor’s buttons, strap flowers, small sunflowers, and pressed ferns for texture—paired with delicate greens. When possible, press flowers with similar moisture content to avoid uneven drying. For this reason, you might separate stems by thickness or weight before pressing, ensuring they dry evenly and lay flat when mounted. If you expect moisture-heavy specimens, press slightly longer to compensate for extra moisture loss in the press.
Drying and pressing methods vary. Classic stack-press methods rely on blotting papers and weights, while gardener-friendly press systems use sandwich-style presses. For best results, press immediately after harvest or collect fallen petals after a light rain when colors are bright. If you’re new to pressing, start with single blooms to learn the feel of moisture release and flattening without breakage. Remember that patience is a virtue here; slower, even pressing yields crisper results with fewer bruises or curling edges.
Safety and maintenance
Floral framing is forgiving but requires care. Fragile botanicals benefit from a gentle touch and slow, deliberate movements. Use fine-tipped tweezers to place each piece and avoid forced repositioning, which can tear petals. Station cleanliness matters; dusty surfaces can transfer grime to petals and create dull finishes. Regularly change blotting papers to prevent color transfer and mildew, especially in humid spaces.
Storage matters too. Keep pressed pieces in acid-free envelopes or between sheets of glassine until you’re ready to mount. Store in a dry, cool space away from direct sunlight to prevent color fade and moisture damage. If you plan to do multiple frames, label each piece with bloom name and pressing date to track color changes and humidity exposure over time. A simple, tidy archive makes future projects faster and more cohesive, particularly when you’re building a family of frames with shared color stories or seasonal themes.
In the next section, we’ll transition from foundational work to hands-on execution. You’ll learn precise pressing techniques, mounting tips, and assembly strategies in Part 2: Step-by-Step Pressing and Framing, so stay tuned for the practical how-to.
Step-by-Step Pressed Flower Frame Creation: Assemble, Arrange, and Frame
Step-by-step, this section guides you through assembling a pressed flower frame that feels curated yet natural. The goal is a finished piece that speaks to the season, the bloom, and your personal style. By aligning technique with taste, you achieve a pressed flower frame that looks polished in 2026 and beyond. Furthermore, a deliberate workflow reduces surprises later on, making the process enjoyable as you create keepsakes that tell a story through color and form.
To begin, prepare your workspace. A clean, dust-free surface matters because even small particles can show through the glass once you seal the frame. A level, bright light, and a calm routine help you observe every delicate detail. Specifically, when you work in a steady environment, you preserve the integrity of each pressed bloom. In addition, good lighting makes color and translucency easier to judge, so you do not overpack the frame with crowded compositions that feel chaotic rather than harmonious.
Choosing the right frame is your next step. The frame should suit the size and mood of your arrangement, with a shallow depth if you want a flat, glass-backed finish, or a deeper frame if you prefer a subtle shadow box effect. Specifically, consider whether you want a glass cover or a clear acrylic sheet, since acrylic is lighter and less prone to breakage, though glass offers a crystal-clear, traditional look. When the goal is longevity, favor a frame with acid-free backer material and UV-filtering glass or acrylic to minimize fading over time. In practice, this choice influences how you mount the blooms and how easily you can access the piece for updates or care. For a clean, museum-like presentation, pair the frame with a neutral mat in ivory or soft gray to allow the pressed flower frame to take center stage.
Layout planning comes next. You can adopt a grid-based arrangement for symmetry or a freeform approach for a more organic feel. Specifically, grid layouts help achieve balance when you have a mix of large and small blooms. Freeform arrangements create spontaneity and mimic how flowers naturally cluster in a meadow. In either method, test the layout before mounting. Use tracing paper or a plain sheet of backer board to lay out the blooms, moving them around until you’re satisfied with spacing and color progression. In this planning phase, consider the journey of light through the frame; lighter blooms near the top and warmer tones toward the bottom can yield a pleasing visual flow.
Adhesive and mounting principles are crucial. The aim is a secure yet reversible setup so you can reframe or refresh without damage. Specifically, opt for pH-neutral, acid-free mounting tape or a light, archival-quality adhesive that dries clear. Avoid heavy glues or anything that could cause yellowing or chemical reactions with the plant material. When you position each bloom, anchor it with gentle touches of tape at the stem or base, keeping the petals free to display their natural color. If you are using delicate petals, consider securing them with microdots of archival silicone adhesive placed at the leaf nodes or along the midrib, so you preserve structure while avoiding glue seepage into the petals themselves. Importantly, let the adhesive cure for a few minutes before proceeding to the next bloom to prevent shifting.
Now, breathe life into your pressed flower frame by assembling the blooms. Start with the largest items as anchors and fill in with medium and small pieces to create a cohesive tapestry. Specifically, layer blooms with complementary tones to avoid color clashes and to emphasize texture. When you position a bloom, evaluate its transparency and how it interacts with light; some varieties glow softly when backlit, while others remain more opaque. In contrast, a well-balanced arrangement maintains a sense of air around each bloom, preventing crowding and preserving individual character. If you plan to include leaves or seed pods, place them where they naturally support the floral architecture, not merely as filler. For extra depth, rotate bloom orientations slightly and stagger stems so the composition reads as lively rather than uniform.
As you assemble, keep distribution of weight in mind. A pressed flower frame should feel evenly weighted so it sits comfortably on a wall or shelf. Specifically, you want no single area to sag or pull on the frame. A small, discreet weight at the bottom edge can help balance the visual mass. Consider simulating a shallow shadow effect by placing a few darker blooms toward the back edges while lighter colors occupy the foreground. In addition, respect color theory: cool tones recede slightly while warm tones advance, guiding the viewer’s eye through the piece. This approach helps you craft a harmonious pressed flower frame that remains engaging from multiple angles.
With the layout pinned down, prepare for the mounting phase. If you want to preserve orientation, mark the back of each bloom with a tiny, non-damaging note indicating its position. Specifically, a light pencil mark or a small archival sticker can serve as a cue during framing. When you are ready to secure, apply adhesive sparingly, focusing on the contact points that will keep the bloom flat without puckering. In many cases, you will anchor a bloom at its base and use light tape to hold edges of petals in place. This method reduces the risk of curling as the frame is sealed. In practice, you can check through the glass to ensure nothing has wrinkled or shifted. If you notice any misalignment, pause and adjust before the adhesive fully sets.
Layering for depth is an art in itself. Specifically, you can create subtle depth by placing a primary bloom flat against the backer and layering secondary blooms in front, using tiny spacers like curved paper shims or It is crucial that these spacers do not press against the petals, which could cause flattening. In contrast, a modest elevation can give your pressed flower frame a gallery-worthy feel. If you want a more dramatic effect, use a few blooms with natural three-dimensional shapes and position them at slightly different angles to catch light from various directions. Additionally, you can place a single accent bloom toward the upper third of the composition to draw the eye upward and create a focal point that anchors the frame.
Before you seal the project, perform a final check. Specifically, inspect for any glue seepage, air pockets, or unintended creasing. If you detect a stray petal that wants to lift, press it down gently and re-anchor with a discreet touch of archival adhesive. In addition, confirm that the entire arrangement sits flat against the backing and that there is no visible gap between the blooms and the glass or acrylic cover. Now you are ready to place the assembly into its frame, attach the backer, and close the piece with the protective front sheet. As you fasten the frame, ensure even pressure around the perimeter so the seal is tight but not overly constricting. For a finished look, wipe the glass carefully with a clean microfiber cloth to remove fingerprints and dust, preserving the pressed flower frame’s clarity.
Carefully consider the finishing touches. Specifically, label the back with details such as the date, location of collection, and any notes about the species or color variation. This step helps you document the piece for future displays or gifting. In addition, include a short statement about how the piece was created, which adds a personal touch and increases its collectible value. A well-labeled frame also helps when you rotate pieces seasonally, making it easier to keep track of your pressed flower frame catalog. As you complete the project, reflect on the process: what worked, which blooms were particularly cooperative, and what you would adjust next time. This reflection helps you improve your technique for future pressed flower frame projects and keeps the craft enjoyable rather than repetitive.
To connect with other creators and gather further inspiration, you can explore practical guides that expand your technique. For example, this resource offers additional tips on pressing and preserving blooms, which can complement your knowledge of the pressed flower frame process. How to Press Flowers provides actionable ideas that you can adapt to your frame projects. Specifically, use their insights to refine your method and avoid common pitfalls while maintaining your personal aesthetic.
Now that you’ve completed the core assembly and framing steps, you can think about how to display your pressed flower frame. The choice of display affects how the blooms read and how long the colors stay vibrant. Consider whether your space benefits from a vertical wall, a light-filled shelf, or a rotating gallery. In any case, ensure the frame is mounted away from direct sunlight and heat sources to minimize fading and warping. If you use a hanging system, verify that the hardware can bear the frame’s weight without stressing the glass or acrylic. In a well-lit room, a pressed flower frame earns attention without shouting, and its quiet beauty becomes a daily source of delight.
Eco-conscious choices support both your art and the planet. Specifically, select materials that are recyclable or reusable and choose parts that can be replaced rather than discarded. For instance, pairing a higher-quality backer with a readily available frame means you can refresh the display when you want a new arrangement without recreating the entire piece. In this way, your pressed flower frame becomes a sustainable craft that you return to again and again, season after season, while maintaining a strong sense of personal style.
Finally, as you finish this Part 2, you are ready to transition toward the finishing considerations, display planning, and long-term care that will be covered in Part 3. In Part 3, Finishing Touches, Display Options, and Maintenance, we’ll explore sealing methods, protective coatings, and creative ways to showcase your pressed flower frame in different environments. Next, in Part 3: Finishing Touches, Display Options, and Maintenance, we explore sealing, framing alternatives, and care to keep your piece pristine for years to come.
For more on preserving delicate botanicals before framing, this guide can help you optimize the preservation stage, ensuring your blooms retain color and detail as you assemble the pressed flower frame.
Advanced Techniques and Final Guidance for a Polished Pressed Flower Frame
In this final section, we synthesize advanced techniques and actionable steps to push your pressed flower frame from good to gallery-worthy. The goal is a polished, lasting piece that reflects your eye for detail and respect for delicate blooms. Throughout, you will see the focus keyword pressed flower frame woven into practical guidance, so you can replicate results with confidence.
Before we dive deep, remember that consistency is your ally. A polished pressed flower frame relies on predictable processes, clean surfaces, and archival materials. Small choices—like using acid-free paper, a glass front, and a light mounting adhesive—compound into a standout finished piece. Now, let’s explore the precise steps that separate an amateur craft from a professional, exhibition-ready pressed flower frame.
Choosing the Right Specimens for a Pressed Flower Frame
The foundation of any refined pressed flower frame starts with choosing specimens that photograph well in their flat state. Favor blooms with flat or gently curved petals and minimal water content in the petals themselves. For example, camellia petals, small roses, daisies, and most wildflowers press with clean edges and consistent color. In a pressed flower frame, diversity matters, but balance matters more. Aim for three to five colors that harmonize rather than clash. Pair bold blooms with softer greens, creams, or pale yellows to avoid crowding the frame. If you plan to add leaves, choose those with even texture rather than highly veined varieties that can show through the glass.
Test a small piece first. Place a single bloom in your pressing setup and note how the color shifts after the full drying period. If you see excessive browning or color loss, swap to a different pigment or adjust your pressing time. Practicing with a few specimen sets yields a more consistent pressed flower frame in the final project. Finally, prepare a tiny mock layout on your backing paper before you commit to mounting. This forethought helps you avoid repositioning later, which can damage delicate petals.
Advanced Pressing Techniques for a Consistent Look
To achieve a consistently flat and vibrant pressed flower frame, consider a blend of time-tested methods and modern aids. We’ll cover three proven approaches that yield reliable, repeatable results.
Silica Gel Pressing Method
The silica gel method accelerates drying while preserving color and shape. Fill a shallow container with silica gel to create a soft bed for your blooms. Place the specimen face-up, sprinkle with more gel to cover, then seal the container. Maintain a cool, dark environment and check daily. Most blooms finish within three to seven days, depending on thickness. The gel minimizes curling and preserves crisp edges, which is essential for a sharp pressed flower frame. After drying, gently brush off the gel and store the pieces in an archival sleeve until you’re ready to mount.
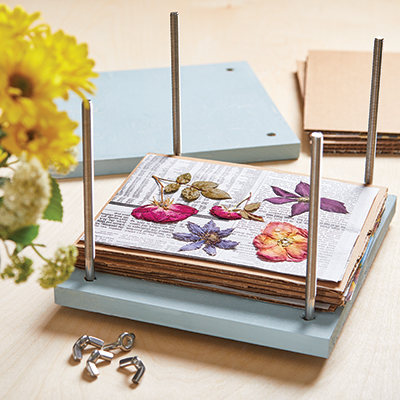
Book-Pressing and Vacuum Pressing
Traditional book-pressing uses heavy weights or a purpose-built press. Layer blotters and parchment between the petals and a lightweight backing. Apply steady, even pressure for one to two weeks. To speed up the process without sacrificing color, you can employ a vacuum press, which removes moisture uniformly. The result is an even thickness across elements, minimizing warping when you assemble your pressed flower frame. Always check that each piece lies flat before moving to mounting.
Air Drying with Controlled Humidity
Air drying in a controlled humidity environment remains popular for its simplicity. Use blotters and a weight in a dry, dark space with low humidity. Periodically swap blotters to prevent molding. This method works well for simpler arrangements and keeps you in the driver’s seat for color retention. For a pressed flower frame with a more delicate palette, combine air-dried elements with a light glass flattening method to maintain uniformity across all components.
Mounting and Framing: Aligning Elements in a Pressed Flower Frame
Mounting precision is the difference between a frame that looks handmade and one that looks museum-ready. Start with archival, acid-free backing and a UV-filtered glass or acrylic front to protect color over time. Layout is critical. Place the largest bloom first, then build a balanced composition around it. Use gentle, archival adhesives—acid-free mounting corners, double-stick tape, or a light gel adhesive—so you can reposition briefly if needed but avoid excessive handling once secured.
When you attach pieces, avoid pooling adhesive under petals. Apply a small amount only at the base of each element. This prevents seepage that can stain petals or create shiny spots. If you’re working with a mat, cut it precisely to your backing size. A mat not only frames the piece elegantly but also helps manage dust and life-cycle exposure to light. Finally, align everything flush with the glass. A minor tilt can distort the overall symmetry of your pressed flower frame and distract from the natural beauty of the blooms.
Color Preservation and Finishing Touches
Color retention is a central concern in a long-lasting pressed flower frame. Light exposure, humidity, and the thickness of elements all influence how vivid the final piece remains. Start with color-safe materials and avoid direct sunlight during display. When you’re ready to seal or finish, choose a non-yellowing, acid-free sealant or spray designed for pressed botanicals. A light, even coating protects against dust and minor handling while preserving the delicate translucence of petals.
Consider a subtle matte finish to reduce glare for gallery-style viewing. Matte surfaces help the intricate network of veins and color gradients to read as you intended. If you prefer a glossy look, apply cautiously and in thin layers to prevent the bloom edges from curling. Remember: different materials may react differently to sprays, so test on a spare piece before committing to your final pressed flower frame. For additional guidance on finishing techniques, you can explore this practical guide: How to press flowers.
Troubleshooting Common Issues in a Pressed Flower Frame
- Curling or warping: Reassess humidity during pressing and ensure an even weight during mounting. Reinforce with a light backing if needed.
- Color bleed or browning: Use quick-drying, color-stable materials and avoid over-mature blooms. Store pressed elements in airtight sleeves until mounting.
- Sticking or tackiness: Choose adhesives that dry clear and remain archival. If tackiness persists, air-dry longer or use a minimal amount of adhesive on each piece.
- Glass fog or condensation: Ensure the frame sits in a stable environment with controlled humidity and temperature.
- Uneven thickness: Verify your underlying layout before mounting. If necessary, trim petals or leaves with clean scissors to achieve a flush finish.
With practice, these issues become predictable hurdles rather than roadblocks. The goal is a pressed flower frame that reads cleanly from edge to edge and invites a closer look at every bloom’s details.
Creative Variations and Personalization for Your Pressed Flower Frame
Personalization expands the appeal of your pressed flower frame and makes it a meaningful gift. Try one or more of these ideas:
- Mono-color palettes for a modern aesthetic. Choose a single bloom or a single color family and vary the shapes to create visual rhythm.
- Seasonal collections. Build frames around spring wildflowers, summer dahlias, autumn petals, or winter evergreens for year-round charm.
- Layered depth. Use a raised element (a small bloom mounted in a shallow 3D inset) to create depth while keeping the overall piece flat enough to frame.
- Incorporated text or monograms. A delicate, neutral script in the matting or an acrylic overlay can personalize a pressed flower frame without overpowering the natural beauty.
- Botanical mini-collections. Create a set of frames that together tell a story—pollinator-friendly flora, edible flowers, or a regional bloom map can be delightful and informative when displayed together.
Remember to maintain balance. Too many elements can overwhelm the composition, while a few thoughtfully chosen blooms can create a compelling, cohesive pressed flower frame that resonates with viewers.
Maintenance, Care, and Long-Term Longevity of Your Pressed Flower Frame
Proper care extends the life of your pressed flower frame. Display location matters as much as the frame itself. Avoid direct sun, heat vents, and areas with high humidity. A cool, dry room is ideal. Regular cleaning—gentle dusting with a microfiber cloth or a soft brush—preserves brightness without abrading the surface. Rotate framed pieces seasonally to minimize light exposure on the same items, and consider UV-protective glazing for added longevity. When you relocate or reframe, handle with clean hands or gloves to prevent oils from transferring to delicate surfaces.
For frames that sit near kitchens or bathrooms, check humidity frequently and use silica gel packets within the frame housing if permitted by the design. This helps stabilize moisture and reduces the risk of fogging or spotting on the glass. If you notice any color change, assess your display conditions first, then consider re-framing with fresh botanicals. A well-cared-for pressed flower frame remains a cherished keepsake for years, especially when your approach is methodical and patient.
Inspiration Gallery: Elevating Your Pressed Flower Frame with Themed Collections
Inspiration is the spark that elevates craft into art. Create themed mini-galleries by grouping frames by season, color family, or flora type. A coordinated display invites viewers to explore your technique while appreciating each piece’s unique story. For example, a garden-to-frame series could feature blooms sourced from your own yard, with notes about harvest timing, color shifts, and preservation decisions. Use consistent framing hardware and matting across the collection to create a cohesive, professional look that amplifies the beauty of a pressed flower frame rather than competing with it.
Conclusion
In summary, advanced techniques and final guidance bring your pressed flower frame to a professional level of finish. From specimen selection and pressing methods to mounting, color preservation, and long-term care, each decision shapes the final presentation. A carefully planned layout, archival materials, and mindful finishing transforms delicate botanicals into a lasting work of art. Ultimately, your pressed flower frame becomes more than a decorative piece—it is a personal narrative of growth, seasonality, and craft mastery. If you’re ready to start your next project, explore BloomHaven’s resources and subscribe for ongoing tips, inspiration, and exclusive tutorials. The pressed flower frame you create today will not only beautify your space but also capture the fleeting beauty of nature for years to come. Take action now: gather a small set of blooms, dry, mount, and frame your first polished pressed flower frame, then share your results with the BloomHaven community to inspire others.