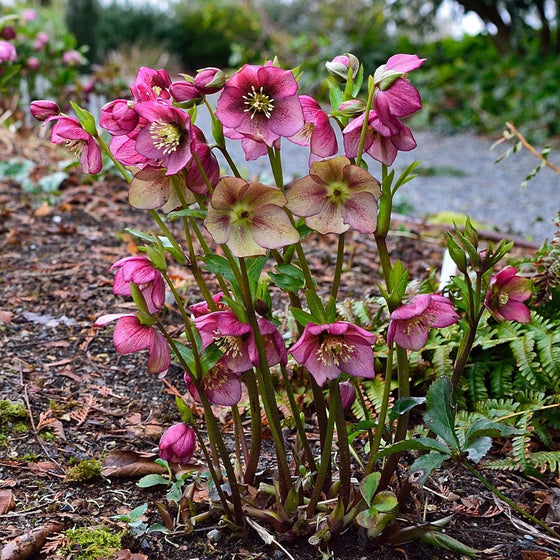
Winter Hellebore Shade Garden: Plan, Plant, Thrive
If your dream is a winter hellebore shade garden, you can turn frosty, low-light corners into a month-by-month display of color and texture. Winter-blooming hellebores offer early-year interest when few other perennials wake up, and their evergreen foliage adds structure long after bloom fades. This guide to Winter Hellebore Shade Garden Foundations: Planning, Site Prep, and Planting for Shade walks you through a practical, step-by-step approach. You’ll learn how to evaluate shade from different parts of the garden, select hardy cultivars, and pair them with companions that thrive in cool shade. By prioritizing planning, drainage, and careful planting, you create a resilient, low-maintenance bed that stays beautiful well into spring. For anyone aiming to grow a seasonal scene that looks intentional even in midwinter, this foundation work matters as much as the display itself. If you dream of a winter hellebore shade garden, start with the essentials learned here and build from there.
Planning begins with understanding light patterns, soil behavior, and microclimates. The right plan accounts for how much sun a site actually receives during the depth of winter, how moisture moves through the bed, and where wind or heat pockets might stress plants. With hellebores, you also consider bloom timing, foliage texture, and color pairing so that winter, early spring, and late winter interest flow together. In practice, that means sketching elevations, mapping drainage, and noting nearby trees, walls, or fences that influence shade levels. The result is a structured blueprint you can reuse year after year—a blueprint that keeps your focus on winter hellebore shade as a core theme rather than a serendipitous mix of plants.
In this section, we translate planning into actionable steps: selecting the right varieties, testing soil, and choosing bed locations that maximize the plant’s natural habit. You’ll learn how to balance evergreen foliage with winter flowers, so texture remains strong even on overcast days. We emphasize long-term sustainability, favoring native-adapted or well-proven cultivars and low-input care. The goal is a garden that delivers reliable performance with minimal fuss, while still offering dazzling winter and early-spring color. As you progress, you’ll see how small decisions—like bed edges, weed control, and mulch depth—compound into a joyful, low-maintenance landscape that embraces the quiet beauty of winter hellebore shade.
Winter Hellebore Shade Garden Foundations: Planning, Site Prep, and Planting for Shade
First, assess your site before you buy plants. Shade comes in many forms: dense canopy, dappled understory, or compact shadows near structures. Each form changes root competition, soil moisture, and air circulation. For winter hellebore shade to thrive, your plan should address three pillars: planning principles, site preparation, and thoughtful planting. Planning principles guide decisions about cultivar choice, planting density, and companion partners that extend bloom and color. Site preparation ensures soil structure supports steady moisture and drainage without inviting root rot or drought stress. Planting for shade converts theory into practice, with specific steps for bed layout, spacing, and establishment. With these pillars in place, your winter hellebore shade garden becomes a reliable, year-round feature rather than a seasonal afterthought.
Winter hellebore shade: Core Planning Principles
Before you buy a plug or a pot, define the role hellebores will play in your shade garden. The core principles are simple: prioritize winter interest, choose varieties with sturdy stems and lasting foliage, and pair with companions that fill color gaps when hellebores are not in bloom. When you plan, think in layers—ground cover, foliage, flowers, and seed heads—all tuned to a cool-season palette. This approach helps you avoid crowding and ensures each plant has room to grow without competing for the same limited resources. In addition, plan for bloom timing so that you achieve a steady rhythm from late winter through early spring. By aligning cultivar selection with your microclimate, you maximize both visual impact and resilience in winter hellebore shade settings.
For a consistent, low-maintenance result, you should map light changes across seasons. Winter sun angles differ significantly from summer patterns, especially under deciduous canopies. Therefore, place hellebores where they will receive morning sun or bright, indirect light for several hours daily, and shield them from harsh afternoon glare when possible. Soil quality matters as much as light. A evenly moist, well-drained bed reduces stress and encourages robust growth. You’ll want to minimize peat-heavy mixes that compact in shade and favor organic amendments that improve structure while feeding soil biology. This is how you create a foundation that supports healthy roots and promotes longer-lasting foliage, stems, and buds in winter hellebore shade beds.
Successful planning also requires ongoing observation. After installation, note how plants respond to rainfall, frost, and adjacent growth. Small adjustments—like extra mulch to regulate moisture or a slight reshaping of the bed edge to improve air flow—can significantly extend plant vigor and bloom windows. By documenting response patterns, you build a practical playbook you can reuse every season, reinforcing a reliable, beautiful winter hellebore shade ensemble. In addition, keep a simple plant map to track cultivar performance, bloom color, and height as plants mature. The result is a dynamic plan that grows with your garden and your confidence in winter hellebore shade gardening.
Site perspective matters, too. A north-facing corner, a chalky soil zone, or a dry pocket beneath a roof overhang each demand unique handling. With hellebores, the goal is to equalize moisture and improve soil structure so roots can establish quickly in late fall or early spring. When you set expectations this way, you’ll be more likely to succeed with fewer surprises. Finally, learning from experienced gardeners or trusted resources—such as perennial care guides and regional extension programs—helps you tailor the plan to your climate and soil. A well-planned foundation keeps your winter hellebore shade garden thriving for years to come.
Light, Shade, and Microclimates for winter hellebore shade
Light is the most variable factor in shade gardening. Even a small difference in light intensity can affect bloom quality and foliage color. Evaluate the site at different times of day and through the seasons. In winter, the sun sits lower, so even a partially shaded bed may produce impressive hellebore blooms if the light is bright enough for several hours daily. Consider nearby structures and trees that shed light in winter, creating microclimates that welcome hellebore varieties with different shade tolerances. When planning, group plants by similar light needs to avoid stressing someone with too little sun or too much heat. This careful placement helps maintain the delicate balance that winter hellebore shade plants require for consistent bloom and foliage health.
Soil texture and moisture control the actual experience of shade. For hellebores, soil that drains slowly after rain but remains evenly moist during dry spells is ideal. If your soil puddles after a storm, you’ll need to improve drainage with organic matter, such as compost or well-rotted leaf mold, and consider raised beds or shallow contouring. In addition, mulching with organic material preserves moisture in dry spells while insulating roots from extreme cold. A consistent moisture pattern under winter hellebore shade will support stronger flowering and better leaf color, especially in young plants that are still establishing their root systems.
Finally, pairing with companions helps achieve year-round interest. Low-growing groundcovers, ferns, and spring-flowering bulbs beneath the hellebores can extend the visual arc as the hellebores fade. You’ll also create a habitat that supports pollinators during late winter and early spring. When you design for microclimates, you naturally maximize returns from your investment in winter hellebore shade gardening and set a clear path for maintenance and renewal each season.
Site Assessment and Microclimates for winter hellebore shade
Site assessment should be a routine part of your gardening workflow. Begin with a simple sun/shade map and annotate where morning sun, dappled shade, or deep shade occur. Note wind exposure, which can desiccate delicate leaves, and observe winter temperatures that may create cold pockets. Use this knowledge to place hellebore cultivars with different shade tolerances in zones that reflect their needs. A well-mapped site reduces plant stress and increases bloom frequency. Additionally, document soil pH and texture, as hellebores tolerate slightly acidic to neutral soils but perform best where drainage is not compromised by heavy clay. If you discover a heavy clay layer, amend with coarse organic matter and consider adding drainage tiles or raised beds for long-term health. A consistent, well-considered assessment routine keeps your winter hellebore shade garden vibrant year after year.
Crucially, plan for seasonal transitions. Hellebores often begin blooming from late winter into early spring, while companion plants may emerge earlier or later. By coordinating plant heights and bloom windows, you avoid a visual battle for attention and create harmonious layers of color and texture across the season. A thoughtful approach also reduces maintenance demands, because you anticipate where plants will fill in as the season shifts. The result is a more resilient, aesthetically pleasing winter hellebore shade setting that remains engaging long after the initial bloom fades.
For a quick reference, keep a small, flexible planting plan that you can adapt as needed. Include spacing guidelines, typical mature sizes, and notes about soil amendments. Over time, this living document becomes your personalized playbook for winter hellebore shade gardens, guiding future plantings and substitutions as your garden evolves.
Finally, consider resources that extend your knowledge beyond your garden. The Royal Horticultural Society maintains extensive guidance on hellebores, their varieties, and care. See RHS Helleborus care and cultivars for additional context and inspiration. This external reference can complement your planning and help you choose varieties that suit your climate and design goals.
Site Prep: Soil, Drainage, and Mulching for winter hellebore shade
Site preparation translates planning into a sustainable bed. Start with a soil test to determine pH, nutrient levels, and texture. In cool, shaded areas, slightly acidic to neutral soils perform best, while high organic content improves moisture retention without promoting stagnation. If your soil tends toward heavy clay, improve drainage with amended organic matter, ag lime or sulfur to adjust pH, and consider raised beds where feasible. Good drainage is essential for hellebore roots, which dislike sitting water after a rain. The goal is to create a loam-like texture that holds enough moisture to support root growth without becoming saturated after storms.
Organic matter is the backbone of a resilient winter hellebore shade bed. Incorporate well-rotted compost, leaf mold, or a balanced organic amendment to boost microbial activity, improve soil structure, and supply slow-release nutrients. For established beds, top-dress annually with a thin layer of compost and mulch to suppress weeds, moderate temperature fluctuations, and conserve moisture. Mulch also protects shallow roots from freeze-thaw cycles, which are common in winter shade gardens. Use a 2–3 inch layer in late fall, but allow some space around crowns to prevent rot. This combination of soil testing, organic matter, and mulching helps create a stable, healthy foundation for winter hellebore shade plants to thrive year after year.
Drainage management is another critical prep step. If you have a low-lying area that stays damp after rain, consider contouring or adding drainage channels to keep roots oxygenated. In some cases, a simple improvement—raking to break up compacted soil and opening drainage pathways—can dramatically improve plant performance. Where soil is particularly sandy or drought-prone, strategize plantings to exploit microclimates that capture and retain moisture during dry spells. The right drainage design ensures that your winter hellebore shade garden stays lush rather than waterlogged.
Finally, plan for winter care. Prepare tools, irrigation planning, and a seasonal maintenance calendar. In cool climates, you will want to water deeply during dry spells and avoid over-watering during winter when plants are in a resting phase. A well-prepared site makes maintenance straightforward and ensures that hellebores emerge strong the following season. For people who want to maximize pollinator appeal in early spring, pair hellebores with early-blooming viburnums or snowdrops, planting schemes that deliver continuous texture and color in shade.
With site prep in place, move to the planting phase, where spacing, depth, and establishment practices determine how quickly your winter hellebore shade garden fills in and begins to look like a mature, curated border.
Planting for Shade: Hellebores and Companions
Planting for shade centers on three practical decisions: cultivar choice, planting density, and establishment technique. For hellebores, select a mix of evergreen foliage types and winter bloom colors to keep interest across the season. Choose cultivars with sturdy stems and resistance to common shade garden pests. For example, look for compact varieties that stay within their intended footprint while delivering prolonged bloom. When planning density, space plants according to their mature size to avoid crowding and ensure good air circulation. In time, hellebores expand rather than sprint, so a thoughtful spacing plan pays dividends.
Establishment technique is equally important. Dig holes that are wide enough to accommodate root balls without bending roots, and ensure planting depth matches the crown at or slightly above soil level. Backfill with a soil mixture enriched with compost, and water deeply to settle the soil around the roots. In shade, roots do not receive heavy sun-driven heat to carry moisture into the plant, so avoid compacted soil and ensure root systems have access to oxygen. Mulching after planting protects new roots and reduces weed competition during establishment. This careful approach helps hellebore roots anchor quickly and begin to establish a stable, healthy foundation for long-term performance in winter hellebore shade beds.
Spacing and companion planting are the final ingredients. Pair hellebores with low-growing groundcovers, shade-loving ferns, and spring bulbs that bloom before or after hellebores. This strategy yields an attractive, layered curtain of texture and color that survives through the long winter months. Ensure each plant has its own space to grow, with enough room for the roots to expand and for air to move between plants. This practice reduces disease risk and helps keep your winter hellebore shade garden vibrant from December through early spring. In addition, consider pollinator-friendly companions, such as early crocus or snowdrops, to draw bees as winter recedes and hellebores begin to fade.
When planting in beds with established trees or shrubs, be mindful of root competition. Tree roots can draw moisture and nutrients, so consider raised beds or mounded borders to give hellebores access to water without drowning in dense shade. If you are planting in containers, choose a wide, shallow pot with well-draining soil and provide consistent moisture. Containers can be a great way to experiment with color and cultivar mixes while keeping shade under control and aesthetics at the forefront. Container placement should account for winter wind exposure and sun angles, as plants may dry out quickly in exposed sites. Therefore, containment that supports consistent moisture levels is key to success in winter hellebore shade gardening.
In practice, the exact placement of each plant depends on your garden’s unique layout. Take a measured approach, monitor results, and adjust as needed over successive seasons. With careful planning, site prep, and thoughtful planting, winter hellebore shade gardens offer a reliable, elegant display that remains visually appealing even when temperatures drop. For gardeners who want to keep the visual momentum going, pair hellebores with perennial grasses and shade-tolerant flowering plants to create a dynamic, year-round scene. The reward is a garden that looks lush and intentional, even in the depths of winter.
To expand your options, explore cultivars that suit your region and soil type, then mix in a few trial plants to judge performance across seasons. A well-designed winter hellebore shade bed sustains color, texture, and structure long after the last autumn leaf falls, while providing early-season nectar to pollinators. For further ideas and inspiration, you can review regional guidance or consult a local horticultural society. This hands-on approach helps you refine your planting strategy and build confidence in winter hellebore shade garden projects.
Next, Part 2 will dig into seasonal care, fertilization, pruning techniques, and long-term maintenance for resilient winter hellebore shade gardens.
Winter Hellebore Shade Garden Core: Step by Step Planting and Care
In this core installment, we translate design into action for a winter hellebore shade garden that thrives through the cold months and into spring. Specifically, you will learn how to choose the right spots, prepare soil, plant correctly, and establish lasting routines that sustain winter hellebore shade plants with minimal fuss. Furthermore, you will discover how to pair them with shade-loving companions to create a layered, pest-tolerant, year-round display. This section focuses on practical, repeatable steps you can implement in a weekend and maintain with minimal disruption to your existing shade bed.
Before you begin, remember that winter hellebore shade gardens are resilient when given structure and good soil. In contrast to flashy annuals, hellebores invest in root health and leaf persistence, rewarding you with dependable winter blossoms and early-spring color. Specifically, this part outlines the core actions from site preparation through ongoing maintenance, with emphasis on safe handling, correct planting depth, and thoughtful watering. By following these steps, you build a foundation that supports robust growth, disease resistance, and long-term garden health.
When planning, treat the garden as a microclimate that favors cool-season plants. In most temperate zones, winter hellebore shade thrives where winter sunlight is filtered or limited by trees, shrubs, or lattice screens. Moreover, a consistent moisture level is essential, but waterlogged soils invite problems. Therefore, the planting and care steps outlined here assume a well-drained, rich, organic soil that remains slightly moist without becoming soggy. In practice, the result is a winter hellebore shade garden that looks calm and refined even as winter frosts arrive, with new shoots and flowers each late winter and early spring. For additional practical care guidance, you can consult the RHS guide to helleborus at RHS guide to Helleborus.
Site Selection and Timing for Winter Hellebore Shade Gardens
Choosing the right site is your first step toward reliable success with winter hellebore shade. Specifically, aim for a location that offers filtered light for most of the day, or dappled shade from deciduous trees. While hellebores tolerate deeper shade, too little light can slow flowering and reduce bloom density. Furthermore, avoid sites with hot afternoon sun that can scorch leaves during late winter thaws. When it comes to timing, establish new plantings in late summer to early autumn, giving roots a chance to settle before the coldest weather. If your schedule requires spring planting, do so as early as soil can be worked and avoid frost pockets where temperatures swing rapidly. In any case, keep irrigation in mind—root zones should stay evenly moist, not saturated, as roots establish in the first season.
Choosing Helleborus Varieties for Shaded Sites
Winter hellebore shade gardens benefit from selecting varieties with dependable bloom patterns and broad, disease-resistant foliage. Specifically, look for cultivars that are known for strong winter flowers, compact habit, and good winter vigor. Popular choices include cultivars with white, pink, or green-toned blossoms that contrast nicely against evergreen or semi-evergreen leaves. In shade, contrast becomes a design tool: pale blossoms pop against dark, glossy foliage, while lighter green or cream-toned blooms brighten dim corners. When possible, purchase diverse cultivars to extend bloom time across late winter and early spring, creating a layered, continuous display. Furthermore, ensure you select disease-resistant stock from reputable nurseries to minimize issues with leaf spots or foliar damage. With the right selections, your winter hellebore shade bed will become a reliable anchor in the winter garden, offering color when few other perennials are active. For gardeners seeking guidance on cultivar names and performance in shade, local extension programs and garden centers often publish performance notes that align with your climate.
Soil Preparation and Amendments for Longevity
Soil preparation is the backbone of a successful winter hellebore shade garden. Specifically, aim for a slightly acidic to neutral pH range, roughly 6.0 to 7.0, which supports robust nutrient uptake and helps maintain healthy root development. In addition, enrich the bed with well-rotted compost and a modest amount of organic matter to improve structure and drainage. Furthermore, incorporate a slow-release, balanced fertilizer at planting time if your soil testing indicates a lack of essential nutrients, but avoid heavy, hot applications that could burn new roots. Mulching with shredded leaves, pine needles, or bark mulch helps regulate soil temperature, conserve moisture, and suppress weeds during the late winter lull. In contrast to nutrient-rich mulches, heavy gravel or dense compost layers can impede root growth, so apply a 2- to 3-inch mulch layer, ensuring it does not cover crown tissues. Practically, this approach yields a soil environment that remains consistently moist but never soggy, encouraging sturdy root establishment for winter hellebore shade plants. For broader care guidance during establishment, consider consulting local soil-test results or university extension resources.
Planting Step by Step: Depth, Spacing, and Establishment
Planting is the moment where design translates into life for winter hellebore shade gardens. First, prepare the planting hole as wide as the root ball and a depth that places the crown at or just above soil level. Specifically, loosen the soil at the bottom of the hole to encourage root penetration, and mix a small amount of compost into the soil removed from the hole. Secondly, place the root ball into the hole and gently tease the roots outward to promote angular growth. Then, backfill with the amended soil, pressing lightly to remove air pockets while ensuring the crown remains visible at the soil line. Spacing is critical in shade beds that will mature into a layered look: give each plant at least 12 to 18 inches of room, depending on the cultivar’s eventual width. Otherwise, crowding can lead to root competition and reduced flowering. Finally, water deeply after planting to settle the soil and initiate root-to-soil contact. In the weeks that follow, monitor soil moisture and adjust irrigation to maintain even moisture without saturation. In a well-designed winter hellebore shade bed, germination is not the goal; rather, successful establishment and steady bloom performance through late winter and early spring are the benchmarks.
Watering, Mulching, and Early Care
Watering discipline is essential during establishment and beyond. Specifically, keep the root zone evenly moist, especially during dry spells, while avoiding standing water. In winter, rainfall often suffices, but dry spells can break the plant’s winter dormancy requirements. Furthermore, mulching remains your best defense against soil temperature fluctuations and weed competition. A 2- to 3-inch layer of organic mulch minimizes temperature swings and reduces soil crusting from rainfall or frost. Additionally, as shoots emerge and flowers form, monitor moisture and adjust watering to prevent soggy soil that can lead to crown rot in harsh winters. In practice, a light irrigation every 7 to 14 days during cool periods, with more frequent checks during warm spells, keeps winter hellebore shade plants thriving without overwatering.
Fertilization and Aftercare Schedules
After the initial planting, your focus shifts to steady, minimal feeding that supports ongoing growth and bloom. Specifically, apply a light, balanced fertilizer in early spring as new growth accelerates and as flowers begin to form. In contrast to heavy feeding, a modest approach prevents leggy growth and maintains robust disease resistance. If you test your soil and find balanced nutrient levels, you may skip this step; otherwise, follow label directions carefully to avoid fertilizer burn. Furthermore, consider side-dressing an organic amendment such as compost around the drip line of established plants in late winter or early spring. This practice nourishes root zones as the plants awaken, supporting a more prolific bloom and healthier foliage for the remainder of the season. Finally, continue annual mulching after spring growth subsides to protect roots during the next winter.
Pruning, Division, and Propagation
Pruning in winter hellebore shade beds should be minimal but purposeful. Specifically, remove spent flower stalks to keep the bed tidy and to encourage new growth without stressing the plant. In contrast to pruning annuals, you can leave healthy evergreen foliage intact to provide winter interest and to protect crown tissues. Division is recommended every 3 to 5 years, particularly for overcrowded clumps that slow flowering or reduce vigor. When dividing, carefully lift a portion of the clump with a clean spade and replant at the original depth. Propagation by seed is possible but slow and unpredictable; most gardeners prefer division or selecting and storing crown offsets for more predictable results. Overall, a light touch with pruning and timely division yields a sturdier, more floriferous winter hellebore shade bed each season.
Pest, Disease, and Winter Protection
Winter hellebore shade gardens are relatively pest-tolerant, but they still benefit from vigilance. Specifically, keep an eye on slugs and snails that may nibble on tender leaf margins, particularly in damp microclimates. In addition, ensure good air circulation to reduce foliar diseases such as black spot or leaf scorch, which can become more visible in cold, wet winters. In winter, frost pockets can cause tissue damage; protect plants with a light mulch layer and avoid heavy mulch that can trap excess moisture against crowns. Furthermore, in early spring, inspect for emerging symptoms of root rot when soils stay wet for extended periods, and adjust irrigation accordingly. By combining proper spacing, soil health, and mindful watering, you significantly reduce disease pressure and keep the winter hellebore shade garden looking pristine. For gardeners seeking deeper disease-management strategies, consider integrating beneficial soil microbes and organic fungicides as needed.
Seasonal Transitions: From Winter Bloom to Spring Growth
Seasonal transitions are when the winter hellebore shade garden truly shines. Specifically, the late winter bloom can carry into early spring, providing color long after many other perennials have paused. In practice, expect new growth to emerge as bees begin to appear, signaling the approach of pollinator season. Furthermore, as blooms fade, you can maintain structural interest by allowing foliage to persist or by selectively removing older leaves to improve air movement and reduce overwintering pests. Throughout the transition, keep monitoring soil moisture and adjust feeding to maintain vigor. This is also a good time to assess plant health and plan for any divisions or replacements to maintain a strong, cohesive shade bed.
Companion Planting and Pollinator Partners
Companion planting with winter hellebore shade plants can extend color and fill gaps in your shade bed. Specifically, pair hellebores with hellebore-friendly companions that tolerate similar moisture and light levels, such as woodland ferns, daffodils that have finished flowering, and early-blooming spring ephemerals. In contrast to high-sun companions, these shade-tolerant partners maintain harmony within the bed while adding texture and seasonal interest. Furthermore, consider pollinator-friendly partners that bloom at different times but share similar moisture needs to maximize garden activity across the late winter and early spring. For example, you can tuck crocus, snowdrops, or early hellebores near the edges of the bed to create a layered effect that surprises the eye as temperatures rise. When selecting companions, prioritize plants with compatible root systems and similar disease pressures to keep your garden cohesive and resilient. Additionally, you can download design notes from reputable sources or consult local garden clubs for region-specific pairings.
Shade Garden Maintenance and Health Monitoring
Ongoing maintenance is the heartbeat of a thriving winter hellebore shade garden. Specifically, inspect regularly for signs of drought stress, nutrient deficiency, and pest activity. In addition, monitor foliage color and bloom density year over year to determine whether you need to adjust mulch thickness or water schedules. Furthermore, keep an eye on overcrowding and be prepared to perform light division if necessary. When you maintain consistent care, you not only protect winter health but also ensure your garden remains visually appealing as the season shifts. Specifically, if you notice a decline in bloom or leaf vitality, revisit soil structure, drainage, and mulch application to address underlying issues quickly.
In all, the winter hellebore shade garden is a quiet performer that rewards careful preparation and steady, mindful care. It offers a signature texture and color that anchors a shade bed through the darkest days of winter and into the first hints of spring. Furthermore, because hellebores are long-lived perennials, your initial investment in soil health, planting depth, and pest management pays off year after year. Finally, as you gain experience with different cultivars and microclimates within your shade borders, you will build a reliable playbook that makes future plantings faster and more rewarding.
Next, in Part 3, we will cover Seasonal Maintenance and Design Deep Dive for Winter Hellebore Shade Gardens, taking the core practices outlined here and turning them into a complete, year-round care rhythm that keeps your garden thriving through 2026 and beyond.
winter hellebore shade: Winter Hellebore Shade Garden Advanced Strategies and Final Guidance
Advanced Planting Schemes and Seasonal Color in Winter Hellebore Shade Gardens
In winter hellebore shade gardens, depth and warmth come from layering evergreen structure with bursts of color from hellebores. The next-level planners think in terms of bloom windows, foliage drama, and microclimate pockets within the bed. You can achieve a continuous display by selecting cultivars with staggered bloom times and by pairing bulbs such as snowdrops and crocuses that appear before or during hellebore bloom. This strategy ensures that as one color fades, another arrives, and the bed never looks flat or sparse. In addition, consider the architectural shapes of leaves—round, lobed, and variegated—to create contrasts even when flowers are not open. Finally, document your plant palette with a small map so you can refine over the years and measure results against your climate-specific data.
Choosing Varieties for Continuous Interest
Selections should emphasize bloom duration and a range of tones. For example, include lavenders, creams, pinks, and greens with occasional chocolate-browns or deep purples. Space cultivars to avoid crowding and to optimize air flow, particularly in humid winters where Botrytis can creep in on crowded foliage. When possible, select compact or medium-height forms that stay within eye level to maintain near-ground drama without blocking pathways or seating areas. Consider trifecta combos: a white-flowered variety at the front, a pink or rose-toned cultivar in the middle layer, and a darker, more dramatic bloom near the back to anchor the bed and tie to larger evergreen forms. Keep in mind that foliage remains a year-round asset; some cultivars have bronzy or plum-toned leaves that extend visual pleasure beyond bloom time.
Companion Planting for Texture and Pollinator Value
Winter hellebore shade beds thrive when you introduce companions that tolerate the same light and moisture profiles. Ferns provide delicate texture; evergreen perennials knit the bed together; snowdrops and anemone blanda add early-season sparkle. Planting in groups rather than single specimens creates a sense of abundance and makes each season’s transitions feel intentional. Pollinators may visit as helleborus nectar becomes available; ensure there are protected microhabitats and resources for insects by leaving small patches of leaf litter and avoiding omnipresent mulch that smothers eggs or hinders beneficial insects. Ultimately, a well-planned palette reads as a living tapestry rather than a collection of discrete plants.
Soil, Water, and Mulch Mastery for Winter Hellebore Shade
Soil quality drives growth. The ideal is crumbly, well-drained soil with organic matter. In shade, soils often run cooler and stay damp; the risk is crown rot or damp fungal issues. Practical steps: test soil pH; amend to near neutral; incorporate compost and leaf mold to improve drainage and microbial activity. Use mulch properly to protect roots in winter and to keep soil temperatures stable. Mulch also moderates soil moisture, reduces weeds, and enhances soil biology. However, avoid a blanket of mulch that smothers emerging shoots in spring. Instead, refresh mulch gradually as the season warms.
Soil Amendments and Mulch Strategies
- Apply 2-4 inches of organic mulch in late fall; refresh to maintain 2-3 inches by winter end.
- In soils with poor structure, spread a shallow layer of compost to improve nutrient availability without creating dense mats that impede drainage.
- Vet pH with a soil test; if pH drifts away from neutral, adjust with targeted amendments like lime or sulfur, but do so gradually to avoid shocking roots.
Watering in Winter and Early Spring
Watering needs shift with the season. Winter hellebore shade beds prefer consistent moisture but do not tolerate waterlogging. In mild winters, you may only need to water during prolonged dry spells; in colder climates, nature often supplies sufficient moisture, and irrigation becomes unnecessary most weeks. A good rule of thumb is to monitor the top 1-2 inches of soil; if it feels dry to a finger test for more than a few days, water deeply, ensuring the water penetrates to the root zone. Drip irrigation can deliver water efficiently with minimal evaporation. If your garden uses a rain garden or catchment system, route overflow away from crowns to prevent rot.
Protection, Pest, and Disease Management for Winter Hellebore Shade
Shade does not guarantee immunity; rather, it requires attentive pest and disease management that emphasizes resilience and low maintenance. The focus is prevention: spacing, airflow, and timely pruning reduce disease pressure and create a healthier environment for winter hellebore shade to thrive. The plan emphasizes observation and early intervention rather than blanket spraying. As you gain experience with your microclimate, your ability to anticipate problems will improve and your garden will stay more robust with less effort.
Slug, Snail, and Root Pest Management
Slug and snail pressure tends to rise after wet periods. Use copper tape around pots or beds as a barrier and consider diatomaceous earth sparingly along the crown line. Encourage natural predators by leaving some leaf litter in a controlled way, and avoid over-mulching that creates a damp, unventilated microclimate. If pest populations grow, apply targeted, organic controls only to affected plants, and monitor neighbor plantings to catch spillover early. Deep, infrequent watering helps keep slugs from moving into new growth at night, reducing damage on tender crowns.
Fungal Diseases and Leaf Spot
Botrytis and leaf spots often appear in damp shade with poor air flow. Improve air circulation by spacing plants adequately, pruning crowded growth after flowering, and removing diseased leaves promptly. Water in the morning to allow leaves to dry, and avoid overhead irrigation late in the day. If disease recurs, consider an approved organic fungicide or consult local extension recommendations to ensure the remedy matches your climate; always follow label instructions and apply only when necessary.
Pest-Resistant Design and Sanitation
Healthy design reduces pest pressure. Use evergreen anchor plants to form barriers and place susceptible hellebore varieties toward the interior of the bed where you can observe them easily. Maintain a schedule of sanitation—remove spent flowers and diseased leaves—so overwintering pests lose food sources. A tidy bed translates to fewer problems and simpler maintenance in late winter and early spring.
Propagation and Reproduction for Expanding Winter Hellebore Shade Areas
Increasing planting density and expanding coverage is smart for a winter hellebore shade garden. Division and offsets are reliable and preserve genetic fidelity. As you map your garden’s growth, you can decide how to allocate plant material to new areas where you want deeper texture or stronger foundation plantings around evergreen shrubs. In addition, layering new plants while leaving the parent plant intact is a cost-effective strategy for expansion and can create lushness faster than waiting for seed-grown plants to mature.
Division and Offsets
When you divide, aim for clumps with healthy roots and several crowns. Use a clean, sharp knife and replant immediately at the same depth, water well after dividing, and mulch to reduce stress. For best results, perform divisions in late winter to early spring just as new growth begins; this timing reduces shock and speeds recovery. Label divisions to track cultivar names and growth habits, which helps in future planning and maintenance.
Layering and Offsets
Offsets present another avenue for propagation. If a cultivar forms a spreading clump with roots at the base or along the runners, you can carefully lift a rooted offset, detach with care, and replant in a new location with rich organic matter. Keep the plant in partial shade and consistently moist until the roots form. Layering maintains genetic integrity and yields plants that bloom with identical color and form as the parent, an ideal option for cohesive design across a larger area.
Maintenance Calendar and Seasonal Timeline for Winter Hellebore Shade
A practical maintenance calendar aligns tasks with plant physiology and local climate patterns. A robust plan reduces guesswork and ensures key care steps occur at the right times. For winter hellebore shade gardens, you’ll want to focus on soil health, pruning, water management, and strategic feeding. The goal is to sustain vigor through winter and transition to spring without stress on root systems or crowns. Below is a robust framework adapted to many temperate zones in 2026 and beyond.
December and January: Establishment and Early Blooms
Protect crowns with a protective mulch layer and avoid heavy pruning. In December, check irrigation systems for leaks and adjust drip lines to ensure even coverage. By January, inspect for frost damage and prune only dead stems or damaged leaves. Maintain even moisture and refrain from heavy nitrogen feed; excess top growth can be damaged by frost. Use this period to plan new plant additions and refine your cultivar map for the coming season.
February: Bloom Peak and Aftercare
February is your main bloom window, so keep an eye on soil moisture and encourage pollinator-friendly companions nearby. Remove spent blossoms to encourage energy toward new growth and a longer flowering season. Apply a light, balanced fertilizer designed for cool-season perennials if your soil test indicates nutrient deficiency. Keep paths clear and ensure good airflow to minimize disease risk as humidity may be higher during late-winter warm spells.
March and April: Transition to Spring Growth
As temperatures rise, adjust irrigation and start to introduce early spring companions so the bed continues to look vibrant. Prune crowded leaves to increase light penetration and to prevent damping-off in new shoots. Place emphasis on the health of crowns and maintain mulch depth to protect roots during the heating-up phase. By late April, plan for a light pruning of any dead foliage from the prior year and prepare for summer maintenance cycles that will follow in May and June.
Design for Sustainability and Low Maintenance in Winter Hellebore Shade Beds
Sustainability in a winter hellebore shade garden means reducing inputs while increasing ecological value. It means choosing companion plants that perform well with little supplemental irrigation, and designing through spacing and microclimate planning to maximize natural vigor. The design aims to create a low-maintenance, high-impact border or focal bed that shines in winter and remains manageable in the heat of summer. Below are practical, proven strategies that work in a range of shade gardens.
Water Efficiency and Rain Harvesting
Invest in a simple rain capture system to ensure a reliable water source without driving up utility costs. Use collected water for winter hellebore shade beds during dry periods, and couple this with a well-timed irrigation plan based on soil moisture rather than calendars alone. Drip irrigation is efficient and reduces leaf wetness; schedule irrigation for the coolest parts of the day and avoid high water volumes that can cause heaving in pots or shallow-rooted species.
Native and Pollinator-Friendly Partners
Choose companions that support pollinators and fit your shade conditions. Native ferns, shade-tolerant woodland perennials, and evergreen groundcovers create a stable base for the bed. By avoiding invasive species and using natives where possible, you help preserve local biodiversity and reduce maintenance needs over time. When pollinators arrive in late winter or early spring, your winter hellebore shade garden will be ready to host them with nectar-rich blooms and a safe habitat.
For further ideas on planting in shade and improving pollinator habitats, see the RHS Helleborus guide and companion resources linked earlier. The framework of mindful design will help you sustain a thriving winter hellebore shade garden for years to come.
Conclusion and Actionable Recap
In summary, the winter hellebore shade garden rewards patient planning and careful execution. By selecting complementary cultivars, pairing appropriate companions, fine-tuning soil, moisture, and fertilization, and employing a thoughtful pest and disease strategy, you can achieve a robust, durable, and beautiful winter hellebore shade bed. The advanced strategies herein are designed to help you optimize bloom windows, texture, and ecological value while keeping maintenance manageable. The ultimate goal is a garden that remains dynamic and healthy across seasons, with winter hellebore shade as a reliable anchor for color, form, and resilience, year after year.
To take action, build your cultivar map, test your soil, set up a simple moisture-monitoring routine, and schedule a few strategic divisions or propagations to expand the bed gradually. Subscribe to BloomHaven’s practical guides and refer back to this plan as you refine plant choices and maintenance in your own microclimate. The focus keyword winter hellebore shade should remain a central thread in your planning, reminding you to keep shade conditions and seasonal color in balance for lasting success. Winter hellebore shade gardens, when designed with care, deliver a serene, evergreen charm that welcomes pollinators and enhances any woodland or shade border in 2026 and beyond.
Lastly, a strong call to action: begin with a focused winter hellebore shade design map, source a few reliable cultivars across bloom times, install a gentle irrigation plan, and observe how your beds respond across the season. Share your wins, experiments, and questions in the BloomHaven community to inspire others and to keep elevating your practice in winter hellebore shade gardening.
For more on cultivating robust, pest-resilient shade borders, see the RHS Helleborus guide RHS Helleborus guide.