Pressed Flower Suncatcher DIY: Create a Floral Window Accent
Intro to Pressed Flower Suncatcher Craft: Tools, Trends, and Setup
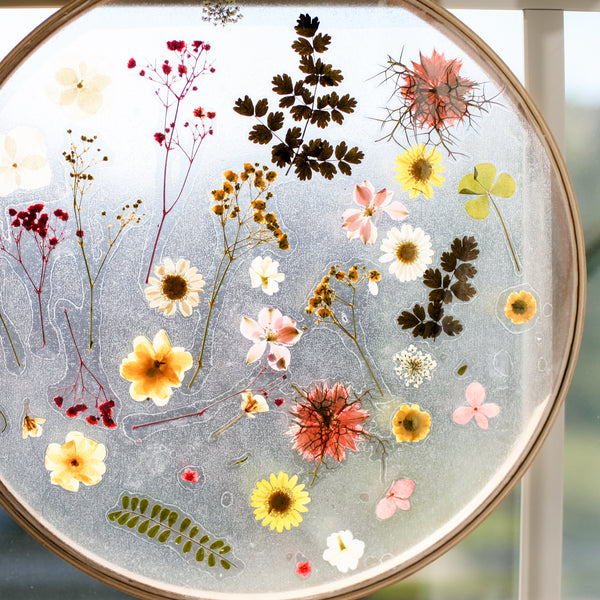
In 2026, a pressed flower suncatcher emerges as one of the most charming, budget-friendly ways to invite light, color, and life into any room. This craft blends garden bloom magic with clear, resin-like windows that catch sunbeams and cast delicate shadows on walls. Whether you’re a seasoned DIYer or a curious beginner, a pressed flower suncatcher offers a satisfying, reusable art piece that celebrates seasonal petals and sustainable design.
At its core, a pressed flower suncatcher is a lightweight frame or clear panel that showcases dried blossoms behind glass or resin. The design plays with transparency, color, and natural texture to create a window accent that changes with the daylight. For BloomHaven readers, it’s a natural extension of garden moments—moments when a bouquet or a patch of wildflowers warrants a longer life and a brighter stage.
In this introductory section, we’ll cover the essential tools, current trends fueling demand, and setup best practices to keep your project tidy and efficient. You’ll learn how to organize petals, choose the right substrates, and plan a layout that highlights color harmony and leaf detail. The goal is a durable, glassy-smooth finish that stays vibrant for years with proper care.
Understanding the pressed flower suncatcher: why this craft shines
Blog readers love this craft for its simplicity, affordability, and high wow factor. Pressed blooms make the most of fleeting garden moments, and the suncatcher uses light to reveal color, texture, and delicate veining. Because petals are dried first, you can preserve a season’s palette without the pressure of fresh blooms wilting. The result is a durable art piece that can brighten kitchens, sunrooms, or bedrooms year after year. It also invites a personal narrative—each bloom tells a story of seasonality and memory.
Additionally, the process teaches patience and precision. You’ll practice measuring and trimming, aligning layers, and sealing so color remains vibrant as daylight shifts. The technique is forgiving with practice, and the payoff is a professional-looking window accent that feels custom and thoughtful. Beyond aesthetics, there’s a sustainability angle: press-and-display reduces waste and gives blossoms a longer life, transforming cut flowers or garden finds into heirloom-worthy decor.
Another benefit is the customization potential. You can tailor a suncatcher to reflect a specific garden bed, a favorite color scheme, or a memory-in-petal pairing. Start simple with a single bloom, then graduate to multi-bloom collages that create depth and movement as light passes through the panel. This flexibility makes the pressed flower suncatcher suitable for gifting, seasonal decor, or a striking gallery piece in a sunlit hallway.
Preparation and drying are critical. Inconsistent drying can lead to color bleed or misshapen edges, so plan for even pressure and uniform thickness. Drying times vary with climate, but a steady routine yields premium results. If humidity is high, you may pin or weight petals longer to maintain flatness. When ready, you’ll enjoy crisp outlines and preserved color that remain vibrant after sealing.
Tools of the trade for a flawless pressed flower suncatcher
Getting the right tools sets the tone for ease and end results. Start with a reliable pressing method, then layer in a few versatile components that make the process smooth from prep to display. A tidy workspace matters, because clarity of sight means better color preservation and placement decisions. The goal is a clean, crisp finish that highlights each bloom’s natural beauty.
Primary tools for pressing and sealing
- Flower press or a stack of heavy books with blotter sheets
- Absorbent parchment or blotting paper for drying
- Clear backing: glass panel or clear resin kit
- Acetate sheets to protect layouts during work
- Soft, pointed tweezers for delicate positioning
- Craft knife and self-healing mat for trimming petals
- UV-safe sealant for resin projects or a precision epoxy kit
- Optional: a ready-made display frame for quick mounting
Optional upgrades and finishing touches
- Light behind-the-panel setup to enhance translucency
- Colored or textured backing for color contrast
- Minimal decorative inclusions like tiny glass beads or microglitter (sparingly)
Trend spotlight: 2026 Pinterest inspiration for pressed flower suncatcher
The 2026 Pinterest landscape is alive with botanical windows and glass art. Cabbage crush textures, wildflowers, peonies, and pollinator-friendly palettes dominate visual searches, especially in DIY decor. People are seeking pieces that feel organic yet contemporary, which makes the pressed flower suncatcher a natural fit. When you design for Pinterest, think about bloom variety, light-dancing color, and layered depth so your piece looks inviting in both bright sun and soft lamplight. Consider pairing pastel tones with bold greens or deep purples to create focal points in a sunny window.
To expand your inspiration library, check out The Almanac’s guide to pressing flowers The Almanac’s guide to pressing flowers.
Workspace setup for pressed flower suncatcher projects: safety and workflow
Dedicate a clean, well-lit zone for layout, pressing, and sealing. A flat surface with a supportive mat reduces the risk of misalignment as you press and dry. Keep a small tray for petals, a brush for dust, and a steady pair of tweezers within reach. If you work with resins or solvent-based sealants, ensure good ventilation and follow safety guidelines. Store petals away from direct sun during drying to preserve color; keep tools sterilized to prevent staining or smudges. A consistent, quiet workflow helps you notice color shifts and adjust the balance of bloom shapes before sealing.
Regarding layout, you can sketch a quick grid or use a layout sheet to pre-plan the arrangement. This practice minimizes rearranging after sealing and helps you achieve a harmonious, balanced piece that reads well from a distance as well as up close.
Materials and finishing options for a pressed flower suncatcher
There are several durable routes to a beautiful finish. A simple glass panel in a slim frame offers a classic, light-catching look that works with any decor. Resin pours create a glass-like, magnified view with a seamless finish and extra protection. UV-curable sealants help lock color and prevent yellowing over time. Each option has nuances in drying time, rigidity, and care, so choose based on your space, sunlight exposure, and how you intend to display the piece. Whichever path you pick, aim for a balanced layout, where each bloom has space to breathe and color echoes across the panel. For long-term care, wipe with a soft, dry cloth and avoid harsh cleaners that may degrade the finish.
Another strategic tip is to photograph your project at different times of day. This helps you evaluate how light changes the color and depth, ensuring the final display will delight you in morning sun just as much as golden-hour glow. A well-sealed suncatcher can become a cherished decor accent that travels well for seasonal swaps or gifting.
Next, Part 2: Pressing Techniques, Flower Selection, and Layout will dive deeper into the actual pressing process and layout planning.
Step-by-Step Guide to Creating a Pressed Flower Suncatcher: From Materials to Display
Welcome to the hands-on portion of our pressed flower suncatcher journey. This section walks you through gathering the right materials, selecting blooms, pressing and curing them, then composing and sealing your finished piece. By following these steps, you’ll create a floral window accent that captures sunlight with gentle color and delicate detail. As you work, remember that this project supports sustainable crafting and leverages the 2026 trends BloomHaven celebrates, from wildflowers to peony-inspired palettes.
Materials You’ll Need for a Pressed Flower Suncatcher
Begin with a clear foundation that lets light pass through. A thin, transparent backing such as UV-rated acrylic or glass provides crisp visibility for the petals and leaves. You will also need a form or frame sized to your preference, plus a sturdy adhesive that dries clear and remains flexible over time. For bonding, select a non-yellowing resin or a compatible epoxy designed for craft projects. A flat-working surface, a soft paintbrush, rust-free tweezers, and a gentle masking medium help you place delicate pieces precisely. Finally, keep a small jar of water, a soft cloth, and a drying rack handy to manage moisture and dust during the process.
Choosing and Preparing Your Flowers
For a pressed flower suncatcher, choose blooms with flat profiles and sturdy petals that press well without crumbling. Species such as daisies, ferns, and certain blooms from peony and wildflower mixes tend to press cleanly. Gather leaves and tiny seed heads to add texture, but avoid overly thick petals that resist flattening. When selecting, aim for color variety and composition that will read well against a light backdrop. Before pressing, lay out your intended design on a clean work surface to visualize spacing and balance. If a bloom seems fragile, consider replacing it with a sturdier counterpart rather than forcing a fragile piece to bend during pressing. For inspiration on flower selection and technique, you can explore additional guidance at The Spruce: How to Press Flowers.
Pressing and Drying Your Flowers for Longevity
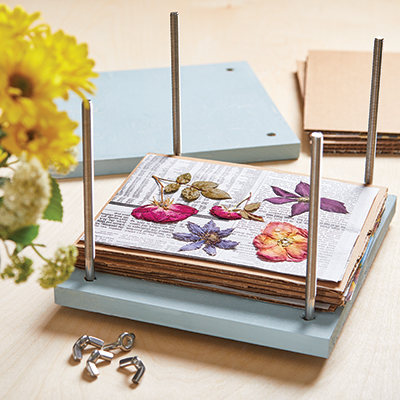
Pressing is both science and art. Start by placing blooms between sheets of absorbent paper with a light weight on top. A traditional method uses a flower press or a stack of heavy books to apply consistent pressure. Check the specimens after a day or two, then adjust the weight and air flow to prevent curling or browning. The goal is to remove moisture evenly while preserving color and form. Depending on thickness and humidity, the drying phase may take one to three weeks. Once fully flat and crisp, store the pressed pieces in a clean, dry environment until you’re ready to assemble. Proper pressing makes a decisive difference when you later seal the pieces into the suncatcher’s clear backing.
Designing Your Layout for a Pressed Flower Suncatcher
With your blooms pressed, it’s time to plan the layout. Start by placing the largest elements toward the center and using smaller pieces to fill gaps around them. Consider color progression from warm to cool tones, or arrange pieces to reflect the light path you anticipate when the sun catches the window. If you prefer a minimalistic look, select a few strong shapes and repeat them to create rhythm. For a more eclectic style, mix petals, leaves, and seed heads in a loose mosaic that still reads as a cohesive composition when viewed from a distance. Remember that clarity matters; the image should remain legible when backlit, so avoid crowding tiny fragments in a single area. You can sketch a quick diagram on paper to guide placement before committing to the frame. For visual inspiration on arranging natural elements, see additional tips at The Spruce: How to Press Flowers.
Cutting, Trimming, and Mounting
Carefully trim your pressed pieces so they fit your backing without obstructing the edge. Use fine scissors or a craft knife to create clean edges that align with the frame. When mounting, apply a thin layer of clear adhesive to the back of each piece and press it gently onto the backing. Work from the center outward to help pieces settle evenly and reduce air pockets. After you position each element, inspect the overall balance and adjust as needed before the adhesive sets. Avoid over-wetting the pieces, which can cause curling or bleeding of color. If a piece shifts during setting, use a small weight or gentle tape to hold it in place while the glue cures. Throughout this stage, keep your workspace dust-free to prevent particles from embedding into the adhesive. A calm, patient approach yields the most durable and beautiful results.
Sealing and Finishing Your Pressed Flower Suncatcher
Sealing protects the delicate arrangement and enhances light transmission. Apply a clear, non-yellowing resin or UV-curable sealant that cures to a glass-like finish. Work in thin layers, allowing each to cure fully before adding the next. This minimizes air bubbles and ensures an even surface. If you’re using epoxy, follow the manufacturer’s instructions for mixing ratios and curing times, and protect your work area from fumes. For an ultra-smooth result, consider a final topcoat that provides a gentle gloss without dulling the colors. If you prefer a matte finish, select a matte sealant designed for glass or acrylic. Regardless of the finish, ensure full curing before handling the suncatcher to avoid fingerprints or marks on the surface. Safety note: work in a well-ventilated area and wear appropriate protective gear as recommended by the product manufacturer.
Finishing with a Protective Layer
A protective layer not only stops moisture but also helps prevent micro-scratches from handling or cleaning. Use a light-touch approach when applying a final coat, allowing adequate cure time between layers. If you notice a fingerprint or dust speck after sealing, a gentle wipe with a soft microfiber cloth during the final cure stage can help. The end result should be a flawless, transparent surface that highlights the pressed flora without distortion. This step completes the core construction of your pressed flower suncatcher and sets the stage for display.
Optional Add-ons: Color Enhancement or Subtle Glitter
If you wish to intensify color or add a touch of sparkle, incorporate tiny, translucent color accents within the resin without overpowering the natural tones. A light sprinkle of micro glitter in a clear resin layer can catch light softly, while avoiding a garish look. When using additives, test a small sample first to ensure the effect remains delicate and cohesive with your design. Always ensure compatibility between the resin and the pigment or glitter to prevent bleeding or separation over time.
Display, Care, and Longevity
Position and mount your pressed flower suncatcher where it can catch direct or bright indirect light. A sunny window with a clean, straight line of light enhances the color and detail of the pressed elements. If you plan to move the suncatcher seasonally, consider a simple hanging system that allows easy rotation or removal without stressing the backing. Cleaning should be gentle; wipe with a soft, dry cloth and avoid harsh cleaners that could compromise the sealant or the integrity of the pressed pieces. Over time, you may notice minor changes in color or slight clouding in the resin. These are normal signs of aging in natural materials and can add character to the piece. With proper care, your pressed flower suncatcher can be a long-lasting focal point in your home, echoing BloomHaven’s celebration of flowers, gardening, and sustainable craft.
Troubleshooting Common Issues
If petals curl or colors shift after sealing, a recheck of the press and a fresh sealant layer may be required. Air bubbles are common in resin; they can be minimized by warming the resin slightly and applying it slowly in thin coats. If adhesives fail to bond to the backing, verify that the surface is clean and dry, and consider a compatibility test with a small sample. Inconsistent brightness when the suncatcher is displayed is usually due to lighting angles; adjust the hanging position to maximize transmission. Remember, patience is a virtue in this process. A calm pace helps you spot issues early and achieve a cleaner final piece.
Creative Variations and Ideas
To diversify your pressed flower suncatchers, try combining botanical silhouettes with color blocks created by tinted resin edges. Explore monochrome palettes using leaves and stems, or go full color with a garden-inspired range of petals. You can also adapt the same technique for mini sun catchers in different shapes, such as hearts, circles, or custom silhouettes. For a seasonal twist, choose blooms that reflect the time of year and your local garden’s personality. Always consider the display environment; a larger window may benefit a bold design, while a small, cozy nook may shine with a delicate, airy arrangement.
Variations on Backing and Framing
One of the joys of this project is how many backing options exist. For a classic look, use a glass disc framed with a slim metal rim. If you prefer a lightweight approach, an acrylic disc mounted in a shallow frame works beautifully and reduces weight. A canvas-coated backing can add a soft, tactile dimension, particularly when paired with translucent petals. Each backing choice changes how color and light behave, so you can tailor the finish to your space and personal style.
Alternative Backings: Resin, Laminate, or Glass
Resin backings offer a strong, chemical-free surface that can double as a protective sealant. Laminates are excellent for budget-friendly projects and are available in various degrees of transparency. Glass provides a crisp, high-end look but adds weight and fragility. When selecting, weigh durability against aesthetics and the intended placement in your home. Regardless of backing type, ensure it is compatible with your adhesive and sealing materials to avoid reaction or discoloration over time.
Where to Display Your Pressed Flower Suncatcher
Consider windows that receive meaningful amounts of daylight so your blooms glow without glare. A kitchen or sunroom where warmth and energy live can make the colors pop, while a bedroom near a soft morning light can create a calming focal point. Mounting hardware should support the suncatcher’s weight and allow for easy repositioning as you change decor with the seasons. If you’re sharing this project online, document the progression with a few close-up shots of the pressed pieces and a wide shot that shows how the light plays through the design.
Maintenance and Care Tips
Clean sparingly to protect the sealant and pressed pieces. Use a dry microfiber cloth to wipe dust and a damp cloth only if necessary, avoiding excess moisture near the sealant. Keep the piece away from direct, scorching heat or high humidity to preserve color fidelity and bond strength. If you notice any lifting or detachment over time, reapply a thin coat of the chosen sealant and allow it to cure fully before re-hanging. Regular dusting and careful positioning can extend the life of your pressed flower suncatcher and help it stay vibrant for years to come.
Next Steps: Part 3 Preview
In Part 3, Finishing Techniques and Display Ideas for Your Pressed Flower Suncatcher, we will explore advanced finishing options and innovative ways to showcase your piece across seasons. We’ll cover framing upgrades, protective coatings, and creative styling that harmonizes with BloomHaven’s floral lifestyle. Stay tuned for the next installment to deepen your craft and expand your display repertoire.
Advanced Techniques and Final Guidance for Pressed Flower Suncatcher Mastery
Welcome to the culmination of your pressed flower suncatcher journey. In this final section, we synthesize advanced methods, precise workflows, and display-ready finishing touches that separate good projects from showpiece designs. The goal is clarity, color fidelity, and lasting brilliance as your blooms catch the light each day. Every technique here builds on solid pressing fundamentals, helping you elevate your craft while staying efficient and economical.
Refined Color Preservation and Flower Selection for a Flawless Pressed Flower Suncatcher
Color fidelity begins with careful material selection. Choose blossoms with strong pigment and sturdy petals when possible. Edges that are not overly thin reduce curling and reduce the risk of color bleed during pressing. If you’re unsure about a bloom, test-press a single specimen first. This quick check reveals how the color behaves under pressure and time. When color quickly browns or dulls, consider substituting with a more color-stable variety or using a shorter press window.
For a brighter, longer-lasting result, opt for flowers that hold up well to light and air exposure. Layered elements, such as daisies, cornflowers, and small peonies, can deliver vivid, multi-hued results when pressed correctly. Don’t overlook foliage and seed heads; these can provide contrast and texture that enhance the overall composition of your suncatcher. When colorfastness is uncertain, you can use a color-stabilizing approach by using thin white tissue to reflect light and reduce direct pigment exposure during the final drying phase.
As you select specimens, plan your layout with permanence in mind. Arrange blooms to maximize light transmission through the finished piece. Consider translucency and opacity to create depth. If you plan a multibloom design, stagger petals so the center of each bloom remains visible through the glass or resin layer below. A well-planned palette reduces the need for later recoloring or re-pressing, saving time and materials in your workflow.
Advanced Pressing Techniques to Maximize Clarity and Color
Pressing is more than removing moisture; it’s shaping structure for long-term clarity. Modern methods combine traditional blotter-and-press with controlled humidity and time. For a high-end finish, you can use a vacuum press or a hydro-pressure technique that reduces air pockets and minimizes curling. If you don’t own a vacuum setup, a heavy flat weight with multiple layers of blotter and parchment still yields excellent results.
Key steps for advanced pressing:
- Use acid-free, pH-neutral blotters to prevent chemical reactions that could alter color over time.
- Place a thin sheet of archival tissue between each bloom layer to prevent sticking and to promote even coloration transfer.
- Apply consistent, even pressure. If your press shifts, re-check alignment to avoid petal distortion.
- Control ambient humidity. A stable environment reduces the risk of browning and edge darkening during the drying phase.
- Consider a secondary pressing pass for dense blooms. A light re-press after a short rest period can improve flattening without crushing delicate areas.
For those exploring resin-encased options, pre-press blooms until they lie flat, then encapsulate with a UV-resistant clear resin layer. This approach preserves color and adds a durable, glass-like shine that enhances light diffusion through the piece. When using resin, follow the manufacturer’s guidelines for cure time and ventilation to ensure a safe, bubble-free finish.
Glass, Resin, and Backing Options for Shine and Durability
Display materials influence how your pressed flower suncatcher is perceived. Each option has trade-offs in clarity, UV protection, and weight. Here are practical choices and how to optimize them:
- Glass front with a resin back: A glass front provides brilliant light transmission; a thin resin backing adds rigidity and protects delicate specimens. Use UV-stable acrylic varnishes or a clear epoxy that cures with minimal heat to prevent warping.
- Acrylic or glass sandwich: Sandwich two clear panels with blooms pressed between. This method reduces the risk of condensation and makes a bold, gallery-like presentation. Seal edges with a transparent frame sealant to prevent moisture ingress.
- Direct resin encapsulation: Encasing blooms entirely in epoxy resin can create a durable, seamless piece. Be mindful of potential yellowing over time; choose a UV-filtered resin and keep in indirect light to maximize longevity.
- Backing options: A light-colored backing (cream or soft gray) helps petals retain their hue. Consider a textured backing for added dimension, especially with lighter blooms.
Whichever route you choose, ensure the assembly remains flat. Warped edges ruin light play and can stress the observed depth. If mounting on a window, consider the weight and frame to avoid sagging or misalignment over months of sun exposure.
Edging, Mounting, and Framing for Professional-Grade Display
Professional presentation hinges on clean, precise edges and smart mounting. Edges that are squared and aligned create a polished look and aid in secure hanging. Methods include:
- Bezel framing: A slim metal or wooden bezel frames the piece, concealing edges and providing a stable mount. Ensure the bezel is cut precisely to the final dimensions for a clean fit.
- Copper foil and glass: For a stained-glass-inspired finish, copper foil around the edges can secure the panes while adding a subtle shimmer. Be patient with soldering to avoid heat damage to pressed elements.
- Hanging hardware: Use discreet, weight-appropriate hardware such as a small picture-hanging wire or a sturdy sawtooth hanger. For larger suncatchers, add a second anchor point to reduce sway.
- Display orientation: Consider vertical vs. horizontal placement. Vertical layouts often showcase color transitions along the bloom edges, while horizontal designs emphasize linear light flow across petals.
Test-fit your design before final assembly. A mock-up helps you refine alignment, spacing, and the visual weight distribution of blooms. Small adjustments now prevent irreversible mistakes later.
Color Stabilizers, Sealants, and UV Protection
Protecting color requires thoughtful sealants and light management. Not all finishes suit every design; test a small, inconspicuous area first. Options include:
- UV-resistant clear coats: Apply a thin, even layer to slow color fade from sunlight. Reapply as directed by the product guidelines and ensure it dries clear without ambering.
- Non-yellowing sealants: Look for water-based or UV-stable sealants that preserve vibrancy along the edges where color gradients are most delicate.
- Edge maintenance: Seal edges to reduce moisture movement, which can cause edge curling or pigment migration over time.
Keep in mind that coatings can alter light transmission. If your design relies on piercing brightness through thin petals, apply sealants sparingly and test under bright window light to confirm the desired glow remains intact.
Maintenance, Care, and Longevity of Your Pressed Flower Suncatcher
A well-made pressed flower suncatcher rewards care with longevity. Simple routines extend vibrancy without requiring specialized tools. Consider the following:
- Cleaning: Use a soft microfiber cloth to remove dust. For stubborn smudges, dampen the cloth lightly with water and wipe gently. Avoid solvents that could affect finishes or pigments.
- Sun exposure: Position away from direct, harsh afternoon sun to slow color fading. Rotating the piece periodically helps even out light exposure across blooms.
- Humidity control: Keep in a dry environment. Excess moisture can cause fogging under the glass and can degrade adhesives over time.
- Storage: When not on display, store in a breathable, acid-free storage envelope to prevent surface abrasion and dust accumulation.
With thoughtful care, a pressed flower suncatcher can become a family heirloom, passing from season to season while retaining its charm and glow.
Troubleshooting Common Issues in Advanced Projects
Even seasoned crafters encounter hurdles. Here are proven fixes for typical challenges you may face as you push toward mastery:
- Petal curling after pressing: Increase blotter thickness, shorten pressing time, or adjust weights to apply steadier pressure. Ensure the blooms are not overly damp when you place them into the press.
- Color bleed or dulling: Use acid-free materials and add a protective tissue layer between blooms. If bleed persists, re-press the affected area with lighter pressure and longer drying time in a shaded, dry space.
- Air bubbles in resin or varnish: Degas resin with gentle heat or vacuum if available. Pour in thin layers, allowing each to cure before adding the next.
- Edge wear or cracking: Consider reinforcing edges with a tighter frame, or switch to a different backing that distributes stress more evenly across the piece.
Patience pays off in troubleshooting. Small adjustments at the right moment prevent larger setbacks later in the process.
Creative Variations: Mixed Media and Seasonal Combinations
Advanced crafters often explore mixed media to add personality and narrative to pressed flower suncatchers. Try these ideas to expand your repertoire:
- Incorporate seeds and seed pods: Small seed components introduce textural variety and natural geometry that interacts beautifully with light.
- Layering techniques: Build depth by layering blooms at different planes within a shallow frame. Use thin spacers to create subtle dimensionality.
- Seasonal palettes: Align color schemes with seasons—cool blues and whites for winter, warm corals and yellows for summer, and soft ambers for autumn harmonies.
- Typography and silhouettes: Create worded or silhouette designs by selectively pressing blooms to form letters or shapes behind a translucent layer.
Mixing media such as pressed leaves, wispy grasses, or pigment accents can bring a fresh, natural feel to each piece while keeping the focus on blooms.
Sustainable Crafting: Eco-Friendly Materials and Practices
Sustainability matters in bloom-inspired crafts. Choose ethical, low-impact materials where possible. Practical tips include:
- Recycled frames and canvases: Upcycle old frames for new suncatchers to minimize waste.
- Locally sourced blooms: Harvest from your own garden or local farms to reduce transport emissions and support pollinator plants.
- Low-VOC finishes: Select water-based sealants and finishes to minimize indoor air contaminants.
- Repurposing packaging: Reuse tissue, parchment, and blotters from past projects when safe and appropriate.
Eco-conscious choices don’t dilute beauty. They can enhance your creative story and appeal to mindful buyers or visitors who value sustainable crafts.
Final Checklist and Quick-Start Recap
Use this concise checklist as your go-to reference when planning a pressed flower suncatcher project. A quick read-through before starting keeps you aligned with best practices and reduces delays:
- Clarify design goals and select a bouquet of blooms with color stability in mind.
- Prepare equipment: archival blotters, acid-free tissues, a flat press or vacuum system, and a clean, dry workspace.
- Press and dry blooms under controlled humidity, testing a small batch first when trying new varieties.
- Plan your layout for light transmission and bloom interplay; sketch or digitally map the arrangement.
- Choose a display method (glass, resin, or layered backing) and prepare the backing accordingly.
- Apply UV-stable sealants or coatings with caution to preserve vibrancy without altering translucency.
- Assemble with precise edging and secure hanging hardware for balance and safety.
- Care for the completed piece with gentle cleaning and thoughtful placement to minimize fade.
- Document your process and photograph progress for future inspiration and sharing.
For reference on foundational pressing methods and color preservation, you can explore related guidance like How to Press Flowers from the Old Farmer’s Almanac.
Final Thoughts and Next Steps
As you approach the final stages of your pressed flower suncatcher mastery, remember this is a practice of balance—between light, pigment, and form. The advanced techniques outlined here are designed to empower you to achieve studio-quality results at home. Each project builds your confidence, expands your vocabulary of arrangements, and deepens your appreciation for the delicate beauty of pressed blooms.
To progress, set a small, repeatable project cadence. Try one new bloom type per month, test two finishing options (glossy resin and glass-with-backing), and document outcomes. Your evolving portfolio will become a source of pride and a reliable reference for future tutorials, patterns, and community feedback.
Conclusion: Mastery Through Consistency and Creativity
Throughout this advanced guide, you’ve learned how to elevate every stage—from thoughtful flower selection and refined pressing to sophisticated display options and durable finishes. The pursuit of mastery in a pressed flower suncatcher blends scientific precision with artistic intuition. By embracing controlled processes, you ensure vibrant color, crisp clarity, and enduring sparkle in your window art. Remember the focus keyword as you craft and share: pressed flower suncatcher. This phrase anchors your technique, your storytelling, and your community contributions.
Ready to put these techniques into practice? Start a new project today, photograph your setup, and share progress with bloom lovers and crafters alike. Explore variations, experiment with materials, and refine your process. If you enjoyed this final guide, subscribe for more tutorials on pressed flower suncatcher and other floral DIYs from BloomHaven. Your next luminous creation awaits — let light meet petals in a celebration of seasonal beauty.