Tabletop Veggie Garden DIY Plans for Quick, Fresh Harvests
Whether you have a sunny kitchen counter, a shaded balcony, or a sturdy table, a tabletop veggie garden can deliver quick, fresh harvests with minimal space. A well-designed tabletop setup blends beauty and function, letting you grow compact vegetables, herbs, and edible flowers right where you prep meals. In 2026, BloomHaven.com celebrates blooms and edible landscapes inspired by current Pinterest trends like cabbage crush, wildflowers, peonies, and pollinator-friendly plantings. The goal of this guide is to help you build a resilient, eye-catching tabletop veggie garden that fits your space, budget, and schedule. You’ll learn design principles that maximize light, air, and access, plus practical tips for space planning and fast setup. By focusing on modular containers, layered heights, and smart water management, you can enjoy a rapid harvest cycle without sacrificing aesthetics or roominess in your living area. Across homes and apartments, the tabletop garden movement is thriving because it scales to small spaces while delivering big flavor and color. Let’s begin with foundations you can apply today.
Tabletop Veggie Garden Foundations: Design Principles, Space Planning, and Quick Setup
Design Principles for a Tabletop Veggie Garden
Design principles for a tabletop veggie garden start with scale and balance. Size matters; choose containers that fit on your surface without crowding. Therefore, modular components are a wise choice. Use plants with varying heights to create depth. In addition, select colors and textures that echo blooms in your focal flower beds for a cohesive look. Crucially, accessibility matters: place frequently harvested herbs within easy reach and keep paths clear.
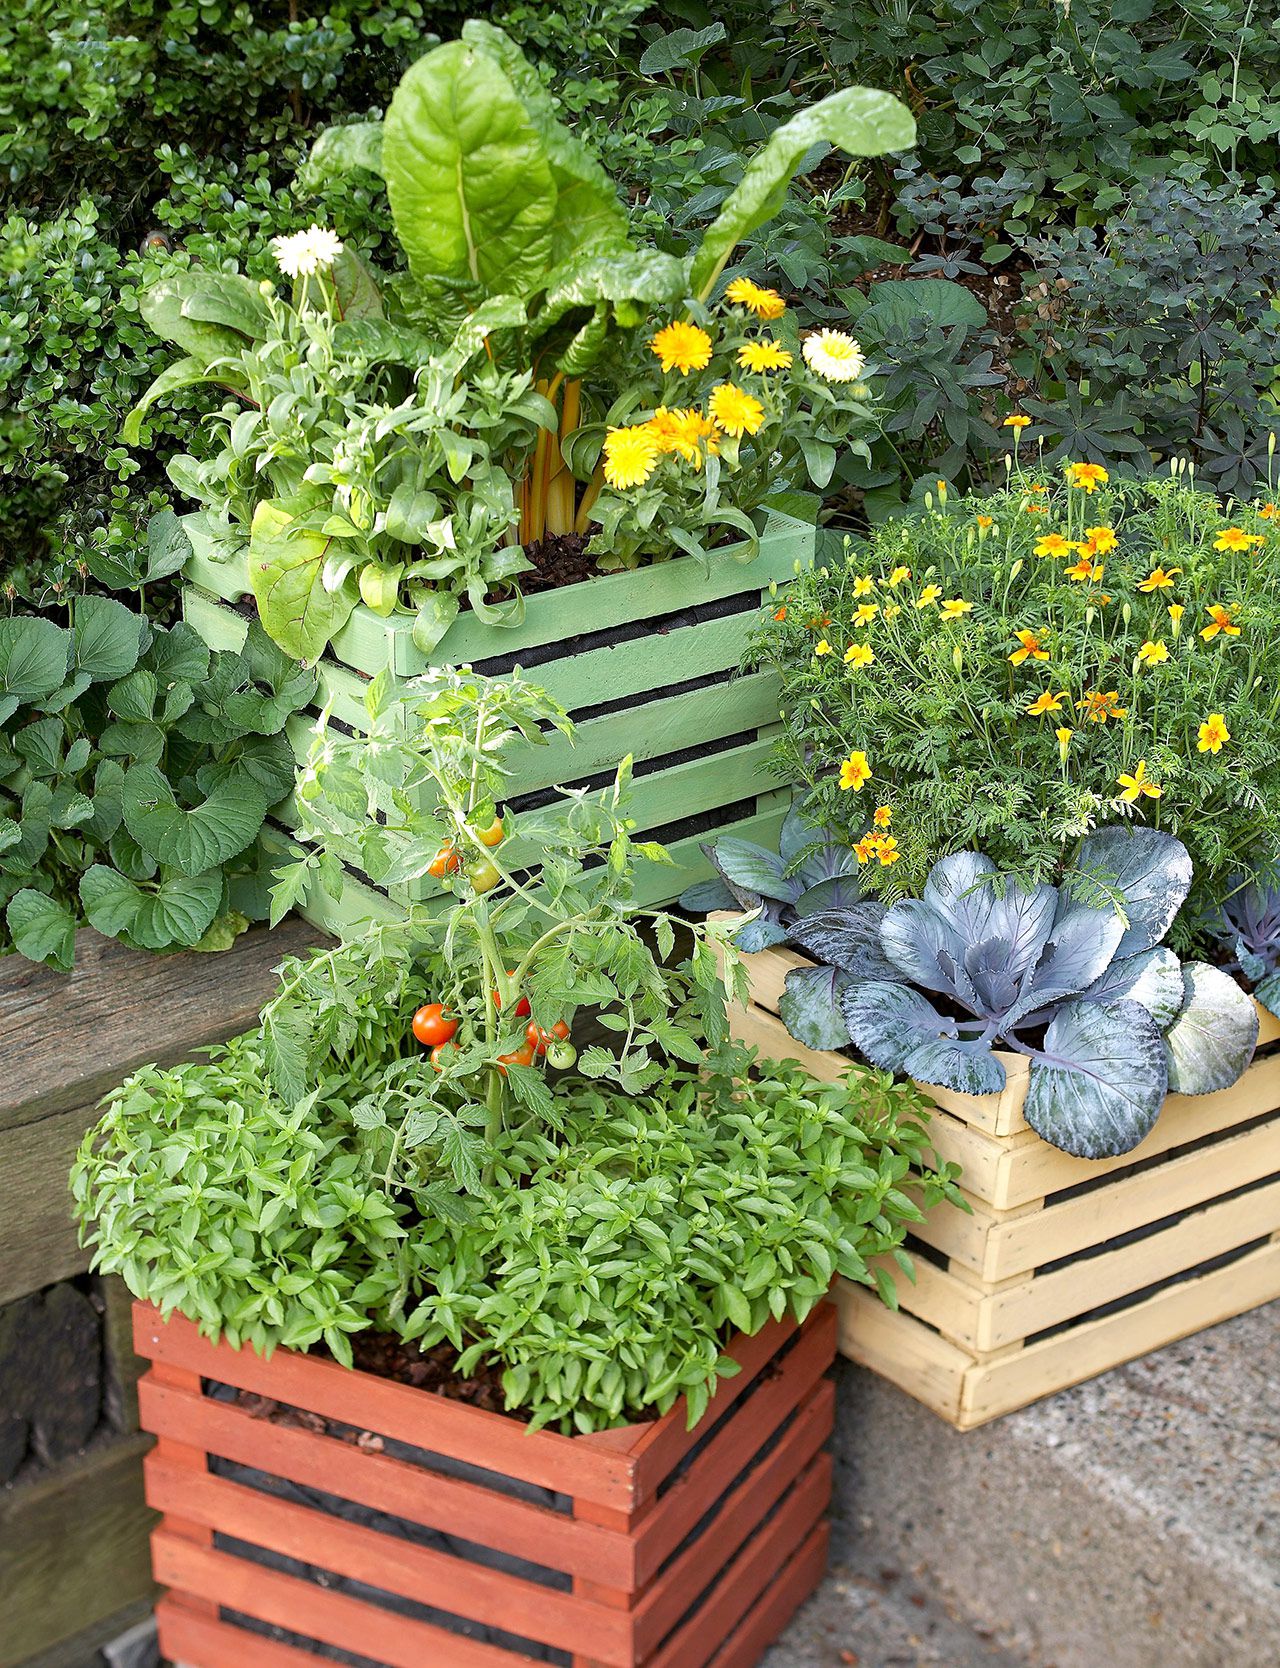
Choosing Containers for a Tabletop Veggie Garden
Start with lightweight, stable containers that distribute weight evenly. For a table that needs frequent access, choose shallow pots with wide rims to keep root zones happy. Therefore, look for modular pieces that stack or snap into place. In addition, consider materials that suit your decor and climate. Plastic and fiber pots stay lighter; ceramic and terracotta add warmth, but may slip on slick surfaces. For a compact tabletop, opt for 6–8 inch (15–20 cm) pots for herbs, and 8–12 inch (20–30 cm) for compact greens. If you want inspiration and guidelines, check this container gardening tips resource.
Planting for Layered Height in a Tabletop Veggie Garden
Layered height makes your tabletop look vibrant and intentional. Think of a small foreground of compact greens, a mid-layer of herbs, and a taller focal plant at the back or in a corner. Use vertical structures like trellises, plant stands, and hanging baskets to add height without crowding the surface. In addition, choose pot colors and leaf textures that echo your floral palette. Crucially, maintain accessibility so you can harvest daily without crawling under plants.
Drainage, Materials, and Finishing Touches for a Tabletop Veggie Garden
Drainage is non-negotiable. Ensure each pot has drainage holes and a tray or saucer beneath. Therefore, place a shallow moisture mat under the containers to wick excess water away. In addition, use a light, well-draining growing mix suitable for containers. Avoid heavy garden soil that compacts in a tabletop setup. Consider a base layer of perlite or coconut coir to improve aeration. For aesthetics, add a decorative ground cover or a small herb that trails a little over the edge. Crucially, maintain a clean, wipeable surface around the setup for easy weekly refreshes.
Space Planning for a Tabletop Veggie Garden
Space planning starts with precise measurements. Map your tabletop or cart surface, then subtract the footprint of each pot plus a little breathing room. Therefore, plan for a walkway of at least a few inches around every container so you can weed, prune, and water without knocking plants over. In addition, use modular pieces that can be rearranged seasonally as you rotate crops. For aesthetics and accessibility, group high-light plants together and keep herbs within arm’s reach. These simple rules help you maximize yield without clutter.
Layout Strategies for a Tabletop Veggie Garden on Compact Floorspace
Consider a grid or staggered layout to squeeze more growing area from the same tabletop. Place tall growers along the back edge, medium-height plants in the middle, and trailing varieties at the front. Use tiered shelves or plant stands if you have vertical space. Therefore, you’ll increase surface area without expanding the base footprint. In addition, leave a clear space for a small pruning or harvest zone so you can work efficiently.
Lighting and Sunlight Planning for a Tabletop Veggie Garden
Most tabletop veggies thrive in bright, indirect light. If your sun is limited, supplement with a high-quality LED grow light. Therefore, choose a light with adjustable spectrum and timer. In addition, rotate containers weekly to ensure even growth and prevent leaning toward light. Place the most light-demanding crops in the sunniest spots, and rotate seasonally. Crucially, monitor heat buildup on hot days and shade as needed to prevent leaf scorch.
Watering Plan and Accessibility in a Tabletop Veggie Garden
Water is often the single biggest challenge on a tabletop. Therefore, implement a simple watering plan: water deeply when the top inch of soil dries. In addition, check drainage trays daily and empty them to prevent root rot. Use self-watering pots or capillary mats if you travel often. Keep a small watering can on hand and label plants so you can water by variety, not guesswork. A weekly check-in helps you catch pests, nutrient gaps, or quirky growth patterns early.
Quick Setup: From Box to Harvest in Minutes for a Tabletop Veggie Garden
When speed matters, the right plan makes all the difference. This section outlines a fast, repeatable process to transform a bare surface into a thriving tabletop veggie garden in one afternoon. The steps below assume lightweight containers, a ready-to-use growing medium, and a small set of tools you already own. Therefore, you can start harvesting herbs and greens within a few weeks.
Materials Checklist for a Fast Start in a Tabletop Veggie Garden
Before you begin, gather the essentials: lightweight containers, a shallow tray or saucer for each pot, a bag of high-quality, well-draining potting mix, a watering can, a handful of slow-release fertilizer pellets, a small spade or trowel, a moisture meter if you have one, and a timer or smart plug for lights. In addition, keep a spray bottle for misting seedlings and remove any packaging from surfaces that could scratch.
Step-by-Step Quick Assembly for a Tabletop Veggie Garden
Step 1: clean the surface. Step 2: lay down a moisture mat or tray. Step 3: place containers in the planned layout. Step 4: fill each pot with potting mix. Step 5: sow or transplant fast-growing herbs and leafy greens. Step 6: water evenly and set the light timer. Step 7: label each pot. Step 8: do a quick check for stability. In minutes, you’ll see promise rather than clutter.
Maintenance and Fresh-Start Routines for a Tabletop Veggie Garden
For ongoing success, set a simple weekly routine. Therefore, inspect plants for pests, prune leggy growth, and refresh mulch. In addition, rotate crops to manage nutrient draw. Water deeply and check the drainage daily during hot spells. Keep a log of what you planted and when you harvested to optimize next season’s combos. With these routines, your tabletop veggie garden becomes a reliable, fast-harvest system.
With the foundations in place, you’re ready to move from theory to action. In Part 2: Materials, Containers, and Starter Setup, we dive deeper into turning these foundations into a ready-to-harvest tabletop veggie garden.
Step-by-Step Tabletop Veggie Garden Construction and Planting with DIY Plans
First, you translate design ideas into a concrete build that stays portable, stable, and easy to maintain. Specifically, this section walks you through a proven workflow to create a tabletop veggie garden that fits compact spaces like balconies, kitchen nooks, or sunny windowsills. Moreover, you will see how to choose materials, assemble a frame, install a growing medium, and place the planter so that you harvest fresh herbs, greens, and compact veggies in days rather than weeks. In the process, you will align the project with the BloomHaven aesthetic, weaving pollinator-friendly plants into the mix to boost visual appeal and ecological value.
To begin, assess the available surface and sun. A true tabletop veggie garden thrives where it receives at least five to six hours of direct light per day. In practice, this means positioning near a south or west facing window or a balcony that gets midafternoon sun. Specifically, measure the table or shelf width, depth, and load capacity to confirm your planned plan fits without tipping or sagging. Then, sketch a simple layout that places taller crops toward the back and compact varieties toward the front, ensuring easy access for watering and pruning. The aim is a neat, accessible unit that you can move with minimal effort when cleaning or rearranging your space.
Advanced Techniques and Final Guidance for a Thriving Tabletop Veggie Garden
Ultimately, mastering a tabletop veggie garden requires precision, patience, and a willingness to adapt. In this final section, we consolidate the most effective practices into a practical, scalable framework you can apply this season and beyond. Each technique is chosen to maximize yield in a compact footprint while keeping maintenance simple and enjoyable.
Advanced Soil Mastery for the Tabletop Veggie Garden
Soil Structure and Amendments for Small-Space Tabletop Veggie Garden
Healthy soil is the foundation of every thriving tabletop veggie garden. For small spaces, build a layered, well-drained profile that retains moisture without becoming waterlogged. Start with a base of high-quality potting mix formulated for containers, then blend in slow-release organic fertilizer, worm castings, and a mineral blend rich in calcium and magnesium. Use a light, fluffy texture to promote root exploration. Ultimately, soil should be breathable, with a near neutral pH. If your test shows excess acidity or alkalinity, adjust gently with lime or sulfur to restore balance. To deepen soil vitality, consider a quarterly top-dress of compost and a splash of mineral amendments tailored to your crop mix. The goal is living soil that feeds roots as they grow.
Choosing Potting Mixes, Mulches, and Drainage for the Tabletop Veggie Garden
Choose a potting mix designed for containers, not heavy garden soil. Incorporate perlite or pumice for drainage and aeration. Mulching is essential to reduce evaporation and keep roots cool. Use a shallow mulch layer of straw, shredded bark, or composted leaves, avoiding materials that mat and compact at the surface. Ensure drainage holes are clear. Inadequate drainage is the most common cause of root rot in tabletop settings. For larger containers, consider a micro-drainage layer and a saucer or tray to catch overflow. This minimizes mess and makes water management predictable. In practice, rotate pot positions periodically to balance sun exposure and prevent localized soil depletion. Combine mulch with a living cover crop of herbs or fast-spreading greens in off-season to maintain soil structure and microbial health.
Smart Watering for a Thirsty Tabletop Veggie Garden
Irrigation Methods that Save Time and Water in a Tabletop Veggie Garden
Water scheduling is critical when space is limited. Use a lightweight drip system, capillary mats, or capillary wicks to deliver moisture directly to root zones. In a tabletop garden, water early in the day so leaves have time to dry and avoid disease. For shy waterers, a simple self-watering reservoir built into the container can be very effective. Check soil moisture with a quick finger test before watering again. A steady, moderate moisture level is far better than soggy feeds or parched roots. Consider a programmable timer to prevent forgetfulness and to standardize watering across multiple pots, especially during travel or long workdays. Pair irrigation with a humidity monitor to fine-tune moisture in enclosed or glassed-in spaces.
Mulching, Condensing, and Drainage Practices for Consistent Harvests
Mulches conserve moisture, suppress weeds, and stabilize temperature. For containers, keep mulch thin but consistent. If you notice water pooling on the surface, you likely have a drainage issue. Elevate pots slightly, ensure saucers are clear, and consider larger drainage holes or a self-watering insert. In addition, group plants with similar water needs to simplify maintenance and reduce waste. From a practical standpoint, consistent moisture yields consistent harvests in a tabletop veggie garden. Seasonal adjustments matter: increase mulch for hotter periods and scale back during cooler seasons to prevent overheating or excessive dampness. A moisture- and temperature-aware schedule keeps yields steady across varieties.
Integrated Pest Management for the Tabletop Veggie Garden
Prevention Through Companion Planting and Beneficial Insects
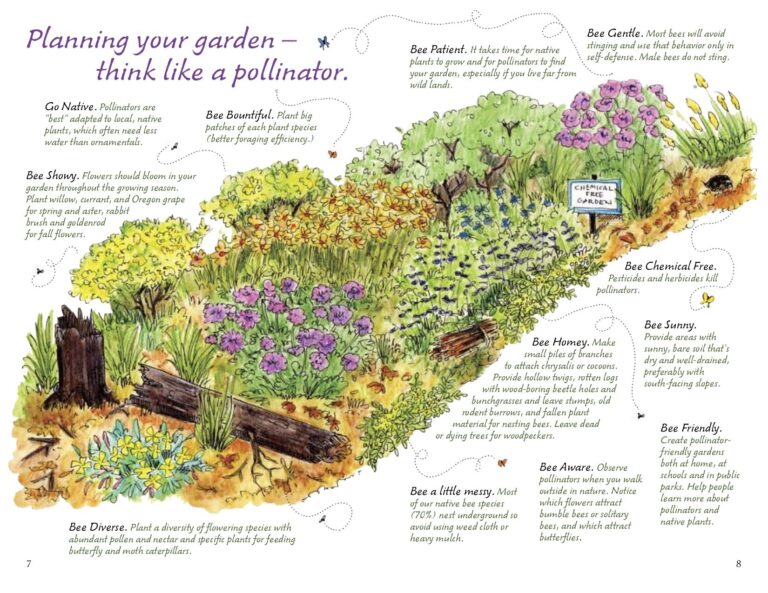
Prevention is the most effective pest strategy for small spaces. Use companion planting to deter pests and attract beneficial insects. For example, basil near tomatoes can repel some pests, while marigolds attract hoverflies that prey on aphids. In a tabletop garden, annuals and edible flowers can be interspersed without crowding edible crops. Encourage pollinators by providing a continuous bloom of flowers in nearby containers or window boxes. A healthy, diverse micro-ecosystem reduces the need for sprays and helps maintain yield. Incorporate flowering herbs like dill or cilantro near cucumber trails to distract and protect young vines while supporting beneficial insects. Practice regular visual scouting as a defense, since small gardens reveal issues quickly and allow for rapid response.
Organic Remedies and Safe Sprays for Small-Scale Tables
When problems arise, start with organic, low-toxicity options. Soap sprays, horticultural oils, and d-limonene-based products can control soft-bodied pests without harming pollinators. Always test on a small area first and apply during cooler parts of the day. Rotate products to prevent resistance and avoid exceeding label rates, especially in a confined tabletop setting. If possible, physically remove pests and prune damaged leaves to prevent spread and maintain plant vigor. Build a simple preventive regimen: weekly leaf checks, monthly soil health audits, and seasonal population assessments to keep pest pressure manageable without harming beneficial insects or edible crops.
Planning for Peak Harvests: Rotation, Succession, and Staging in a Tabletop Veggie Garden
Rotation Plans and Crop Groups for Continuous Yield
Rotation is essential to reduce disease buildup and nutrient depletion. Group plants by family and rotate yearly, even in compact spaces. A simple three-year rotation can be designed as leafy greens in year one, root crops in year two, and fruiting crops in year three. In a tabletop garden, you can reuse large containers with fresh soil and adjust plant placements to keep rhythms steady. This practice sustains soil life and supports ongoing harvests without needing a full backyard. If space is extremely tight, implement micro-rotations by swapping crops between pots every planting cycle, which reduces disease risk while keeping meal plans flexible and exciting.
Succession Planting Calendars for 12-Month Freshness
Succession planting keeps a tabletop veggie garden productive throughout the year. Plant quick-maturing crops in staggered intervals, use warm-season crops when temperatures allow, and extend seasons with season-extending techniques. A practical calendar might schedule lettuce and radish every two weeks, followed by beans or bush peas starting after the last frost. If you lack a cold frame, use lightweight covers to protect seedlings during cool nights. With careful planning, you can enjoy fresh greens and herbs almost year-round in a tabletop garden. For larger harvests, pair intense early harvests with longer-cycle crops such as tomatoes or peppers, telescoping your harvest window for continuous food yields without crowding the space.
Maintenance Checklists, Troubleshooting, and Record-Keeping
Seasonal Maintenance Calendar
Keep a simple calendar that marks soil testing, fertilization, pruning, and container rotation. In spring, refresh soil and inspect drainage and irrigation lines. Mid-season, monitor for pests and adjust water as needed. Autumn, clean containers and prepare for winter to protect plants from temperature swings. A routine reinforces good habits and preserves soil health in a tabletop veggie garden. Use a dedicated app or notebook to capture sunlight hours, watering times, crop performance, and any anomalies so you can forecast adjustments next season with confidence.
Common Issues and Quick Fixes
Common issues include yellowing leaves, droopy plants, and slow growth. For yellowing, check for nitrogen deficiency or overwatering. For droopiness, balance moisture and ensure adequate light. If growth stalls, inspect for root binding in crowded pots and repot into larger, fresh mixes. Regularly prune leggy growth to improve air circulation and light access. Keep a small toolkit and spare parts for irrigation, lighting, and drainage so you can respond quickly to emerging problems. When diagnosing, start with the simplest causes: water and light, then inspect soil for compaction or salt buildup from fertilizer, and finally scan for pests or disease signs before taking corrective action.
Final Guidance and Next Steps
As you prepare for your next growing season, integrate these advanced techniques into a practical workflow. Start with soil evaluation and a plan for amendments, then set up a reliable watering system that fits your space. Pair pest prevention with smart design choices that support pollinators and beneficial insects. Finally, commit to rotation, succession, and a clear maintenance routine. The aim is to simplify, not complicate, your table-top veggie garden journey while maximizing yield and enjoyment. If you want a quick, repeatable framework, build a five-step routine: assess soil, install irrigation, establish pest prevention, plan rotations, and maintain a harvest log. The clarity of this workflow reduces decision fatigue and accelerates progress toward fresh harvests. For further reading on container gardening techniques that complement a tabletop veggie garden, see this practical overview from a trusted horticultural resource: Container Gardening Tips.
In addition, document your results. Track what you plant, when you plant, and how the harvest responds. A simple log helps you compare seasons, refine your timing, and adjust for soil and climate variations. Data-driven decisions are powerful, especially in space-limited environments where small changes yield big rewards. Use photos, notes on sun shifts, and a harvest tally to guide next year’s planning. The habit of meticulous record-keeping elevates a tabletop veggie garden from a nice idea to a productive, reliable system that brings joy and nourishment to your table.
To conclude this section, remember that advanced techniques in a tabletop veggie garden are a balance of science and art. The more you understand the soil, the more precisely you can water, nurture, and prune. Sustainability comes from consistency and curiosity alike, not from a single trick. By blending soil science, precise irrigation, careful pest management, and disciplined planning, you create a compact ecosystem that rewards your effort with steady harvests and ongoing satisfaction. Embrace experimentation, track outcomes, and tailor each technique to your unique space and climate. Your tabletop veggie garden can become a thriving centerpiece of flavor, flavorfulness, and inspiration, year after year.
Final Checklists and Quick Reference
- Soil health first: test soil pH and structure at least once per season.
- Water evenly and monitor moisture with a quick touch test.
- Inspect leaves, stems, and soil surface weekly for signs of pests or disease.
- Rotate crops in containers by family every planting cycle.
- Keep a simple harvest log to optimize timing and taste.
Now is the time to take action. Build your plan, equip your tabletop set, and begin implementing the steps above. The payoff is a thriving tabletop veggie garden that delivers fresh harvests with less effort and more joy.
Conclusion
In summary, the tabletop veggie garden blends compact design with high yield through soil mastery, precise irrigation, proactive pest prevention, and thoughtful planning. This approach makes fresh greens and tomatoes a regular, reliable feature of your dining table or balcony. By applying the techniques described in this guide, you can enjoy a thriving tabletop veggie garden that thrives in 2026 and beyond. The journey combines science, craft, and daily delight, turning small spaces into bountiful harvests. The top-line takeaway is clear: care for soil, water wisely, protect crops, and plan ahead for continuous harvests from your tabletop veggie garden.