Autumn Rudbeckia Border Design for Color and Pollinators
Autumn Rudbeckia Border Design Foundations for Season-Long Color
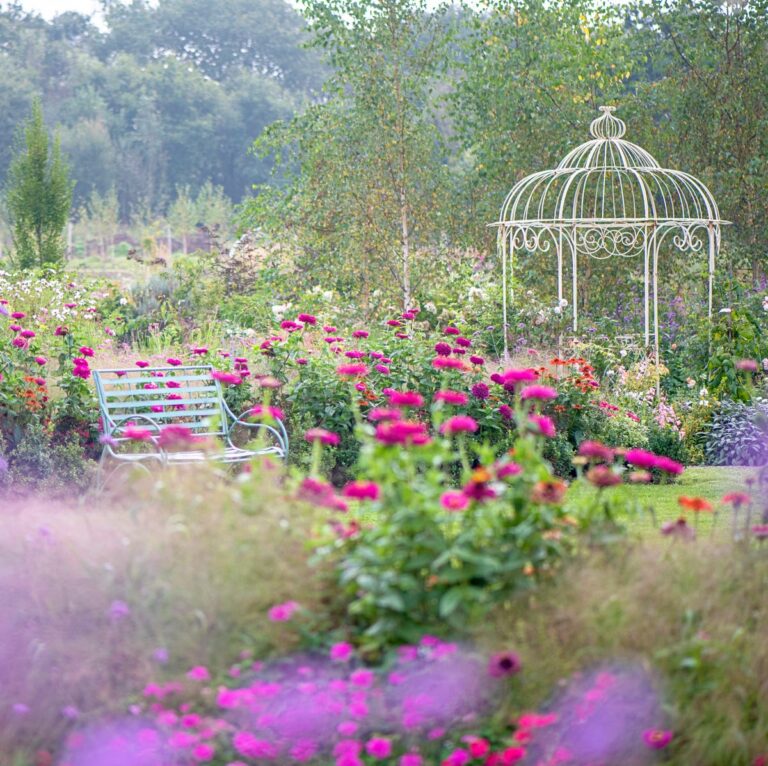
The autumn rudbeckia border is a cornerstone of seasonal color, offering blazing gold petals, dark centers, and a long bloom window that stretches from late summer into late fall. In BloomHaven’s 2026 garden philosophy, borders should glow as days shorten and pollinators busily move through the borders. The autumn rudbeckia border thrives when it is planned with a clear backbone, smart companions, and a palette that remains vibrant through sun and cooler temperatures. This introductory guide lays the foundations you’ll need to design, plant, and maintain a border that delivers season-long color without demanding constant renovation. You will learn how to assess site conditions, prepare soil, sequence blooms, and make aesthetic decisions that keep the border cohesive as the season shifts. By selecting resilient varieties, prioritizing pollinator-friendly partners, and outlining a practical maintenance schedule, you’ll achieve a border that feels intentional, resilient, and capable of drawing the eye year after year. Therefore, you’ll be ready to translate theory into a thriving, color-packed edge that performs in 2026 and beyond.
In this Part 1, we focus on the design foundations, plant selection logic, and the practical steps that set the stage for a successful autumn rudbeckia border. We explore sun exposure nuances, drainage needs, and how to group plants to maximize bloom cadence. You’ll discover how to balance height, texture, and color so the border reads as a cohesive composition from base to skyline. The goal is clarity and confidence: a border that looks curated rather than accidental, yet remains adaptable to weather fluctuations and garden chores. To support pollinator health, we’ll also highlight companion species that attract bees and butterflies while enriching soil structure and biodiversity. Finally, you’ll find ready-to-apply tips for seasonal transitions, so the border keeps performing as the calendar turns toward winter. For ongoing inspiration, consider visiting trusted pollinator resources such as Pollinator Partnership.
autumn rudbeckia border: Design Principles for a Season-Long Display
Design principles act as the blueprint for a border that looks intentional across the spectrum of late summer to late fall. Start with a strong backbone: tall rudbeckia species and their sturdy stems anchor the display. In front of this backbone, layer mid-height perennials and low-growing groundcovers that fill gaps without crowding. This layered approach creates depth and guides the eye through successive zones of color and texture. In addition, repetition brings cohesion. Repeat a few reliable color notes or foliage shapes at regular intervals to create rhythm, even as individual bloom times drift. Contrast remains essential: pair dark-leafed foliage with light, sun-loving blossoms to ensure the border reads clearly from a distance. Crucially, scale and proportion matter. If your border is wide, give taller components enough space to breathe; if it’s narrow, favor more linear, denser plantings to avoid a flat silhouette. The result is a border that exudes confidence and contemporary flair while staying true to a classic, pollinator-rich aesthetic.
In order to keep the focus on the autumn rudbeckia border, choose companions that complement the yellow and bronze palette without overpowering it. For example, blues and purples can enhance the warmth of rudbeckia petals, while soft grasses add movement and a supporting texture. Additionally, consider long bloom windows for a seamless color show from late summer through October. This approach minimizes gaps and reduces the need for mid-season replacements. The following sections translate these principles into actionable steps you can apply in any sun-drenched bed or mixed-border context.
Soil, Sun, and Water Needs for the autumn rudbeckia border
Sun exposure drives bloom vigor and plant health. Rudbeckias adore full sun, ideally at least six to eight hours per day, which encourages robust flowering and sturdy stems. If your site experiences intense afternoon heat, provide light afternoon shade to protect bloom longevity and prevent wilting on the hottest days. The soil should be well-draining yet moisture-retentive enough to sustain roots during dry spells. Amend heavy clay with compost and, if necessary, add organic matter to improve structure and drainage. In addition, a layer of mulch helps retain soil moisture, suppresses weeds, and stabilizes soil temperature during early frosts. Water deeply but infrequently, aiming to keep the root zone consistently damp but never soggy. Drip irrigation or soaker hoses deliver precise moisture with minimal foliar wetness, reducing disease pressure and keeping foliage crisp for longer. A healthy root environment ensures stronger stems and more abundant blooms throughout the season.
To support a resilient border, select disease-resistant rudbeckia cultivars and pair them with companions that share similar water and soil needs. Avoid mixing species that require conflicting moisture or pH levels, which can lead to plant stress and uneven display. In addition, provide good air circulation by avoiding overcrowded planting, which helps minimize powdery mildew and other common leaf diseases. A simple soil test can guide amendments: a soil pH around 6.0 to 7.0 generally works well for rudbeckia and its common partners. With the right conditions, maintenance becomes straightforward rather than arduous.
Spacing and Border Width for the autumn rudbeckia border
Spacing is the secret to a professional, magazine-worthy border. Plan for a gradual rise in height from front to back, with the tallest rudbeckia and supporting perennials toward the rear or center, depending on your bed’s shape. Use the rule of threes when grouping: plant in odd-numbered clusters (three or five) to create a natural, pleasing cadence. In smaller spaces, repeat the same plant in a compact rhythm to imply continuity without crowding. For borders that run along walkways, leave a walkway-friendly clearance so visitors can admire details up close while preserving plant health. A typical mix might place a row of low-growing foliage at the front, a middle tier of mid-height perennials, and a tall focal rudbeckia at the back, ensuring each bloom is visible from multiple vantage points. By planning spacing with intention, you reduce pruning needs and keep the border looking well-groomed across the season.
Additionally, consider seasonal transitions in your spacing strategy. As plants mature and self-seed, you may need to adjust spacing slightly to maintain the intended silhouette. Conversely, some fall-blooming companions can be installed closer to the border’s edge to create a sense of lush abundance as the season progresses. The net effect is a border that remains balanced and continuous, even as individual plants shift in size and bloom timing.
Pollinator-Friendly Planting: Companion Choices for the Autumn Rudbeckia Border
Pollinators are the engine of a thriving border, and the autumn rudbeckia border is a natural magnet for bees, butterflies, and beneficial insects. Choose companions that bloom at staggered times to sustain feeding opportunities from late summer through autumn. For a robust, garden-wide effect, incorporate a mix of native and well-adapted perennials that provide nectar and pollen, as well as architectural interest. Good companions include coneflowers (Echinacea), goldenrod (Solidago), asters (Symphyotrichum), and ornamental grasses (like Schizachyrium or Miscanthus varieties). These choices offer varied heights, textures, and colors that complement the yellow-gold signal of rudbeckia while maintaining a lively, pollinator-friendly microclimate. In addition, consider early-season perennials such as coreopsis or salvia that begin blooming before rudbeckia peaks, ensuring continuous nectar sources as the season unfolds.
To support long-term pollinator health, choose nectar-rich plants with accessible flowers, and avoid heavy-use insecticides that may disrupt beneficial insect activity. For visitors who want to deepen their understanding of pollinator-friendly design, browse trusted resources such as Pollinator Partnership and local extension guides for native species recommendations. Additionally, native grasses and forbs provide both habitat and structure, enhancing the border’s visual and ecological value while offering wind-blown movement that catches the eye as you walk the border path.
Planting plan sketch: front edge—low perennials with textural foliage; middle—mid-height pollinator-friendly blooms; back—tall rudbeckia with strong stems. This arrangement ensures bloom overlap and continuous color while supporting a healthy pollinator network. The result is a border that looks curated, performs reliably through heat and frost, and remains inviting to pollinators for months on end.
Native grasses and perennials to pair
Pair rudbeckia with grasses like little bluestem (Schizachyriums), switchgrass (Panicum), or blue oats (Helictotrichon). Their movement and soft texture contrast beautifully with rigid flower heads. Include perennials such as Echinacea, Aster, Salvia, and Gaillardia for layered color and extended bloom windows. Groundcovers such as Thysanocarpus or Sedum can fill gaps without competing for resources, while ivy or creeping phlox at the edge can soften transitions between border and surrounding bed. The aim is a dynamic, pollinator-friendly spectrum that remains legible and striking from spring through autumn.
Color palettes that support pollinators focus on nectar-rich combinations. Warm yellows and bronzed hues pair well with cool purples, blues, and soft greens. In addition, metallic foliage or variegated leaves add contrast without stealing focus from the star plants. The objective is to create a cohesive color story that changes subtly as blooms shift, rather than a static mosaic that risks looking dated by mid-season. A well-choreographed palette brings both beauty and ecological value to your border, making it a favorite stop for pollinators and admirers alike.
Maintenance and Seasonal Transitions
Maintenance is the practical heartbeat of any successful border. A light annual routine keeps the autumn rudbeckia border looking sharp, reducing the need for heavy mid-season interventions. Start with deadheading to prolong bloom and improve air circulation. In addition, prune spent flower stalks after peak bloom to encourage a second, smaller flush in some cultivars. Mulching helps moderate soil temperature, conserve moisture, and suppress weeds. Mulch layers should be light and even to avoid smothering shallow-rooted plants. Crucially, late-season pruning can prepare plants for the first frost and help protect roots during freezing nights. A carefully timed cut-back in late winter or early spring reveals fresh growth and sets the stage for an orderly restart of the border’s color cycle.
Seasonal transitions deserve special attention. As temperatures drop, some grasses and perennials go into a gentle die-back; others emerge with renewed vigor. Plan for a light cleanup, leaving seed heads and foliage that provide winter structure and food for wildlife. If you prefer a tidier look, apply a thin layer of mulch to protect roots and preserve moisture during dry late-summer spells. For many gardeners, the key is predictable routines rather than reactive, last-minute interventions. By following a simple schedule, you minimize stress on plants and maximize color retention from late summer through autumn.
Color Story and Design Considerations
Color is the language of the border, and a well-crafted color story informs every planting decision. Begin with a unifying color base, such as the warm glow of rudbeckia, then layer complementary hues that lift and extend the palette. For autumn borders, consider a gentle transition from golds and bronzes to silvery greens and cool purples as the season grayness settles in. Use texture to maintain visual interest after bloom peaks; feathery grasses, glossy foliage, and veined leaves create depth even when flowers fade. Repeat color accents in blocks or drifts to avoid a choppy look, and vary plant form to keep the border engaging from different angles. Crucially, test your palette in a small section first to verify how light quality affects color perception as the sun shifts from late afternoon to morning soft light. The result is a border that feels cohesive, modern, and deeply rooted in pollinator-friendly horticulture.
Repeating color blocks create rhythm, while occasional pops of contrasting color provide focal moments. The border should tell a story as the season progresses, not merely a collection of flowers. For example, you might plant a sequence of echinacea and rudbeckia in threes along the back line, with a mid-row of asters and grasses to echo height and texture. The front edge can host low-growing perennials such as coreopsis and salvias that bloom early and bridge the color gap as rudbeckia peaks. With careful planning, your border achieves a balanced cadence that looks intentional from street view and intimate from the garden path. The approach emphasizes beauty, resilience, and ecological value, making the autumn rudbeckia border a standout feature of any sunny border.
Looking ahead to Part 2, we will translate these foundations into a practical planting plan, exact varieties, and a seasonal maintenance calendar designed to maximize bloom and pollinator visits while keeping the bed easy to manage throughout the year.
Implementing the Autumn Rudbeckia Border: Step-By-Step Layout and Planting Plan
Step 1: Define the autumn rudbeckia border footprint
Begin with a clear footprint that guides every planting decision. The autumn rudbeckia border thrives in sun, so choose a location that receives at least six to eight hours of direct light daily. A curving, cottage-style border often works well, but a clean, straight edge can read as more formal while still supporting bold drama. The length and width matter because rhythm and repetition drive visual impact. In most home borders, aim for a length of four to six feet with a depth of two to three feet for a striking yet manageable display. If you have a longer wall, repeat the same height and color rhythm every six to eight feet to create continuity. Plan for a shallow, broad border rather than a skinny strip; this framing helps the autumn rudbeckia border to anchor the garden and attract pollinators from all angles. Position taller focal plants toward the back or center, then step down to mid-height and finally to lighter, low-growing textures toward the edge. This setup ensures the autumn rudbeckia border reads as a layered tapestry, not a row of single specimens. Specific planning saves you later watering and maintenance work, and it makes seasonal transitions smoother. Finally, note microclimates within your border. A stone wall or brick edging can reflect heat, drying the soil slightly and encouraging robust blooms. Conversely, a low-lying area may stay damp, which can encourage root rot in rudbeckia if drainage is poor. If you suspect damp soils, elevate the bed with a thin layer of coarse gravel beneath the soil mix to improve drainage. In every case, you want a border that breathes, dries quickly after rain, and supports prolonged flowering into autumn. The autumn rudbeckia border will reward you with bright yellow blooms, abundant nectar, and a sense of lasting warmth as the season cools.
Step 2: Prepare soil and site conditions for the autumn rudbeckia border
Soil preparation is the foundation of a healthy border. Rudbeckia perform best in well-drained soil with moderate fertility. Test your soil to determine pH, which should ideally fall between 6.0 and 7.0. If your soil leans acidic or alkaline, amend gradually with compost and a balanced fertilizer to bring it closer to neutral. Regardless of existing conditions, add a generous layer of organic matter. This improves drainage, increases microbial activity, and feeds the roots as they establish. For clay soils, incorporate coarse organic matter and a few shovels of perlite or pumice to enhance drainage. If you are dealing with sandy soil, mulch more deeply and apply a slow-release fertilizer to keep moisture available without dense growth that invites pests. Before planting, rake the bed smooth and remove any grass or weeds. A clean surface encourages even emergence and trims away competition that can stunt young rudbeckia. Mulching after planting is essential. A two to three inch layer of organic mulch stabilizes moisture, suppresses weeds, and moderates soil temperature. In spring, as new growth appears, you can gradually reduce mulch to avoid smothering new shoots. Hydration matters. Keep soil consistently moist for the first two to three weeks after planting. Once roots establish, they will tolerate periods of drought better. Finally, plan for long-term soil health. Rotate plant placements if you need to refresh color and texture over the years. This approach helps the autumn rudbeckia border stay dynamic and resilient.
Step 3: Build a plant palette and layout for the autumn rudbeckia border
A thoughtful palette is the heart of a successful autumn rudbeckia border. Rudbeckia fulgida or Goldsturm varieties form a sturdy backbone with vivid, golden blooms that catch the eye from mid to late summer through fall. Use these as your anchor plants, and pair them with a mix of mid-height perennials that bloom in overlapping windows. Think coneflowers, ornamental grasses, and sturdy evergreen foliage for texture and year-round interest. Ground-level accents such as Salvia nemorosa, Heliopsis helianthoides, and ornamental grasses create a layered rhythm that mirrors the golden centerpiece. Plan color with intent: pair warm yellows with soft creams, bronzes, and deep greens to echo autumn leaves. For contrast, tuck in cool-toned accents like blue salvias or purple asters at the margins to extend visual interest beyond peak bloom. Space matters. Tall varieties should anchor the back at roughly 24 to 30 inches apart, mid-height plants about 18 to 24 inches apart, and front-edge plants 8 to 12 inches apart. This spacing lets each plant shine while maintaining a cohesive flow. Remember to maintain repeated intervals for a cohesive look; repetition is more powerful than a random mix. If you want a more natural feel, stagger the placements so drifts occur rather than rigid rows. When selecting companions, choose drought-tolerant perennials that require similar sun and soil conditions. This reduces maintenance challenges and keeps your border vigorous throughout the season. The autumn rudbeckia border benefits from a deliberate mix of backbone, fillers, and spillers. For further guidance on rudbeckia varieties and pollinator value, see the Royal Horticultural Society page on rudbeckia.
For reference, a suggested starter palette could include Rudbeckia ‘Goldsturm’ as the backbone, Echinacea purpurea for late-summer color, Heliopsis helianthoides for extra height, Salvia nemorosa for blue-purple accents, and Sedum spectabile for late-season texture. If you prefer a softer transition into autumn, try turning the border into a mosaic with drifts of different heights arranged in gentle curves. The key is balance: plenty of light, steady moisture, and a rhythm that guides the eye along the border from back to front. The autumn rudbeckia border will reward you with a warm tapestry of color and biodiversity that supports pollinators as the season wanes.
Step 4: Spacing and rhythm to achieve a true autumn rudbeckia border
Rhythm is essential for a border that feels intentional and alive. Build a rhythm by repeating color blocks and plant heights. Place your tallest plants at the back or center so they anchor the scene, then step down with mid-height varieties, and finish with compact, ground-hugging specimens at the front. In practice, this means a visual ladder where the eye travels from tall to short without interruption. Maintain consistent spacing to prevent crowding; cramped roots lead to stressed plants and reduced bloom. Start with the back row and fill forward, adjusting plant positions as needed for a natural drift rather than a rigid grid. Consider seasonal overlap: plan bloom times so you have color from early summer through late autumn. Rudbeckia blooms massively in late summer and continues into autumn, but you can extend interest with companions that begin flowering earlier and last longer. Repetition is your ally. Repeating the same plant types in staggered pockets across the border creates unity and a more expansive feel. If your space allows, install a soft mulch edge that softens transitions and enhances soil moisture retention. Finally, keep an eye on sun exposure. If one area becomes too shaded by tree growth over the years, you may need to relocate a few plants to preserve rhythm and health. The goal is a dynamic, graceful autumn rudbeckia border with a steady cadence of color and life.
Step 5: Planting technique and timing for the autumn rudbeckia border
The moment of planting sets the trajectory for the border’s success. Spring is typically the best time for establishing rudbeckia, once the danger of hard frost has passed. In cooler climates, early summer plantings can work, but you must protect young transplants from heat and drought. If you live in a region with mild falls, autumn planting is possible, especially for divisions or purchased nursery stock that can root before winter. Prepare each root ball by gently loosening the roots with a light massage to encourage outward growth. Position the plant at the same depth as it was in the container, backfill with a soil mix rich in organic matter, and firm gently to remove air pockets. Water thoroughly after planting to settle the soil around the roots. Apply mulch around the base, keeping mulch a few inches away from the crown to prevent rot while preserving moisture. For tall perennials, stake them loosely if winds are frequent, but avoid heavy staking that can break stems or create an unnatural appearance. In terms of care, keep the soil evenly moist during the first two to three weeks; once established, reduce frequency but monitor deeply during dry periods. Spacing, as noted earlier, should reflect the intended rhythm; do not crowd plants to force faster growth. Implement a light feeding in early spring with a balanced fertilizer. This practice supports robust stems and vibrant blooms that characterize the autumn rudbeckia border. Finally, prune only as necessary. Remove dead or damaged stems soon after frost or at the end of winter to make room for new growth while maintaining structure.
Step 6: Maintenance plan for a thriving autumn rudbeckia border
Maintenance keeps the border looking polished through autumn and into early winter. Mulch remains your frontline defense against weeds and moisture fluctuations. Replenish mulch as it decomposes, aiming for a stable two to three inches depth. Irrigation should be deep and infrequent, encouraging deep root growth rather than shallow, water-wasting watering. Water deeply during dry spells and rely on rainfall when available. Deadheading can extend bloom; remove spent flowers to redirect energy to developing seeds and new growth. However, if you prefer natural seed distribution, you can leave a portion of blooms for self-seeding. Divide clumps every three to four years to maintain vigor and prevent overcrowding. Early spring is ideal for division, as new shoots push through with warmth and light. Fertilize lightly in spring and again after heavy bloom cycles, if needed, to support consistent growth. Watch for pests such as aphids on new growth and yellowing leaves on older plants. If you notice trouble, inspect the soil moisture and ensure good air circulation. A well-mannered autumn rudbeckia border also benefits from companion edge plants like Nepeta or thyme, which deter pests and increase pollinator visits. Finally, observe seasonal transitions. As frost edges closer, consider cutting back the border to encourage tidy, low regrowth and prepare the bed for the next season. The end result is a robust, long-lived border that keeps color and ecological value high into late autumn and early winter.
For readers who want a quick reference on plant choices and pollinator-friendly design, a reliable overview of rudbeckia varieties and their appeal to pollinators is available on the Royal Horticultural Society site. Rudbeckia care and varieties.
As you complete this step-by-step layout and planting plan, you will be ready to move into the next phase of design refinement and color strategy. In Part 3, we will explore Color and Variety Selection for a Pollinator-Friendly Autumn Border, where we will fine-tune color schemes, texture, and seasonal transitions to elevate your BloomHaven border to a showpiece.
Advanced Strategies and Final Guidance for an Autumn Rudbeckia Border
In this final module of the guide, we translate theory into actionable tactics that maximize color, pollinator attraction, and seasonal longevity for your autumn rudbeckia border. The goal is to move beyond single-season bloom into a resilient, multi‑season statement that remains aesthetically compelling from late summer through frost. Every strategy here is framed to work with real-world gardens, not just idealized plots, and to respect the needs of pollinators while delivering long-lasting structure and color for BloomHaven readers.
To ensure you can implement these ideas with confidence, we begin with a comprehensive, field‑tested workflow: assess, plan, plant, protect, and propagate. This cycle keeps the autumn rudbeckia border vibrant as light levels change, soils dry after summer heat, and populations of beneficial insects surge or wane. The emphasis is on precision in planting, discipline in maintenance, and creativity in design, so your border remains lively, low‑effort, and ecologically beneficial year after year.
Mastering Site Assessment and Plant Selection
Climate and Microclimate Considerations
Start with a microclimate audit. Note sun exposure, wind patterns, and drainage across the border. An autumn rudbeckia border thrives in full sun—minimum six hours a day—with well‑drained soil. If pockets of the border lean toward excess moisture, amend with organic matter and consider raised beds or drain channels to prevent rhizome rot and mildew. In autumn, cool nights can slow growth; plan for sunnier, drier microclimates within the border to maintain robust vigor and continuous color spillover. When you tailor plant placement to microclimates, you reduce stress on rudbeckia and improve late-season performance.
Soil pH typically falls in the mildly acidic to neutral range for rudbeckia. If your soil tests show extremes, adjust gradually with compost and a balanced fertilizer. Avoid sharp, sudden amendments that can shock roots. Your autumn rudbeckia border should feel cohesive from edge to edge, with microclimates guiding a natural distribution of taller and shorter plants to create depth.
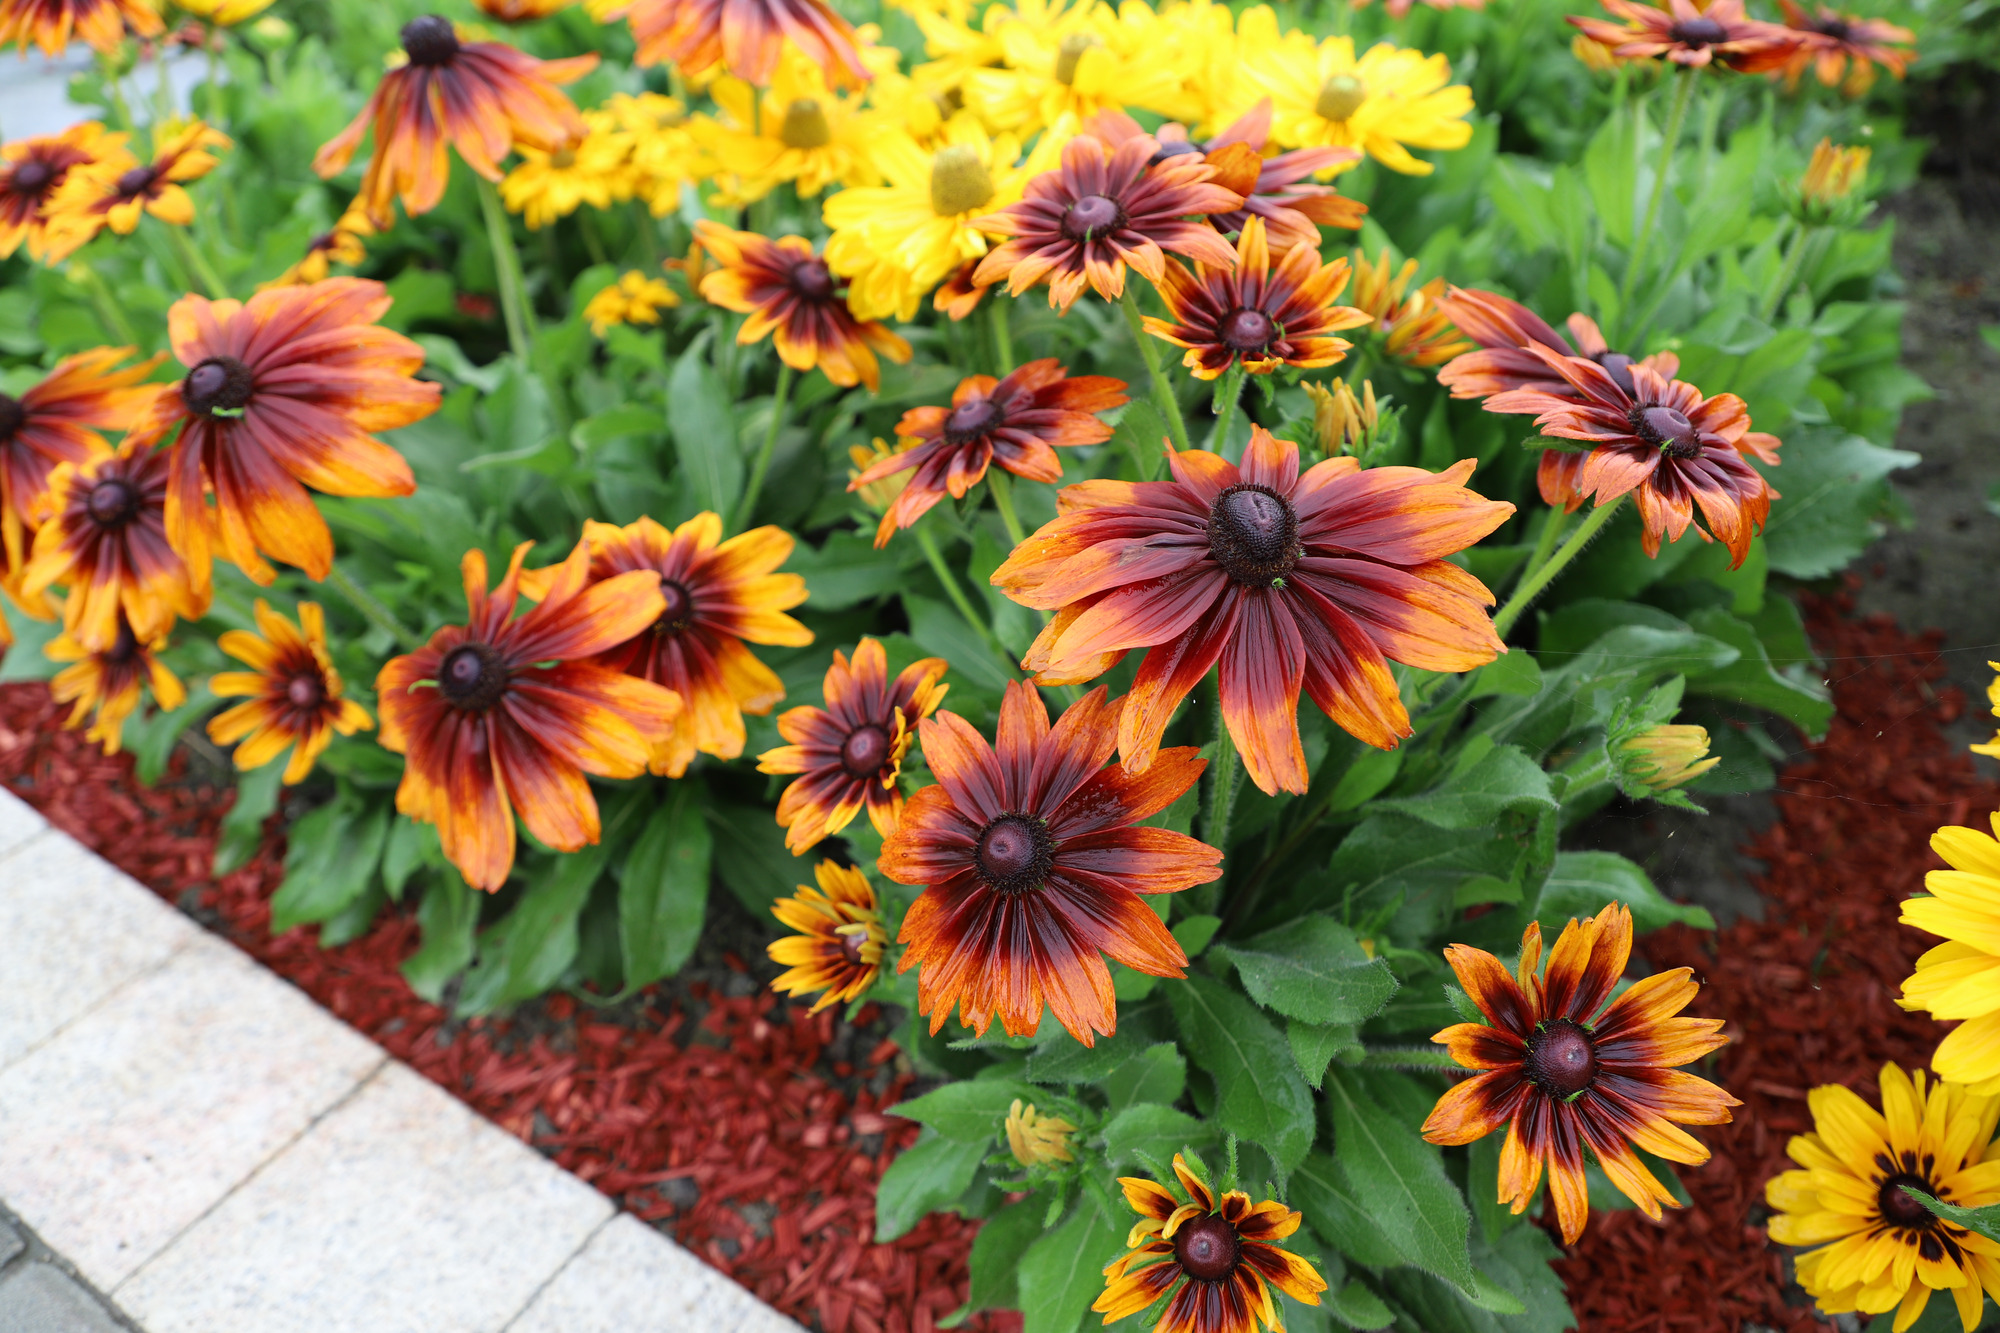
Rudbeckia Varieties for Autumn Border
Choose varieties that complement the iconic Goldsturm while providing extended color and disease resilience. Consider Rudbeckia fulgida cultivars for sturdy, durable bloom, and introduce a few ornamental companions that echo warm tones. For a robust autumn rudbeckia border, mix in late‑season perennials such as aster, agastache, or ornamental grasses that blanket the base with texture as rudbeckia approaches dormancy. When selecting varieties, prioritize disease resistance, drought tolerance, and pollinator appeal. A well‑composed border uses a palette of warm yellows, coppery oranges, and soft browns that transition gracefully from late summer through fall.
Practical planting notes: stagger planting so that taller forms do not shade shorter rudbeckia late in the season, preserve a gentle curved line rather than a rigid straight edge, and group plants in natural drifts rather than uniform blocks. This arrangement creates movement in the autumn rudbeckia border and provides room for beneficial insects to traverse the margin. If space allows, include a few early‑blooming companions to bridge the season, ensuring continuity even as rudbeckia fade in late autumn.
Planting Design for Height, Texture, and Color in Autumn
Layering by Height
Plan three vertical levels: ground cover and low mass at the front, mid‑height plants in the middle, and tall backdrops at the rear. This layering guarantees a lush autumn rudbeckia border with visible blooms and leaves from the street or garden path. Keep panicles and seed heads intact for a long display of architectural value. With careful spacing, you avoid crowding that can lead to moisture pooling and disease pressure during wet spells.
Implement a dynamic rhythm: alternate blocks of 2–4 rudbeckia plants with lighter, airy companions to prevent visual fatigue. This rhythm ensures the autumn rudbeckia border remains engaging even as individual plants drift through different phases of bloom. Mid‑season height balance is essential; if you overplant tall varieties toward the front, you lose the layered effect that makes autumn borders so compelling to the eye and to pollinators alike.
Color Transitions from Summer to Fall
Leverage the warm palette of rudbeckia to carry color into late autumn. Pair yellow blooms with deep burgundy, copper, or bronze foliage tones from nearby grasses and perennials. The autumn rudbeckia border benefits from gentle color transitions rather than abrupt shifts. For instance, pair Rudbeckia laciniata with dark‑leaf cultivars of echinacea or coreopsis, so the border reads as a cohesive heat wave of color that continues into cooler months. Incorporate seed heads as textural features that glint in the late afternoon light. When planning color, consider the surrounding landscape to ensure the border harmonizes with existing plantings while still standing out as a focal point in autumn.
Texture matters as well. Combine smooth, shiny leaves with astral seed heads, and contrast broad towels of foliage with fine, lacy grasses. The autumn rudbeckia border becomes a tapestry rather than a single note, inviting closer inspection by pollinators and humans alike.
Pollinator-Friendly Combinations
Design for continuous bloom and nectar sources. While rudbeckia bloom heavily in late summer, pair them with late bloomers such as rudbeckia’s late‑season companions, asters, solidago (goldenrod), and sedums that attract bees, butterflies, and even hummingbirds. Include nectar-rich perennials with complementary bloom times to keep the border vibrant when rudbeckia start to fade. A well‑planned blend ensures your autumn rudbeckia border remains a beacon for pollinators and a magnet for garden visitors. Remember to avoid dense, monolithic plantings that reduce airflow and invite mildew; instead, celebrate openness and air movement to protect plant health.
Soil Health, Fertility, and Water Management
Soil Preparation and Amendments
Healthy soil underpins every thriving autumn rudbeckia border. Begin with a soil test to determine baseline nutrients and pH. Incorporate well‑aged compost to enhance microbial life, water‑holding capacity, and soil structure. Avoid heavy additions of high‑nitrogen fertilizers late in the season, which can encourage lush foliage at the expense of flower production. Instead, opt for balanced fertility that supports robust root systems and enduring bloom. For autumn borders, a modest application of slow‑release fertilizer in early spring and a light top‑dressing of compost in late summer can improve vigor without forcing excessive vegetative growth.
Mulch after planting with a 2–3 inch layer of organic mulch such as shredded leaves or bark. Mulching stabilizes soil temperature, moderates moisture fluctuations, and reduces weed competition. In the autumn rudbeckia border, mulch also helps retain moisture during dry spells and cedes space to warmer microclimates within the border that support late-season growth.
Mulching and Moisture Retention
Mulch is a multi‑purpose tool. It protects shallow rudbeckia roots, reduces evaporative loss, and adds organic matter as it decomposes. Replenish mulch annually to maintain the 2–3 inch depth. In regions with winter freeze/thaw cycles, a thicker mulch layer can shield plants from soil heaving. Position mulch away from the crown to prevent rot while still covering the root zone. In the autumn rudbeckia border, mulch also creates a soft edge that helps transitional color to blend with nearby plantings, improving the overall aesthetic during late summer and fall days.
Sustainable Irrigation Practices
Automatic irrigation systems should deliver deep, infrequent soakings rather than frequent, shallow waterings. Rudbeckia prefer well‑drained soils that retain moisture between rain events. Water at ground level to minimize foliage diseases that can plague leaves during humid periods. In drier climates, consider a drip irrigation line beneath mulch to deliver moisture directly to the root zone. In autumn, reduce irrigation gradually as nights cool and plants quit actively growing. This helps promote seed formation and better frost tolerance while preserving root reserves for the following season.
To support sustainable water management, collect rainwater in barrels where possible and time watering to coincide with cooler parts of the day. A well‑designed irrigation plan reduces water waste and promotes a healthier autumn rudbeckia border with lower disease pressure. For ongoing learning, consult local extension resources or horticultural guides that address climate‑specific watering needs.
Maintenance Cheatsheet for Plant Health and Longevity
Pruning and Deadheading
Develop a routine that preserves vigor while encouraging a longer display of color. Deadheading spent flowers encourages a second flush on many rudbeckia cultivars, though some gardeners appreciate seed heads for winter interest. In the autumn rudbeckia border, strike a balance: remove faded blooms to maintain visual clarity, but leave a few seed heads as natural ornaments that provide texture and food for birds.