Peony Support Cage DIY Plans: Build & Protect
Growing peonies brings lasting beauty to any garden, but their lush blooms can overwhelm stems and topple in windy weather. A robust peony support cage is essential to keep every flower upright, protect emerging shoots, and extend the plant’s life in a busy, sun-drenched bed. In this guide to Foundational Peony Support Cage Plans for a Sturdy Garden Bed, we’ll walk you through practical, affordable designs that balance strength with garden aesthetics. By the end, you’ll have a clear plan to choose materials, size, and layout that fits your bed and climate, so your peonies stand tall year after year, even when the weather tests them.
Foundational Peony Support Cage Plans for a Sturdy Garden Bed
What a peony support cage does for your garden
Peonies reward gardeners with spectacular blooms, but their heavy flower heads can bend stems and shade nearby plants if unprotected. A peony support cage acts like a lightweight scaffold, giving stems a guiding frame so blooms rise gracefully rather than flop toward the soil. Crucially, a well sized cage preserves air flow around the foliage, reduces foliage rot after storms, and minimizes soil splash that can invite fungal issues. Therefore, you reduce maintenance time and increase the chance of a full, eye catching display each late spring.
With a foundational plan, you can install a cage that blends with your garden design. It holds petals upright while allowing foliage to breathe. In addition, a cage that fits your peonies’ mature width can be adjusted over successive seasons, so you aren’t forced into repeated replacements as plants grow.
Foundational design goals for a peony support cage in a sturdy garden bed
- Provide vertical support without crowding stems or crowding the bed’s space
- Use corrosion resistant materials suitable for 2026 garden beds
- Allow for natural movement in windy weather without snapping stems
- Be easy to assemble, install, and adjust during the growing season
- Keep costs predictable and materials readily available at local retailers
In addition to these goals, the design should be modular enough to accommodate different bed sizes and sun exposures. Therefore, plan for an adjustable height and a frame width that suits the peony’s root spread. Crucially, you want simple components that can be repaired or replaced without tearing the bed apart.
Materials you’ll need for a peony support cage
- Galvanized steel rods or heavy gauge wire for the frame (1/8 to 1/4 inch thick)
- Flexible garden netting or welded wire panels that won’t sag under bloom weight
- Connectors, zip ties, or U brackets to lock the frame together
- PVC sleeves or plant-safe padding to protect stems from hard edges
- Adjustable crossbars or hoops to create a curved crown over flowering stems
- A few stake anchors or ground spikes to secure the cage to the bed
- Basic tools: pliers, a wrench, measuring tape, and a knot-safe saw or cutter
For a quick overview of stake guidelines, see How to Stake Peonies.
Sizing and bed prep considerations for a peony support cage
Start by measuring the bed width and the typical spread of your peony clumps at full bloom. If you have a standard 4 ft by 8 ft bed, you can center a cage that runs roughly 2 ft by 2 ft per plant, with extra room for the stems to swing. Consider the mature height of your varieties; some peonies grow tall enough to require a cage that rises 3 ft or more above soil. In addition, think about access: you’ll want enough room to prune, deadhead, and water without removing the cage. Therefore, plan for a frame that can be opened or temporarily removed for maintenance. If you expect heavy rainfall or strong winds, allow extra clearance so the cage does not channel water onto the crowns or rub against leaf tips.
Step-by-step foundational build plan for a peony support cage
- Prepare the bed: remove weeds, lay down ground fabric if you use mulch, and mark placement for the cage corners; this ensures a square or rectangular footprint that sits flat with the soil.
- Cut frame pieces to length, using galvanized steel or stainless steel to minimize corrosion; smooth edges with a file or sandpaper so no sharp edges touch foliage.
- Assemble a low perimeter frame first, then add vertical supports at each corner to create a stable base that won’t flex in storms.
- Attach horizontal crossbars at predetermined heights to guide stem growth; use clamps or brackets to secure crossbars without drilling into the main frame.
- Slip protective sleeves over any sharp edges and position the crossbars so they form a crown over the bloom zone, not on top of it.
- Incrementally adjust the height as the plant grows; release or tighten connections to accommodate the expanding crown and keep stems supported without constriction.
Maintenance is simple: inspect the cage after storms, wipe off debris, and tighten fasteners as needed. This routine ensures longevity and keeps peonies looking intentional rather than engineered. In addition, inspect the lattice or netting for sagging areas and replace any weak panels to prevent blooms from becoming stuck.
Next, Part 2—Advanced Build Variants and Maintenance for Peony Support Cages will explore customizable cage sizes, weatherproof materials, and long-term care strategies to keep your plants protected season after season.
Core Construction and Installation Steps for a Peony Support Cage
Planning and materials selection set the foundation for a sturdy peony support cage. This component of a peony care plan protects heavy bloom heads and prevents breakage during gusty weather. In 2026, gardeners increasingly prefer cages that are both unobtrusive and long-lasting, so we focus on corrosion resistance, stability, and ease of installation. Before you cut a single piece, picture the final silhouette around the peony clump and ensure there is at least a few inches of clearance around the crown for root expansion and seasonal growth. The peony support cage should feel like a natural extension of the plant, providing support without crowding promising new shoots. A well-planned approach minimizes future adjustments and keeps the focus on the flowers themselves. This section walks you through concrete, field-tested steps to translate that plan into a sturdy, attractive peony support cage that will perform through multiple seasons.
In this core construction guide, we emphasize a balance between rigidity and flexibility. The peony support cage must resist wind and the weight of dense bloom clusters while remaining forgiving enough to accommodate growth and occasional storm gusts. You’ll want to choose components with generous load margins and a design that distributes force evenly around the stems rather than concentrating it in one area. The emphasis on even load distribution protects stems from snapping and helps buds stay upright as they mature. As you proceed, remember that precision in the early build translates to long-term reliability; a slightly slower, more careful assembly now prevents frustrating rework later. With a durable frame and properly attached mesh, the peony takes center stage, and the cage quietly does its part to protect the display.
When building a peony support cage, you also lay the groundwork for straightforward seasonal maintenance. A robust, well-fastened frame reduces the need for frequent tightening and makes inspection quick and efficient. This is particularly important for dense varieties where heavy, late-season blooms can add significant weight. The goal is not to create a fortress around the plant but to supply a stable, clean scaffold that supports stems and allows light to reach foliage. If you follow these steps carefully, you’ll produce a cage that remains unobtrusive as the plant expands, while still providing the strong support necessary to keep blooms upright and appealing for pollinators and admirers alike.
As you prepare to install, consider the surrounding bed: soil type, drainage, and nearby plants that might influence wind flow and accessibility. A peony show is a focal point in any garden, but the structural cage should recede aesthetically into the landscape while delivering the needed protection. With thoughtful planning, you’ll gain a durable peony support cage that requires only periodic inspection and minor adjustments, making it a smart investment for 2026 and beyond.
Planning the Cage: Dimensions, Placement, and Growth Expectations
Start with a clear mental model of the mature plant. The peony support cage should frame the bloom clusters without constraining new shoots or bracts. A practical rule of thumb is to provide 2 to 3 inches of clearance around the crown and to extend the top of the cage at least 18 to 24 inches above the tallest bloom spike. In many garden configurations, a cage roughly 4 to 5 feet tall and 2 to 3 feet wide at the base accommodates a wide range of peony varieties, from herbaceous to tree peonies, while leaving room for foliage to breathe. If you plant several peonies in a single bed, a wider, multi-panel cage helps manage growth without forcing plants into a tight crowd. Consider prevailing wind direction, which influences the cage’s orientation; placing the open side toward the wind can reduce direct impact on stems while ensuring that blooms remain accessible for pruning and pollinators. Also evaluate seasonal sun exposure—excessive shade around the crown can slow growth, whereas too much heat can desiccate stems in late summer. Finally, map out future growth so you aren’t forced to relocate the cage as plants mature. The peony support cage, when sized and oriented correctly, merges with the garden’s rhythm rather than interrupting it.
Next, determine the base footprint and the frame’s geometry. A square or slightly rectangular design provides predictable weight distribution and straightforward assembly. Some growers prefer hexagonal or octagonal shapes to better accommodate sprawling stems and ensure even support around the crown. The ultimate objective is to maintain airflow while keeping the plant upright against wind uplift. For tall varieties with heavy heads, you may decide to use an additional internal brace or a secondary ring to diffuse pressure. When you finalize dimensions, sketch or measure exact lengths for each frame member, so you avoid last-minute adjustments that can compromise stability. By prioritizing dimension accuracy and alignment, you’ll reduce friction between stems and metal, preserving plant vigor and the beauty of the blooms.
In practice, the cage should be easy to install with common garden tools, even for first-time builders. If your bed is uneven, plan a base that sits level and accommodates minor ground contours without pressing on the crown. The peony’s roots need steady soil contact, so ensure the cage sits just above the root zone. Finally, keep a margin for future pruning and occasional re-staking as the plant grows taller. A well-planned cage will not only protect your peonies but also simplify routine garden maintenance and visual enjoyment throughout the season.
Materials and Tools You’ll Want for a Long-Lasting Peony Support Cage
Choosing the right materials is essential for a peony support cage that lasts beyond a single season. For most backyard peonies, galvanized steel offers a strong, affordable option that resists rust and fatigue. Stainless steel is excellent in damp soils or coastal environments, though it costs more. Powder-coated aluminum combines light weight with corrosion resistance and a cleaner finish. For those who prefer simple construction, heavy-duty PVC can be used with internal bracing, but it may sag in heat or become brittle in cold snaps. The key is to balance stiffness with flexibility so the cage can bend slightly under wind without failing. In addition to the frame, you’ll need connectors that won’t corrode or loosen with time. Stainless steel bolts or rust-resistant nuts and washers are ideal for joints, while heavy-duty zip ties provide quick, non-permanent tie-downs for mesh or lattice. Consider also corner brackets, clamps, and a rust-inhibiting paint or coating for any exposed hardware. Your goal is a frame that stays rigid under load yet allows the plant a small amount of movement to prevent the stems from becoming overly stressed. Tools to gather include a measuring tape, metal snips or a hacksaw suitable for your material, a drill with the correct bit size, a wrench or pliers, a rubber mallet for careful adjustments, and work gloves to protect hands during cutting and assembly. With the proper mix of material choices, fasteners, and protective finishes, your peony support cage will perform well across seasons and weather conditions.
As you consider options, also think about maintenance implications. Stainless or galvanized components resist corrosion and require less frequent replacement, which is a meaningful time and cost savings over several growing cycles. If you choose aluminum, verify the coating’s durability and plan for re-coating every few years to maintain protection. Finally, keep a few spare fasteners and mesh patches on hand so you can respond quickly to minor wear after a hard freeze or a heavy storm. A thoughtful material selection reduces maintenance headaches and makes the peony support cage a reliable garden workhorse.
For practical guidance on staking peonies that complements the cage approach, you can consult a trusted resource like the Old Farmer’s Almanac. Their straightforward staking tips offer a useful baseline for supporting heavy blooms without constraining growth: Staking peonies.
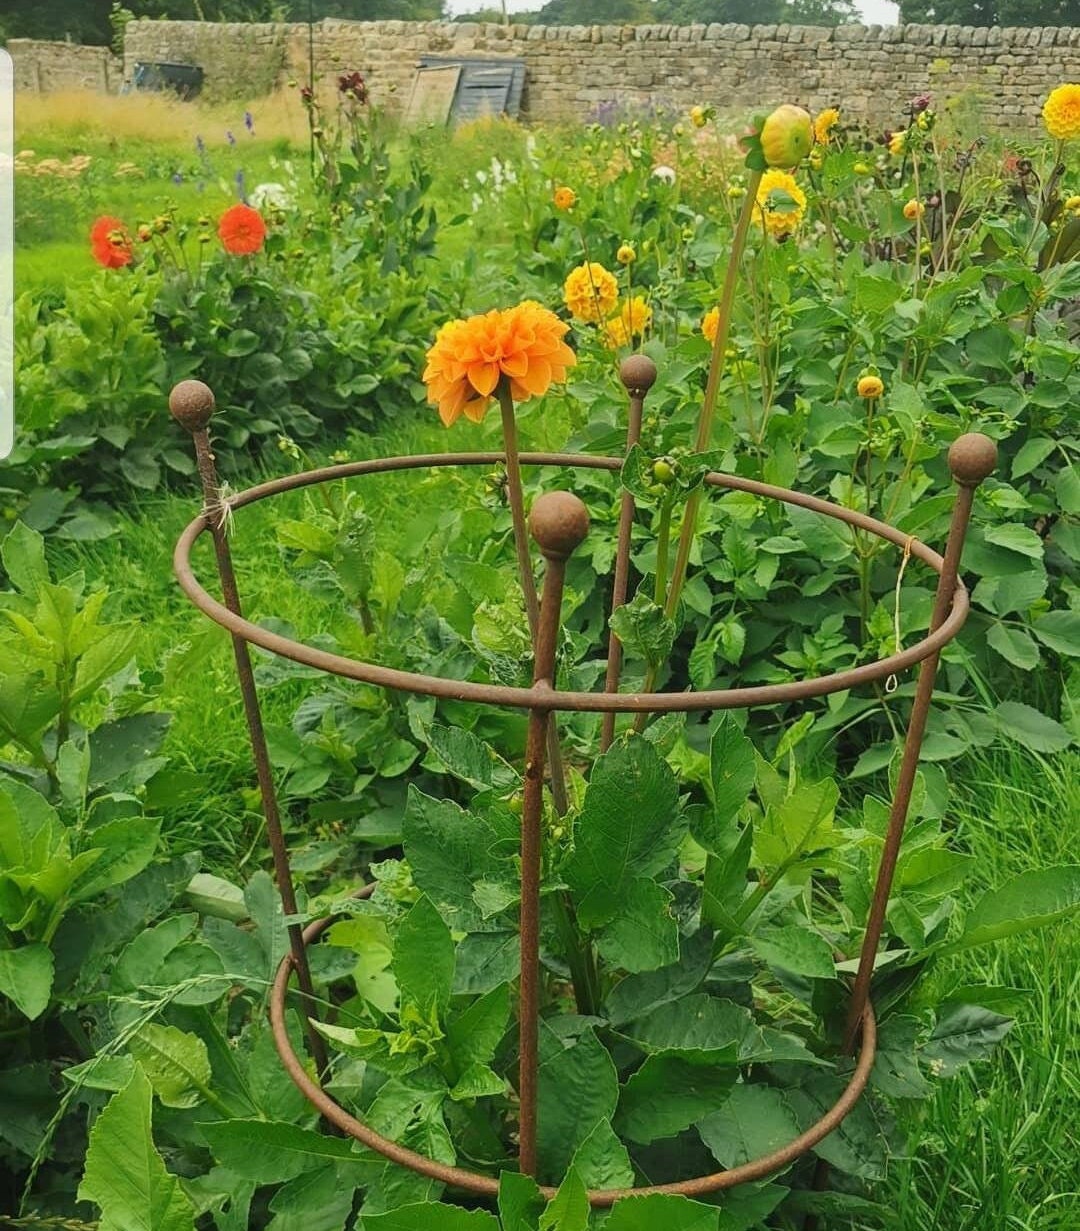
Frame Construction: How to Cut, Assemble, and Secure Joints
Accurate cutting and precise joints create the backbone of a reliable peony support cage. Start by marking the frame pieces according to your planned dimensions. If you’re building a cube or a 4-sided frame, ensure each corner is square; a misaligned corner invites wobble and reduces wind resistance. For a more open look, a hexagonal or octagonal frame distributes pressure more evenly across the stems and keeps foliage from rubbing against the mesh. When you cut framed panels, use a quality metal saw or snips appropriate to the chosen material. Always deburr edges to prevent cuts and to reduce moisture traps that can lead to corrosion. A common approach is to join sections with stainless steel brackets at each corner or with a simple threaded rod running through drilled holes in framing members. For added rigidity, you can install a cross-brace or diagonal support on taller cages. The peony support cage benefits from this extra bracing, especially at the points where wind loads are highest or where the plant forms a tight dome of growth. After assembly, check the frame for any flex by applying gentle pressure with both hands; any wobble indicates a loose joint that should be tightened before the cage is installed in the garden. A well-built frame makes the cage instantly sturdy, reducing maintenance needs during the growing season.
Cutting Techniques and Safety for the Peony Cage Noting safety is essential when cutting metal. Use eye protection and gloves, and keep the work area clear of bystanders. When you notch or trim pieces, file the edges smooth to minimize snagging on clothing or skin. If you’re installing a taller cage, work with a helper to hold pieces in place while you secure fasteners. This two-person method prevents slips that could cause injuries or damage the frame. After cutting, you can pre-drill holes for bolts to ensure alignment and speed installation. In all cases, maintain a clean, dry workspace to reduce the risk of rust or misalignment. The goal is to have a precise fit that resists bending, not to force pieces together through sheer force. A precise cut and careful assembly step dramatically improves the long-term performance of the peony support cage.
Joining Methods: Bolts, Clips, and Quick Connects For sturdy, repeatable joints, bolts with lock nuts provide the most secure connection, particularly where the frame interfaces with a base or a cross-brace. If you opt for simpler assembly, robust stainless steel clamps or heavy-duty zip ties can work, but they may loosen over time in high winds or exposure to sun. The peony support cage benefits from a hybrid approach: use bolts at critical corners and use cable ties or clamps for non-load-bearing cross-braces. When you tighten fasteners, do not overtighten; you can strip threads or warp light-gauge metal. Consider applying a small amount of anti-seize compound on threads to reduce galling, and periodically re-tighten joints as the plant grows and as seasons change. A well-fastened joint resists oscillation, which is particularly important for larger peony blooms that add substantial weight to the stems. Regardless of method, every connection should be tested for firmness with a gentle shake and readjusted if any movement is detected. A stable frame is the foundation of a successful peony support cage.
Mesh or Lattice: How to Choose and Attach for Airflow and Support
Mesh or lattice material is chosen to balance airflow, light penetration, and support for heavy blooms. A fine mesh can protect buds from swelling pests while allowing sunlight to reach the leaves. For peonies, a mesh with 1/2 inch to 1 inch square openings generally works well, providing enough support without snags on new growth. Material choices include welded wire mesh, expanded metal, or perforated panels; each has different rigidity and price points. Consider coating options that resist rust and minimize staining on stems or foliage. When attaching mesh to the frame, align the mesh evenly and secure it with stainless steel staples, zip ties, or small clamps. Start at one corner and move methodically around the frame, pulling taut to avoid sagging while maintaining some give to accommodate shifting stems. By maintaining consistent tension, the peony support cage keeps a pleasant form as the plant expands and flowers open. As with any structure exposed to weather, routinely inspect the mesh for corrosion or loose ties and replace any damaged sections promptly. A well-chosen mesh enhances both aesthetics and plant health, ensuring blooms remain the focal point rather than the cage drawing attention away from the peonies.
Practical Tips for Attaching Mesh When you attach mesh to the frame, leave a slight margin between the mesh and the crown so emerging shoots have space to grow without rubbing against the metal. If you’re using ties, space them every 6 to 8 inches around the frame to distribute load evenly. For added stability, consider running a light cross-brace along the back of the cage to resist bending in windy conditions. In addition, you can install a small climate cover or shade cloth during peak heat weeks, but ensure it does not trap excessive moisture around the stems. The peony will appreciate a structure that stays rigid during heavy storms, yet flexible enough to adapt to rain and wind. For gardeners who want to minimize maintenance, you can pre-cut panel sections and store them for quick future installs. A little planning here pays off when you need to secure the vicinity quickly during a late-season wind event. You can also refer to practical guides such as staking guides from trusted sources like the Old Farmer’s Almanac for a broader understanding of passive support strategies.
Installation and Placement: Positioning Your Peony and Cage
Now you’re ready to place the assembled peony support cage around the plant. Gently loosen surrounding mulch and lift the plant crown to allow the base to sit within the cage with a margin for roots and soil. Avoid pressing the cage down onto the crown; the cage should sit a short distance away to accommodate root expansion. When you slide the cage into place, orient it so the open sides face the direction of the prevailing wind for better wind loading management. This orientation helps protect the stems from gusts while keeping blooms accessible for viewing and pollination. As you set the frame, keep a clear path around the peony for maintenance, pruning, and any future staking adjustments. In many garden beds, you’ll find that a square frame works best for compact clusters, while a broader, multi-panel design handles larger or spreading varieties with grace. The peony support cage becomes a defined boundary for the plant, guiding growth in a controlled, aesthetically pleasing manner.
When securing the cage in place, test for level alignment and re-check soil contact. If the bed has uneven terrain, you may need to adjust the base by lifting light-to-midweight frames slightly on one side to compensate. The goal is to maintain a stable stance without applying upward pressure on the crown. If drainage is an issue in heavy rain, you can create a shallow gravel trench under the base to improve water flow and reduce moisture buildup around the roots. A thoughtful placement plan saves time during installation and makes future maintenance quick and straightforward.
Anchoring for Wind Resistance: Stakes, Guy Lines, and Corner Braces
Wind can challenge a peony through the growing season, so ensure your peony support cage is anchored properly. A simple base with stakes driven into the ground at each corner creates a strong anchor, but you can boost stability by adding guy lines to the sides that face open wind directions. Use garden stakes or rebar for the corner anchors, and secure the lines with proper knots that won’t slip under tension. If the planting area has soft soil, drive stakes at a slight angle away from the plant rather than straight down to improve resistance to lateral forces. For taller cages, add corner braces that connect the top frame to the base. These braces take some weight off the joints and keep the structure from deforming during heavy rain or storms. The combination of stakes, guy lines, and braces minimizes sway, reduces stem rubbing against metal, and preserves the health of the plant through late-spring winds and early-summer storms. With careful anchoring, the peony remains upright and blossoms remain prominent, even under challenging weather.
If you’re in a windy area, consider adding additional anchoring points along the frame’s midsection. These mid-frame anchors help resist lateral bending when gusts hit the plant broadside. Ensure that your lines or wires are not placed where they could rub against flowering stems as they grow longer. The aim is to create a stable, resilient structure that tolerates seasonal shifts without compromising the peony’s vigor or beauty.
Finishing Touches: Aesthetics, Access, and Durability
A peony support cage does not have to be an eyesore. In fact, you can choose a finish that blends with the garden or stands out as a neat architectural element. If the frame is unpainted metal, consider a clear protective coating to slow corrosion, especially in wet climates. Paint or powder-coat the exterior components to match a fence line or a trellis color. Ensure that the finish remains breathable and does not trap moisture against the metal, which could promote rust over time. For accessibility, design the cage with one side left slightly more open so you can reach the plant for pruning, deadheading, or staking adjustments as blooms mature. The peony support cage should enable quick inspection for pests and disease while keeping its structural integrity. A well-tended finish extends the life of the cage and reduces the frequency of replacement, saving time and resources in the long run. If you prefer a minimalist look, choose a low-profile profile that sits close to the ground and blends with the plant’s natural shape, while still providing essential support for heavy clusters.
Consider integrating the cage with existing garden features by selecting a color or finish that complements other structures within view, such as a fence, trellis, or decorative edging. A cohesive visual approach makes the peony display more striking and cohesive, while the functional cage remains its quiet workhorse. Finally, document your build with a simple photo log so you can replicate the same setup for future peonies or nearby varieties. A consistent approach across your beds makes maintenance predictable and efficient.
Maintenance, Adjustment, and Seasonal Care
As the growing season unfolds, you’ll want to inspect the peony support cage at least every two weeks for signs of stress. Look for bent members, loose fasteners, and any sag in the mesh. In 2026, many gardeners prefer a lightweight yet sturdy frame that can be adjusted as the plant grows. If you notice a few stems leaning toward a corner, you can loosen a fastener, slide a brace into place, and re-tighten. Seasonal changes may require you to raise or lower the arching sections to accommodate new blooms. Keep an eye on the base after heavy rains; soft soil can allow the frame to shift slightly, so you may need to re-anchor. Periodic cleaning helps prevent corrosion by removing soil deposits and organic matter that cling to joints. The peony care routine benefits from a consistent maintenance window that becomes a habit over time, especially for larger, later-blooming varieties. By staying proactive, you ensure that the cage supports the plant without constraining it. And in cases where you need quick temporary protection for a severe storm, you can add a loose protective cover that does not hold moisture against the stems.
Record any adjustments you make in a garden journal or a digital note. A short log helps you anticipate next year’s needs, saving you from surprises when the plant enters its most vigorous growth phase. If you find that a particular corner tends to loosen after heavy rain, reinforce with an extra brace or a longer stake. Seasonal care also includes cleaning the frame at the end of the season to remove soil, leaf litter, and any organic matter that could trap moisture and promote rust. Each maintenance step helps the peony stay healthy and vibrant, while the cage remains a reliable, long-lasting support system.
Troubleshooting Common Issues
Even with careful planning, you may encounter issues with your peony support cage. Sagging mesh at the bottom might occur after a heavy rain or when the plant produces exceptionally heavy blooms. If sagging happens, loosen the surrounding ties, reposition a brace, or add a reinforcing cross member to lift the sag. If the frame shows slight twisting from wind, re-tension the connections and re-anchor the base. For peonies that rub against metal, check the interior attachments and ensure the mesh is pulled evenly around the plant. Another common issue is corrosion on unprotected joints; address this by applying a rust-inhibitor coating and resealing with a protective finish. In some cases, you may need to replace a rusted clip or a damaged section of mesh, which is simpler than replacing the entire cage. The goal of troubleshooting is to preserve airflow and plant health while keeping the structure robust against weather and time. A proactive approach minimizes downtime and keeps your peony display intact throughout the flowering season.
If you notice persistent stalk breakage despite the cage, evaluate whether you need additional internal supports or a larger top ring to distribute weight more effectively. If staking becomes a recurring task, consider reconfiguring the design to add more cross-bracing that shares load across a broader area. Finally, check for pests or diseases that might weaken stems or hardware; addressing these early helps protect both the plant and the structure. A thoughtful troubleshooting process ensures your peonies remain a reliable, year-after-year focal point in your garden.
Final Checklists, Quick Reference, and What Comes Next
Before you close the project, do a final pass over every joint and fastener. Verify the cage remains at the correct height above the crown, confirm that there is adequate clearance for new growth, and check the ground anchors for stability. A quick final inspection reduces the chance of late-season failures, such as winged stems or bent panels, that could compromise the plant. Remember that the peony support cage is a living support system; as the plant grows, you may need to adjust tension, re-anchor, or reposition components. In short, the cage should be adaptable while maintaining a neat silhouette in the garden. In Part 3, titled “Maintenance and Long-Term Care for Peony Support Cages,” we will explore maintenance schedules, seasonal adjustments, and practical fixes to keep your system performing season after season.
Advanced Maintenance and Design Tweaks for a Long-Lasting Peony Support Cage
Beyond basic assembly, true longevity comes from a disciplined maintenance routine and smart design tweaks that anticipate growth, weather, and daily garden use. In this final section, we outline a thorough approach to keep your structure reliable year after year. The goal is a peony support cage that holds heavy bloom clusters without sagging, rusting, or losing shape as seasons change.
Regular Maintenance Schedule for a peony support cage
Set a rhythm that matches your growing season. Short, routine checks prevent major failures and protect blooms. A consistent cadence also helps you catch wear before it becomes costly.
- Spring post-bloom inspection: tighten fasteners, recheck joints, and remove debris from around the base of the cage.
- Early summer adjustments: ensure blooms aren’t crowding the cage; adjust height or add a brace if heavy heads risk bending a rod.
- Fall readiness: inspect for wind damage, replace corroded parts, and anchor more deeply if the soil has settled.
- Winter prep: clean, dry, and store components or apply a breathable protective cover to prevent moisture ingress and freeze-thaw damage.
Monthly checks you can perform
Even during busy months, a quick routine helps. Examine for rust spots on metal, loose screws, bent rods, and signs of material fatigue. If you notice movement when you shake the frame, stop and tighten before blooms form. Regular touch-ups reduce the risk of mid-season failures in a peony support cage.
Record-keeping and traceability
Maintain a simple log with date, part replaced, and notes on performance. A quick ledger helps you plan upgrades for next season and track the cage’s life expectancy. Over time, this history informs smarter component choices and better long-term stability for your peony support cage.
Design Tweaks to Extend the life of a peony support cage
Design matters as much as diligence. Small tweaks now save larger repairs later, especially as peony clumps expand and blooms grow heavier.
Choosing materials for a peony support cage
Popular options include stainless steel, galvanized steel, and powder-coated aluminum. Each offers different advantages in corrosion resistance, weight, cost, and ease of maintenance. For a climate with frequent showers or heavy humidity, a robust peony support cage built from stainless or galvanised steel with a durable powder coat provides long-lasting performance and minimal upkeep.
Joints and fasteners that endure
Use corrosion-resistant hardware, such as stainless or hot-dip galvanized components. Reinforced joints and locking connectors prevent wobble as the plant grows. Avoid cheap plastics in joints that face temperature swings; if you must use plastic caps, choose UV-stable varieties and replace them periodically. These choices directly affect the longevity of your peony support cage.
Protective coatings and corrosion control
Coatings add a sacrificial layer that slows rust and wear. Regularly inspect coated areas for chips; touch up with manufacturer-approved paint or powder-coat refinishing. A well-maintained coating reduces friction at moving points and maintains a tidy appearance for your peony support cage.
Weather Resilience and Anchoring for a peony support cage
Weather is the silent designer of garden structures. Strong anchors and smart geometry keep your peony support cage stable through storms, heat waves, and fast-changing soils.
Anchoring strategies for wind and wet soils
Use ground anchors, augers, or masonry anchors depending on soil type. In sandy or clay soils, drive stakes at a slight angle for uplift resistance. For tall cages or heavy blooms, consider cross-bracing and triangulated anchors to distribute wind loads evenly. Proper anchoring directly protects the integrity of the peony support cage.
Seasonal weather considerations
Plan for spring storms, summer gusts, and winter freeze-thaw cycles. Loosen or re-tension cables after heavy rains to prevent slippage. If you notice ground heave, re-level the base and re-seat anchors to maintain a solid footing for the peony support cage.
Modular Design and Reconfiguration for a peony support cage
Modularity allows the cage to grow with your peonies. A flexible layout reduces the need for complete replacement and enables quick adaptations as plant size shifts.
Expandable grids and adjustable height for a peony support cage
Choose panels with common interlocks and height increments of 2–4 inches. This makes it easy to raise the cage as peonies reach for higher clouds of bloom. Snap-together connectors let you expand without disassembly, keeping disruption to a minimum during the growing season. With a peony support cage that scales, you preserve stability while accommodating bigger blooms.
Reconfiguring around clumps and border beds
Opt for circular, U-shape, or polygon layouts that surround the plant with generous airflow and light. Use flexible ties or quick-release clamps to re-anchor panels as you reconfigure. A well-planned layout maintains bloom access and reduces abrasion on stems, ensuring your peony support cage supports every stem without stress.
Troubleshooting Common Issues with a peony support cage
Even the best designs face challenges. Anticipate common problems and have remedies ready to minimize downtime and protect blooms.
Sagging panels and bent rods
Response options include upgrading to higher-grade rods, adding cross-bracing, or distributing load with diagonal supports. If you catch sag early, you can strapping the mid-span temporarily while replacing weak sections. Regularly check soil moisture and anchor stability, since moist soils can shift bases and encourage slippage for a peony support cage.
Pests and disease considerations around a peony support cage
The cage itself doesn’t cure disease, but it influences airflow and moisture distribution. Keep leaves dry by avoiding bootstrap-style water traps at joints, and clean debris that could harbor pests. If rust or staining appears, treat promptly with appropriate horticultural products and avoid contact with foliage. A clean, well-drained zone around the peony support cage reduces pest pressure and disease risk.
Aesthetics, Finishes, and Safe Hardware for a peony support cage
Form meets function when hardware is chosen with both safety and garden design in mind. A discreet, high-quality finish helps the cage blend with plant textures and bed edges.
Finishes and visibility
Powder coatings, color-matched hardware, and rounded edges reduce visual disruption and enhance safety. Hidden fasteners minimize snagging on clothing or gloves and improve the user experience during maintenance. For a cohesive garden look, align finishes with fence or trellis finishes and keep the aesthetics of your peony support cage consistent with the landscape.
Fasteners, edges, and accessibility
Use rounded edge profiles and accessible fasteners for quick maintenance. Color coding screws or bolts speeds up replacements and reduces the chance of installing the wrong part. These tiny details protect the long-term integrity of the peony support cage.
Conclusion: Final thoughts on a thriving peony support cage
Advanced maintenance and design tweaks ensure your peony support cage stays strong year after year. A regular schedule, smart material choices, and modular design make the cage adaptable as peonies grow and weather changes come. Ultimately, the combination of vigilance and thoughtful upgrades yields better blooms, steadier support, and a garden that radiates health. For gardeners seeking longevity, remember that the peony support cage is not just a stake—it’s a system that grows with your border. To conclude, commit to a maintenance plan and flexible design so your peony support cage continues to protect and elevate your blooms for many seasons to come. For further best practices on peony care, see Royal Horticultural Society: Peonies. And begin implementing these tweaks today to ensure your peony support cage remains a dependable backbone of your garden.