Spring Hyacinth Forcing Guide: How to Force Blooms
Foundational Guide to Spring Hyacinth Forcing for Indoor Blooms
Spring hyacinth forcing is a delightful way to bring fragrance and color into your home even when outdoor gardens are sleeping. In this Foundational Guide to Spring Hyacinth Forcing for Indoor Blooms, you’ll learn proven methods to coax sturdy, perfume-filled spikes from bulbs kept in the warmth of your home. Whether you’re brightening a winter windowsill, filling a sunlit alcove with scent, or preparing blooms for a centerpiece, this guide provides a reliable, step-by-step approach that beginners can master and seasoned growers can refine. By following the science of chilling, moisture, and light, you’ll cultivate healthy roots, clean stems, and bloom cycles that align with BloomHaven.com trends in 2026, from cabbage-crush-inspired displays to pollinator-friendly accents. Spring hyacinth forcing is highly adaptable, so you can tailor the technique to compact containers, glass vases, or shallow trays depending on your space and décor.
In this introductory section, we’ll establish the core concepts, the essential tools, and the safety notes you’ll rely on as you begin your forcing journey. A thoughtful setup matters as much as the bulb quality, because even a small misstep—overwatering, insufficient drainage, or wrong temperature—can delay blooms or shorten their fragrance. Therefore, you’ll leave with a clear plan you can put into action this season, plus practical tips to adjust for your environment, whether you live in a cool apartment or a sun-rich home office.
To support your learning, this article follows Yoast SEO best practices for structure and readability. You’ll find focused sections, concise paragraphs, and clear headings that guide you from concept to execution. In addition, you’ll see a practical, non-competitive outbound resource for deeper science on forcing bulbs, so you can cross-check technique and terminology with trusted horticultural guidance.
Foundational Guide to Spring Hyacinth Forcing for Indoor Blooms
Tip: Before you begin, take a moment to check your bulbs’ vitality. Only firm, unwrinkled bulbs without soft spots should be used for spring hyacinth forcing. This simple check helps ensure robust roots and vibrant blooms, reducing the chance of mold or rot during the chilling phase.
What is spring hyacinth forcing and why indoors?
Spring hyacinth forcing refers to the process of simulating the bulb’s natural vernal cues so that it blooms indoors ahead of outdoor conditions. The term captures both the technique and the goal: to coax fragrant, colorful flower stalks from winter-ready bulbs, inside a controlled environment. Crucially, forcing relies on chilling or cold treatment to satisfy the bulb’s dormancy period, followed by light and warmth to trigger growth and flowering. In a typical schedule, bulbs are kept cold for several weeks, then moved to a bright, cooler room where they begin to push shoots and develop flower stems.
Indoors, forcing offers several advantages. It gives you bloom timing control, enabling you to schedule beauty for holidays, birthdays, or special events. It also extends the display season of hyacinths beyond their garden time frame. And for many growers, the scent—rich, honeyed, and robust—creates a sensory centerpiece that pairs beautifully with other blooms such as white narcissus, hyacinth varieties with pink or purple hues, or even compact ranunculus in punchy color schemes.
Therefore, understanding the forcing cycle is essential. You’ll want to map out each phase: selection and chilling, potting or container preparation, the transition to light, and the final bloom care. Because the process is reproducible, you can build a repeatable plan that yields consistent results year after year, even if you move bulbs between containers or adjust the environment to fit your space.
Definition and goals
The goal of spring hyacinth forcing is not to grow a plant from seed in the traditional sense but to awaken a bulb’s stored energy. When you succeed, you’ll see a sturdy stem, a tight cluster of florets, and a fragrance that fills the room. A well-forced hyacinth will produce a robust head and a strong stem capable of supporting its blossoms without flopping. The result is an indoor display that remains visually appealing and structurally sound for several weeks.
In addition, choosing the right forcing method can influence how quickly blooms appear and how long they last. Some methods favor a rapid bloom cycle, while others prioritize extended vase life. Cracking the balance between speed and longevity is part of the art of forcing, and it often comes down to temperature, moisture, and light management. For most homes, a straightforward approach that combines a refrigerator-chill phase with careful potting and bright, indirect light yields excellent results.
Seasonal timing
Timing is everything in spring hyacinth forcing. If you’re aiming for blooms around late winter or early spring, start the chilling phase several weeks in advance of your target bloom date. A common rule of thumb is six to twelve weeks of cold treatment, though some varieties may require longer. The exact timing depends on bulb size, cultivar, and the specific temperature you maintain during chilling. Therefore, plan your schedule with a calendar that marks the chill period, the media preparation, and the move to light. This helps ensure you won’t be surprised by an uneven bloom or a delayed flush of color.
As you gain experience, you’ll learn to adjust the chilling duration for your climate and space. If your indoor environment remains consistently cool during the forced phase, you may be able to shorten the chill slightly. Conversely, a warmer home may require a longer cold period to prevent rapid triggering of sprouting that could result in poor stem formation. The key is to observe and adapt rather than force a one-size-fits-all timetable.
Choosing bulbs and varieties for indoor spring hyacinth forcing
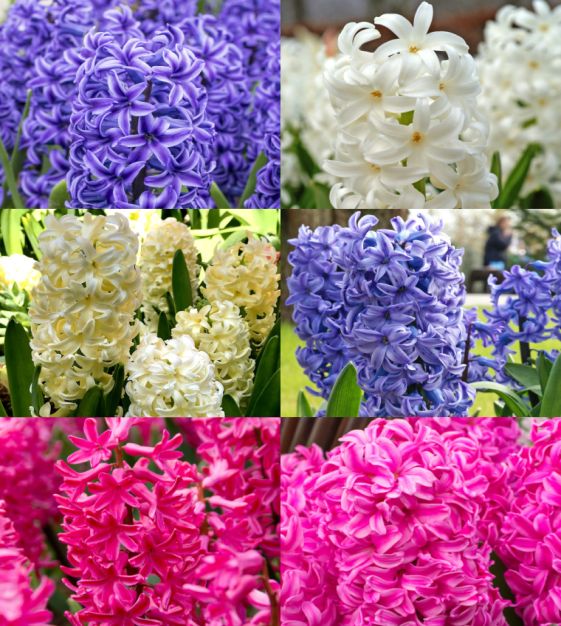
Selecting the right bulbs sets the foundation for a successful indoor forcing project. Look for high-quality hyacinth bulbs labeled as suitable for forcing, and choose varieties known for strong stems, dense flower heads, and reliable fragrance. Hyacinths come in a spectrum of colors—from deep purples and brilliant pinks to creamy whites and pale blues—so you can tailor your display to your interior palette. When possible, select bulbs with uniform size and firmness; these traits often correlate with consistent bloom times and stems that stand tall without bending.
In addition to bulb quality, consider cultivar characteristics. Early- or mid-season cultivars tend to bloom sooner after their cold treatment, while late-season varieties may offer longer vase life once they open. If you’re new to forcing, start with classic, reliable cultivars such as ‘City of Haarlem’ or ‘Jan Boskamp’ (depending on availability in your region) that are well-documented for indoor forcing success. You can then experiment with newer cultivars in subsequent seasons to diversify color and form.
For containers and display purposes, think about how many blooms you want in a given arrangement. Hyacinths can be grown in shallow trays for a dense, blooming carpet or in individual pots to create a collection you can place around the room. The container depth should accommodate the bulb’s root system and leave enough space for the shoots to rise without crowding. In addition, ensure your chosen containers have proper drainage to avoid waterlogged media, which can lead to rot.
As you plan, keep an eye on sourcing. Local garden centers and bulb suppliers often stock forcing bulbs in late summer and fall, ensuring you have fresh stock for winter displays. If you prefer online ordering, read customer reviews and check bulb size ratings and return policies so you aren’t stuck with subpar bulbs after chilling. For readers seeking practical guidance on bulb selection, a helpful external reference is available here: Forcing hyacinths indoors (Gardeners World).
Materials and workspace setup for spring hyacinth forcing
Equipping your forcing project with the right materials ensures a smooth process from chilling to flowering. The core toolkit includes a clean tray or shallow container, a suitable rooting media or potting mix, a lightweight pot or container, a humidity tray (optional), and a bright, cool space for the bloom phase. The media should be well-draining but moisture-retentive enough to sustain the roots as they grow. For many setups, a soilless mix or a sterile, fast-draining media like perlite with a small amount of peat or coconut coir works well.
First, choose your container. For a traditional hyacinth forcing look, use a shallow container that holds the bulb with its base resting on the surface but not obscured by soil. You want the bulb’s base in contact with the moisture, yet the top of the bulb above the media to prevent rot. Second, prepare a cold storage plan. A standard refrigerator (not the freezer) is ideal for chilling, as is a cool, dark basement with stable temperatures around 38–48°F (3–9°C). Third, arrange your workspace so you can move bulbs and containers between the chill zone and the light zone with minimal disruption. A small cart or shelf makes this simple and efficient.
Lighting is the next critical factor. After removing bulbs from cold storage, place them in a bright location that provides indirect, cool-to-moderate light. Aim for about 12–16 hours of ambient light per day, which helps prevent leggy growth while encouraging sturdy stems. Temperature during the bloom phase should be cooler than standard room temperature; a range of 60–65°F (15–18°C) supports healthy flowering and reduces stress on the developing shoots. If your home is warmer, consider placing the container near a north-facing window or using a sheer curtain to diffuse direct sun. And while you’re setting up, ensure the area remains free from drafts and sudden temperature swings that can shock the bulbs.
Safety and sanitation are often overlooked, but they matter. Wash your containers and tools before starting to prevent fungal infections. Keep your working area dry and free from standing water to avoid mold and rot. Finally, label each container with cultivar name and desired bloom date to keep your planning precise throughout the season. For further guidance on environmental considerations, see this related resource on indoor bulb care: Royal Horticultural Society care guidelines.
Timing, temperature, and care for indoor hyacinth growth
With bulbs selected and containers prepared, you’ll begin the practical timing and care sequence. The chill phase is critical: the longer the bulbs stay cold, the more energy they store to support vigorous blooms. If you’re targeting earlier blooms, extend the chill period within practical limits; for later blooms, shorten it slightly. During chilling, ensure bulbs are kept in dark or dim conditions to prevent premature sprouting. Once the chill phase is complete, move the bulbs to a bright, cool environment that supports steady growth without overwhelming heat. This staging helps the stems grow strong and the flower heads to form tightly.
Watering is nuanced in forcing. Keep the media evenly moist but never waterlogged. Overwatering during the bloom cycle can rot the bulb or cause root damage, while underwatering may lead to a stunted or weak bloom. A lightweight, well-draining media helps maintain consistent moisture without saturation. Fertilization is optional but beneficial; a dilute, balanced fertilizer applied every couple of weeks during the growth phase can promote robust blooms and a longer vase life. If you choose to fertilize, use a product labeled for bulb crops and follow label directions for dilution and frequency. For inspiration on practical watering strategies, you can consult a wider guide on bulb care from a trusted horticultural source.
Step-by-step forcing method for spring hyacinths
The forcing method unfolds in clearly defined phases, each with its own actions and checkpoints. Phase 1 centers on chilling and root establishment. Phase 2 covers the transition to light and growth, culminating in bloom. Phase 3 focuses on bloom maintenance and display readiness. Below is a practical, repeatable schedule you can adapt to your space.
- Phase 1 — Chilling and preparation (weeks 1–6+): Place bulbs in a dark, cool storage area. Maintain consistent temperatures in the 38–48°F (3–9°C) range. Do not plant or cover the bulbs with soil during this phase; the goal is to satisfy dormancy cues and encourage root initiation in a controlled, moisture-sustained environment.
- Phase 2 — Transition to light and warmth (weeks 7–10+): Move bulbs to a bright, indirect light area with cooler room temperatures. You should see the shoots begin to form, with the stems strengthening as they rise. Water sparingly at first to avoid waterlogged media, then adjust as growth accelerates.
- Phase 3 — Bloom and display (weeks 11+): As buds color and open, keep the stems upright by supporting with gentle staking if needed. Maintain bright light and moderate temperatures. Remove spent flowers to encourage energy to remain in the bulb for potential rebloom in future cycles, and ensure the display remains visually balanced with the stem length and flower head size.
During each phase, observe the plant for signs of stress. Yellowing leaves can indicate overwatering, while pale stems may signal insufficient light. Adjust moisture and light accordingly to support a healthy, one-to-two-week bloom window. If you find your stems leaning or blooming unevenly, light positioning and gentle rotation can help the plant grow more symmetrically without causing stress. For an additional technique, you can explore a detailed, user-friendly step-by-step guide here: Forcing hyacinths indoors (Gardeners World).
Troubleshooting common issues in spring hyacinth forcing
Even with careful planning, you may encounter common issues. The most frequent problem is a stem that remains weak or bends under the weight of the flower head. This can be addressed by ensuring adequate light, using a support mechanism, and avoiding over-watering during the growth phase. If the bulbs fail to sprout or show delayed growth, re-check the chill duration and temperature. A slightly longer cold period or a cooler bloom environment often resolves this without sacrificing bloom quality.
Another frequent issue is mold or rot in the rooting media. This typically results from excess moisture or poor drainage. Use a well-draining mix and ensure your containers have drainage holes. If you notice suspicious odors or visible mold, remove affected bulbs promptly and adjust your watering frequency going forward. Finally, if you observe weak fragrance or pale colors, verify both the light intensity and the ambient temperature; a warmer room and lower light can dull color intensity and fragrance, whereas cooler, brighter conditions typically enhance both.
To support ongoing learning, BloomHaven readers can reference additional guidance on indoor bulb care through reputable sources. For a practical overview of troubleshooting and best practices, visit a dedicated care resource here: Royal Horticultural Society bulb care.
In closing, the foundational steps above are designed to give you confidence as you begin spring hyacinth forcing. With a reliable chilling plan, the right containers and media, and careful attention to light and moisture, you’ll enjoy indoor blooms that brighten your space and your season. Next, in Part 2: Step-by-Step Hyacinth Forcing Techniques, we will walk through a practical, room-by-room forcing schedule that translates these principles into a repeatable, easy-to-follow routine.
Step-by-Step Process for Spring Hyacinth Forcing Indoors
Embarking on spring hyacinth forcing indoors requires careful timing, precise technique, and a steady routine. This section delivers a complete, expert-driven workflow you can follow in 2026 to coax fragrant, colorful blooms into your home. You will learn how to plan, select bulbs, implement a proper cold treatment, choose a forcing method, set up the container and medium, manage light and water, and care for the plants through bloom and aftercare. The result is predictable, beautiful hyacinths that brighten rooms at the moment you want them most.
Step 1: Planning for spring hyacinth forcing Indoors
Begin with a clear bloom target. Decide the date you want flowers and work backward to set a realistic schedule. Hyacinths need a period of cold dormancy before growth resumes, so you must account for chilling plus root development and shoot growth. In practice, many homes require about 12 to 16 weeks of a cold period at roughly 35–45°F (2–7°C) before you move to a warmer, brighter phase. Consider your space limitations and whether you prefer a soil-based setup or a water culture system, because each path changes the timing and care. Map out your steps, assemble your supplies, and label everything. The more you plan, the less room there is for last minute stress or mistakes. Finally, set up a stable location away from direct heat sources, drafts, and ethylene-producing fruit so the bulbs feel calm as they transition from dormancy to bloom.
Remember that record keeping helps. Note the bulb size, chilling duration, method chosen, and bloom date. Over several forcing cycles, you’ll refine your approach and improve consistency. If you track environmental cues like room temperature and light intensity, you can adjust next season for even better results. In addition, keep in mind that sun-loving interior spaces may intensify growth once the chill ends. Plan to provide bright, indirect light from the outset to avoid leggy stems. This planning stage lays a strong foundation for a reliable spring display.
Step 2: Selecting Bulbs and Materials for spring hyacinth forcing Indoors
Choosing the right bulbs is essential for a successful indoor forcing project. Start with large, firm bulbs free of mold, soft spots, or shriveling. Bulbs that feel heavy and sturdy usually produce taller, sturdier stems and richer blooms. Avoid bulbs that show signs of damage, such as cuts, mold, or frost damage. If you intend to force in soil, pick pots that fit the bulb heart and allow for stable rooting with good drainage. For water culture, select a narrow, tall bulb vase that supports the bulb while keeping the base exposed to air and moisture. Accessories like a shallow tray, decorative outer pots, and clear labeling help you maintain the setup with minimal fuss. Above all, ensure you have fresh, well-draining potting mix or a clean water reservoir. Using clean materials reduces disease risk and keeps roots healthy throughout the forcing window.
Bulb quality and the forcing method are closely linked. If you choose soil, you’ll rely on a light, bulb-specific mix and moisture management that keeps the soil just barely moist. If you choose water culture, you’ll monitor water quality and refill as needed to keep the bulb hydrated without sitting in water. Either route benefits from a clean workspace, proper sanitation, and a calm environment to prevent growth stresses. For practical guidance and product recommendations, see The Old Farmer’s Almanac Hyacinth Forcing Guide.
In addition to bulbs, assemble your containers, a moisture meter if available, a small trowel for soil work, and a tidy tray to catch excess moisture. If you plan to stage multiple cycles, consider labeling each container with the expected bloom window and the forcing method you’re using. The more organized your materials, the more efficiently you can manage the forcing process and adjust as needed for consistent results.
Step 3: The Chill and Dormancy Phase for spring hyacinth forcing Indoors
The chilling phase is the heart of spring hyacinth forcing indoors. Proper cold treatment triggers the bulbs’ dormancy release and initiates uniform flowering later. For most setups, store bulbs in a cool, well-ventilated space at about 40°F (4°C) for 12 to 16 weeks. Keep humidity moderate and avoid excess moisture that can encourage mold. Do not allow bulbs to freeze, and protect them from direct light during the chill. Label each batch with the date started and the target bloom window to maintain a precise schedule. After the chill period, transition bulbs to a warmer environment gradually. Move them into a location with cool, bright light, and start to increase exposure gradually to prevent shock. If you’re using soil, you can begin the potting process after chilling by placing the bulbs so that about one-third remains above the soil line; this ensures stable anchorage and effective rooting. If you’re using water culture, rotate the bulbs into the appropriate vase where the base is in water but the upper portion remains dry to encourage robust root formation once light increases. The transition step is critical, and a careful ramp helps you avoid leggy growth or weak stems later on.
As you manage dormancy and transition, keep a steady eye on temperature cues. Sudden temperature swings can slow growth or stretch stems. A steady shift from the cold phase to the warmer, light-rich phase yields stronger stems and richer blooms. The goal is to create a predictable pipeline from dormancy to bud formation, and then to charged growth as the plant responds to light and warmth.
Step 4: Planting and Setup for spring hyacinth forcing Indoors
Planting and setup are where the method you chose truly comes to life. For soil forcing, select containers with good drainage. Fill them with a light potting mix designed for bulbs. Place each bulb with the pointed end up and press gently so the bulb sits snugly. Do not cover the bulb completely; leave the top third exposed to allow light to reach the developing shoot. Water gently and evenly, taking care not to overwater. Keep the soil just barely moist until roots emerge and shoots begin to grow. For water culture, select a bulb vase or container that allows the bulb base to sit on water while the upper portion remains dry. Fill with clean water and avoid placing the bulbs into standing water that could rot the base. Position the container so the bulb feels secure and stable. In both methods, place the setup in a cool, bright area to encourage steady growth. A calm, consistent environment reduces stress and improves bloom quality. The timing from planting to visible growth varies with method and bulb size, but anticipation grows as shoots emerge and green tissue develops.
Depth, positioning, and light all relate to the final bloom quality. In soil, keep bulbs upright and ensure they are not leaning, which can lead to uneven stems. In water culture, watch for scaling on the vase and sanitize as needed to keep water clean. A stable routine—consistent watering (or refill), bright indirect light, and moderate temperatures—supports uniform, lengthy stems and fully formed flower clusters when the buds open.
Step 5: Forcing Indoors: Care and Timing During Bloom Preparation
Care during the bloom window hinges on consistent light, temperature, and moisture. Hyacinths love bright light; place them in a well-lit room with indirect sun to avoid scorching. During the early growth phase, you can maintain daytime temperatures around 60–65°F (15–18°C) and keep nights cooler, around 55–60°F (13–16°C). If your space runs warm, use sheer curtains or provide a splash of shade mid-day to prevent overheating the blooms. Relative humidity should be moderate, ideally 40–60%, to support sturdy stems and prevent botrytis or mildew. If you notice pale or leggy growth, adjust light exposure and consider a supplemental light source to push the plant toward a compact, upright form. Hydration is vital. In soil, water when the top inch of soil dries to a slight touch. In water culture, top up the reservoir with clean water and replace it every 5–7 days to prevent stagnation and odor. Feeding is optional but beneficial. A dilute, balanced bulb fertilizer used sparingly once roots have formed can enhance bloom development without overstimulating foliage. Specifically, apply at a half-strength rate to minimize risk of foliage overpowering the flowers. If leaf yellowing appears, it can signal low light or excess moisture, and you should adjust accordingly to protect the plant.
During this stage, observe for common issues such as mold, tip burn, or brown edges on leaves. Cleanliness helps prevent problems. Rotate containers weekly to encourage even growth and uniform flower presentation. If you’re forcing multiple bulbs, stagger the timing a little so you enjoy blooms over a longer period, rather than all at once. A calm routine and careful attention to the plant’s cues lead to a more reliable, show-stopping display.
Step 6: Bloom Management, Display, and Aftercare
As buds color and petals begin to open, manage the display to maximize vase life and scent. Move flowering hyacinths away from direct drafts and extreme heat. Consider rotating the container or vase modestly every few days to maintain even orientation and prevent stems from bending toward light. A cooler room at night can help extend the bloom period, preserving fragrance and color. For display, pair hyacinths with complementary textures—soft greens, pastel ceramics, or seasonal florals—so the blooms become the focal point. After flowering declines, allow the foliage to die back naturally if you plan to reuse the bulbs. You can store the bulbs for future forcing in a cool, dry place, or, with soil-grown bulbs, gently lift and dry them before storing. Do not store diseased bulbs; discard them to protect future forcing cycles. Finally, take pride in your success and document what worked well so you can refine your technique next season.
To continue, stay tuned for Part 3: Troubleshooting and Aftercare for Forcing Hyacinths, where we address common issues, bloom timing, and post-bloom care.
Advanced Spring Hyacinth Forcing Techniques and Final Guidance
Ultimately, this final section translates theory into repeatable practice. You will find refined cold-treatment timelines, precise environmental controls, and container strategies that elevate the reliability and beauty of spring hyacinth forcing. The goal is to deliver predictable bloom windows, stout stems, and fragrant, vibrant spikes that inspire as much as they delight. Each technique here expands on our foundation, turning a seasonal hobby into a purposeful, year‑round regime. By embracing nuanced cold treatment, disciplined light and temperature management, and thoughtful media choices, you can consistently achieve exceptional results with spring hyacinth forcing.
To begin, acknowledge that no two bulb lots are identical. Even within the same cultivar, vigour and blooming times vary slightly due to storage conditions, import origin, and microclimate in your home. With advanced techniques, you accommodate those differences rather than fight them. The sections that follow outline a practical, fail‑safe workflow you can adapt for surplus bulbs, seasonal gifts, or display gardens. If you want a quick reference, copy the practical checklist at the end of this section and pin it near your forcing station. This is where practice meets precision in spring hyacinth forcing.
Spring Hyacinth Forcing Precision: Advanced Cold-Treatment Schedules
Cold treatment remains the cornerstone of predictable hyacinth forcing. The aim is to vernalize the bulb so that when warmth returns, buds form promptly and stems elongate without legginess. In practice, you have two main pathways: traditional cold storage for non‑pre-chilled bulbs and accelerated schedules using pre‑chilled stock. Each path yields reliable results when paired with accurate timing and consistent temperatures. For spring hyacinth forcing, a typical cold period ranges from 10 to 14 weeks at temperatures around 34–40°F (1–4°C). If your storage location runs cooler or warmer, adjust gently by 1–2 degrees to avoid shocking the bulbs.
When you are working with bulk forcing, a staged approach reduces risk. Stage one is chilling the bulbs; stage two is warming and planting; stage three is growth management. During chilling, moisture balance matters more than at any other stage. Do not allow bulbs to dry out; avoid condensation that can promote mold. If you must relocate bulbs during the chill period, keep the temperature constant and minimize handling. Consistency yields consistent blooms, and consistency begins with a robust cold‑treatment plan. For spring hyacinth forcing, always label batches with cultivar, chill date, and target bloom window so you can align care with bloom expectations later in the timeline.
Two-stage forcing is particularly effective when you are coordinating multiple varieties. In stage one, chill the bulbs as described. In stage two, plant them in a well‑drained medium, then place containers in a cool, bright area where temperatures remain roughly 60–65°F (15–18°C) during the initial root development. After roots establish, gradually increase daytime temperatures to 60–68°F (15–20°C) and maintain cooler nights to mimic a natural spring swing. This staged warming helps prevent bud failures and yields sturdier stems. For spring hyacinth forcing, a steady ramp is preferable to abrupt temperature shifts, because hyacinth buds respond to gradual cues just as they would in a natural setting.
Common mistakes to avoid in cold treatment include uneven chilling, temperature fluctuations, and overly long or short chill windows. If bulbs are chilling near a drafty window or a heat vent, micro‑currents can disrupt vernalization. Use a dedicated, stable fridge or a basement shelf with a consistent temperature. When you remove bulbs from cold storage, do not rush the transition; a brief acclimation period at room temperature helps reduce shock and supports even growth. If you notice uneven budding after the first flush of growth, reassess the chill duration and ensure the bulbs were not exposed to unexpected heat at any point in the process. For spring hyacinth forcing, precision in cold treatment translates directly into bloom reliability and stem strength.
Light, Temperature, and Humidity: Nailing the Microclimate for Consistent Blooms
After the cold treatment, the microclimate becomes king. Light quality, intensity, and duration, as well as temperature fluctuations and humidity control, determine how long the blooms take to open and how robust the stems become. In practice, bright, indirect light on a stable temperature regime yields the best outcomes for spring hyacinth forcing. Place containers near a well‑lit east or south‑facing window where the sun is not directly blasting the bulbs. Excess heat or direct, intense sunlight can scorch tender leaves and compromise bud development. When the clock is ticking toward bloom, a steady light exposure helps buds form evenly rather than race ahead on some stems while others lag.
As for temperature, aim for 60–65°F (15–18°C) during active growth and keep nights cooler, around 55–60°F (13–16°C). This diurnal pattern supports balanced growth and helps prevent incongruent flowering times among a variety of bulbs. If your home experiences warm afternoons in summer or cool nights in winter, use sheer curtains or a fan to moderate microclimates without introducing drafts. Humidity also matters; excessive humidity invites Botrytis and other fungal issues, while too-dry air can desiccate developing leaves and hamper bud formation. A simple two‑zone approach—wet the potting mix slightly during growth and allow surface moisture to dry before watering again—helps maintain the right humidity window. For consistency in spring hyacinth forcing, track the actual room conditions daily for a week after switching from cold storage to growth mode, then adjust actively to keep temperature and humidity within the target range.
Light‑management tools such as light meters, white curtains, and reflective surfaces can help you achieve uniform exposure across containers. When multiple containers are placed together, air movement matters. Gentle airflow reduces the risk of mold on the surface and helps stems grow upright instead of leaning toward light. In summary, the right microclimate supports uniform bud formation, robust stems, and strong fragrance across all hyacinth cultivars in your forcing program for spring hyacinth forcing.
Media, Containers, and Watering: Engineering Support for Strong Stems and Vivid Color
Medium choice influences nutrient availability, drainage, and root establishment. A light, well‑draining potting mix with added perlite or vermiculite improves air‑filled porosity and reduces compacting as roots grow. For spring hyacinth forcing, a medium that remains slightly damp but never soggy is ideal. Use containers with drainage holes and consider a bottom layer of gravel or clay marbles to improve drainage efficiency, especially in deeper pots where roots might otherwise stagnate. A uniform depth of about 1–2 inches of medium above the bulbs helps anchor them and supports even root growth. If you plan to reuse containers, sanitize between cycles to minimize disease carryover. When you water, aim for a steady, moderate schedule. The goal is to avoid both waterlogging and drought stress. A consistent watering rhythm helps bulbs allocate resources toward bud development, rather than fighting to rehydrate after a long dry spell.
Nutrition during forcing should be balanced and mild. Use a dilute, complete fertilizer every two weeks once shoots appear, keeping the concentration low to prevent fertilizer burn. High nitrogen early in growth can encourage leafiness at the expense of flower development. If you choose to fertilize, switch to a balanced or bloom-boosting formula once buds begin to swell. For spring hyacinth forcing, the medium supports root health and bud formation; the right water and nutrition plan converts that foundation into consistent, colorful blooms and a lasting vase life.
Container aesthetics matter when you stage multiple varieties together. Clear glass vases highlight the bulb, roots, and water level, creating a striking display, while ceramic or stoneware pots offer structural elegance. If you select glass, ensure the bulbs sit above the water line to prevent rot; if you choose a water‑only display, use a tall, clean vase with a stable base to support the heavy hyacinth stems. For a non‑competitive but informative resource on container choices and gardening practices, see RHS Hyacinth care guide.
Troubleshooting and Quality Control: Diagnosing and Solving Common Forcing Challenges
Even with a rigorous plan, issues can arise. Etiolation, or elongated, pale stems caused by insufficient light, is a frequent symptom of underlit forcing. If you notice legginess, increase light intensity or reposition containers closer to the light source, while maintaining cool nights. Conversely, overly bright sun may scorch developing buds; if you see leaf scorch or browning tips, reduce light intensity or add a light-diffusing layer. For spring hyacinth forcing, the ideal balance is bright but indirect light with consistent daily duration. Troubleshooting early helps you salvage a forced display instead of losing it to poor bud formation.
Botrytis and other fungal diseases thrive in humid, stagnant air. Improve air movement, reduce surface moisture, and sanitize tools and containers between cycles. If you observe fuzzy gray growth on leaves or bulbs, remove affected material promptly and treat with an appropriate fungicide if permitted in your region. Pests such as bulb mites or scale can derail a forcing program by weakening bulbs before bloom. Quarantine new bulbs, inspect for signs of infestation, and maintain clean growing conditions to minimize these risks. By actively monitoring for disease and pests, you protect both current and future forcing cycles so your spring hyacinth forcing remains reliable and visually stunning.
In addition to disease and pests, timing is a frequent variable. Hyacinths typically have a predictable bloom window when your schedules are aligned; deviations can occur with cultivar variability or storage history. If bloom is later than anticipated, revisit the chill duration, room temperature, and light exposure during the post-chill growth phase. If blooms arrive early, confirm that the growth conditions were not overly warm during the critical bud‑formation stage. For spring hyacinth forcing, precise control across these variables is the difference between a striking display and a near-miss. Implement a small calendar for each batch and compare expected bloom dates with observed outcomes to fine‑tune future cycles.
Post-Forcing Care, Vase Life, and Bulb Reuse: Extending Value Beyond the Display
Once blooms fade, care continues to preserve the value of your forcing project. Remove spent flowers promptly to encourage further stem vigor while preserving leaves, which feed the bulb for next year’s cycle. Water sparingly after flowering to maintain a steady moisture balance and reduce rot risk. If you intend to reuse bulbs, allow foliage to mature and die back naturally, then gently lift bulbs, dry them in a shaded, ventilated area, and store them in a cool, dry place until the next chilling window opens. For spring hyacinth forcing in subsequent years, consider selecting a subset of robust cultivars known for repeat performance and fragrance. Planning for reuse reduces waste and maximizes the return on your forcing investments.
For display longevity, recut stems at an angle and place them in clean, fresh water. Change water regularly, wipe the vase interior to remove any residue, and keep them away from heat sources, which can shorten vase life. If you wish to extend the fragrance in a room, position hyacinth arrangements near openings or near living spaces where fragrance is welcomed but not overpowering. Across these steps, remember that the best forcing programs treat the entire lifecycle—from chilling to bloom to post‑bloom recovery—as a continuous, orchestrated process rather than separate tasks. This mindset yields remarkable, repeatable results in spring hyacinth forcing.
Conclusion and Quick Reference for Spring Hyacinth Forcing Mastery
In summary, advanced spring hyacinth forcing hinges on disciplined cold treatment, precise environmental control, and thoughtful media and watering strategies. By applying refined cold‑treatment schedules, managing light and temperature with care, and selecting appropriate media and containers, you can achieve consistent blooms, strong stems, and preserved vase life across years. The key is to treat each bulb batch as a living project with a documented timeline and a predictable growth trajectory. This approach reduces guesswork, boosts success rates, and makes your spring hyacinth forcing truly repeatable. If you want a concise playbook, follow these core steps: confirm cultivar suitability for forcing, chill or source pre‑chilled stock, plant in a well‑drained medium, maintain bright indirect light with steady temperatures, water diligently without oversaturation, fertilize sparingly during growth, monitor for pests and disease, and practice careful post‑bloom bulb care for future cycles.
As you conclude this guide, remember that spring hyacinth forcing is both an art and a science. The more consistently you apply the routines described here, the more reliable your blooms will be. For ongoing inspiration and up‑to‑date techniques aligned with 2026 Pinterest trends and BloomHaven’s emphasis on pollinator plants, keep experimenting with cultivars, formats, and display styles while maintaining the core principles outlined above. Ready to start your next forcing cycle? Gather a batch of well‑chosen bulbs, prepare your chill and growth phases, and let the scent and color of spring fill your spaces with life. spring hyacinth forcing