Wildflower Photo Spots: A Photographer’s Guide
In BloomHaven’s photographic world, wildflower photo spots become a canvas where color, motion, and light converge. For 2026, our guide centers on practical, field-tested approaches that help you capture ephemeral beauty while staying respectful of habitats. Whether you shoot from a sunlit meadow edge, a quiet hillside, or a pollinator-friendly verge, the right approach turns fleeting blooms into lasting stories. This introduction lays the foundation for Wildflower Photo Spots Essentials for BloomHaven Photographers, outlining mindset shifts, gear choices, and field-tested workflows that translate nature’s choreography into captivating imagery. If you’re chasing vibrant textures and botanical nuance, you’re in the right place to elevate your wildflower imagery.
With purpose-driven planning, you’ll move beyond random snapshots and toward a consistent, publish-ready workflow. This Part 1 focuses on defining ideal wildflower photo spots, selecting gear that travels light yet shoots boldly, and building a field routine that respects habitats while maximizing impact. You’ll learn to read the land, anticipate bloom windows, and compose scenes that tell a story—not just capture a flower. By the end, you’ll have a repeatable system for scouting, shooting, and preparing images that perform well on BloomHaven’s visual-first platform.
Wildflower Photo Spots Essentials for BloomHaven Photographers
What makes a great wildflower photo spot?
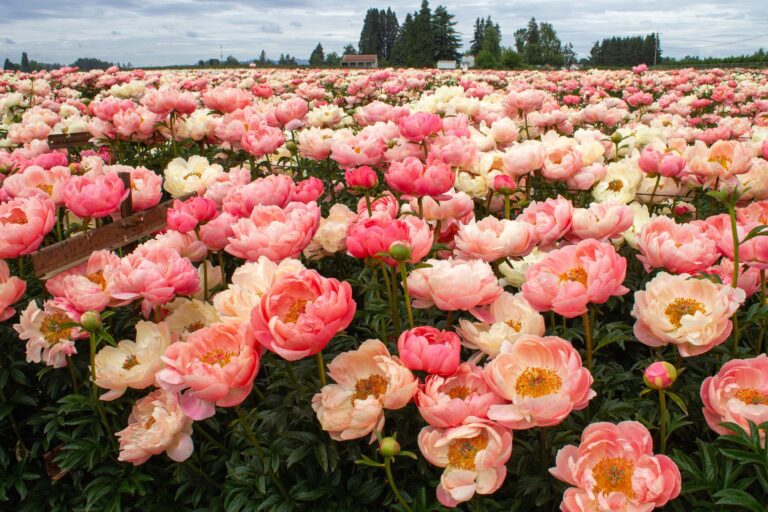
A great wildflower photo spot balances color, texture, and context. Look for spaces where blooms cluster naturally, creating a tapestry rather than a single focal point. Pay attention to the background: a clean, complementary backdrop makes petals pop, while busy foliage can distract the eye. Crucially, consider the seasonal shifts; a spot that is dramatic in spring may fade in late summer, while a different bloom takes center stage. Therefore, you want to map multiple spots across the season to keep your portfolio fresh.
In practice, evaluate three core features: light quality, subject density, and accessibility. Light quality changes with time of day and weather, so scout a location at dawn or late afternoon to see how warm tones interact with petals. Subject density ensures you won’t shoot wasted footage; dense patches allow variety in framing, while sparse patches demand stronger composition. Accessibility matters for safety and workflow—choose spots you can return to without compromising the habitat.
Gear and camera settings for BloomHaven photographers
Choosing gear that is light, versatile, and reliable is essential for wildflower shoots. A macro-capable lens (60–105mm range) helps you isolate details while keeping a safe distance from fragile blooms. A mid-range zoom (24–70mm) offers flexibility for environmental portraits and broader scenes. A sturdy tripod improves sharpness in low light and enables controlled compositions, especially when you’re working with wind or longer exposures. In addition, bring a sturdy memory card strategy and backup power so you stay in the field longer.
For settings, practice a baseline workflow: shoot in RAW, use a moderate to small aperture (f/8–f/11) for enough depth of field while keeping the background softened, and adjust shutter speed to freeze or reveal motion. When wind is light, you can capture delicate petals with a slower shutter (1/125–1/250s). If wind picks up, switch to faster speeds (1/500s or faster) and consider burst sequences to catch a single moment of motion. Therefore, you’ll produce a mix of tight macro detail and broader environmental context in a single session.
Field scouting and planning: timing and location
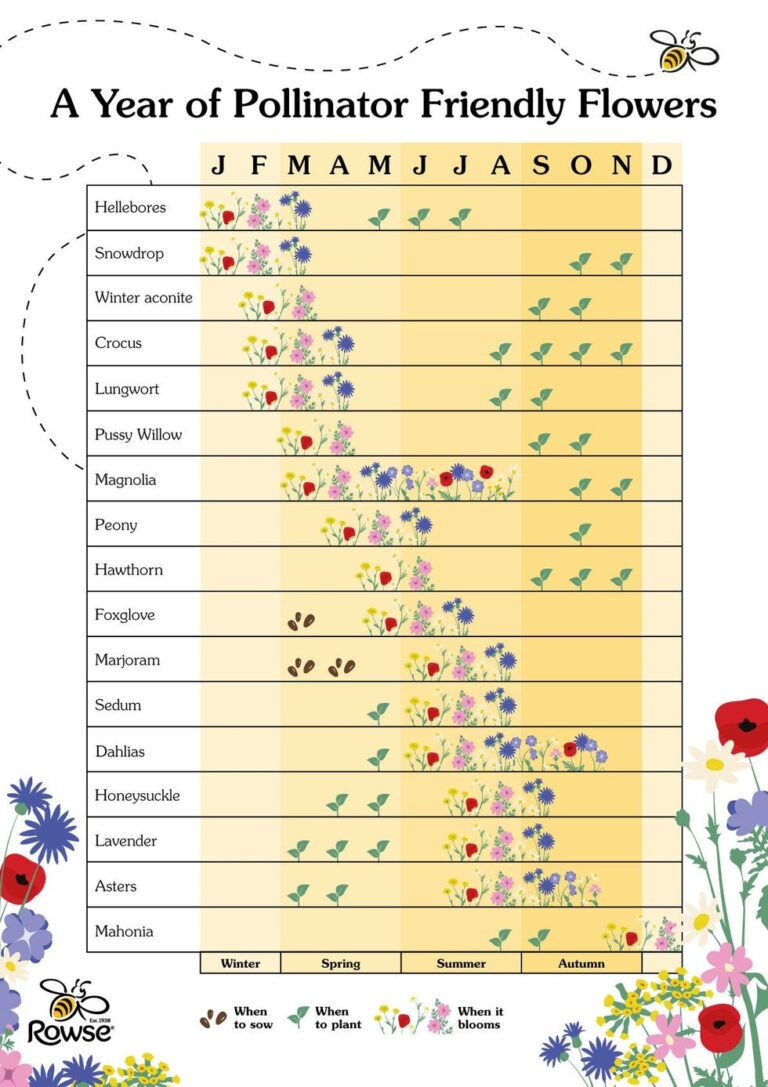
Effective scouting saves time and yields higher-quality images. Start with a bloom calendar for your region and map potential spots near water, sunlight access, and pollinator activity. Therefore, integrate local microclimates into your planning; a sheltered hollow can harbor early bloomers even when nearby flats are late. Next, visit locations during golden hours to gauge how light wraps around the landscape and where sun patches fall on petals. In addition, check for signage, public access rules, and protected areas to avoid conflicts and protect habitats.
Composition techniques for wildflower spots
Composition is the heartbeat of good wildflower photography. Use rule of thirds to place key blooms off-center, and employ leading lines such as a path, a stream, or a fence to draw the viewer’s eye into the image. Create depth with a layered foreground, midground, and background; a blade of grass in the foreground can frame the central bloom beautifully. Color theory matters: pair warm yellows with cool blues or purples to create contrast that pops on screen. When possible, shoot multiple angles—low, eye level, and slightly elevated—to discover the most compelling perspective.
Consider environmental context as part of the frame. A field of wildflowers against a distant hill or a row of trees can convey place and season more effectively than a flat close-up. In addition, practice negative space to give the flower room to breathe, especially in busy habitats where color can overwhelm the subject. Crucially, keep your horizons level to ensure a clean, professional look in every frame.
Lighting strategies for outdoor bloom shoots
Light is your most influential collaborator. Golden hour light—shortly after sunrise or before sunset—adds warmth and subtle shadows that sculpt petals. Overcast days provide even, soft illumination ideal for macro detail and pastel tones. When bright sun dominates, seek shade or use a reflector to shape highlights without harsh shadows. In addition, consider backlighting to reveal translucence in petals and the delicate structure of blossoms. Therefore, you can achieve luminous color without blowing out highlights if you meter carefully and adjust exposure to preserve detail.
To maximize consistency, create a light plan for each location: note the best times for the key spots and plan backup dates if weather shifts. This approach yields a reliable set of images across different lighting conditions and seasons.
Ethics and sustainability: photographing with care
Respect for habitats is non-negotiable. Stay on established paths and minimize contact with sensitive plant communities. Always follow posted rules and seasonal closures to protect fragile ecosystems. Therefore, opt for portable gear that minimizes soil compaction and avoids trampling. By photographing with restraint, you preserve the very environments that make bloom photography possible.
Practical practices include using a lower-impact setup, packing out all waste, and avoiding disruption to pollinators during peak activity hours. For a broader understanding of how to support pollinators while shooting, see Pollinator Partnership.
Post-processing workflow for BloomHaven style
A disciplined post-processing routine ensures your wildflower images align with BloomHaven’s visual language. Start with a balanced white balance to reflect true color, then adjust vibrance and saturation to preserve natural tones without oversaturation. Use a mild contrast lift to recover details in petal textures, and apply selective sharpening to petals and centers. Finally, crop for composition, ensuring the final frame respects the rule of thirds and maintains a clean horizon.
Non-destructive RAW processing is essential. Save edits as presets for recurring locations to speed up workflow while maintaining consistent color and mood across shoots. In addition, create a lightweight workflow for batch processing when you photograph multiple spots in a single trip. Therefore, you’ll deliver a cohesive set of images that performs well in both editorial placements and social media.
Practical field workflows you can adopt today
Develop a repeatable scouting and shooting routine to reduce decision fatigue in the field. Start with a pre-shoot checklist: weather forecast, bloom windows, gear status, and backup plans. During the shoot, keep a simple shot list that prioritizes macro detail, environmental context, and wide landscape scenes. Practically, rotate through three core formats: macro close-ups, mid-range environmental portraits, and wide scenic captures. In addition, capture multiple angles and a few seconds of motion to convey breeze and life within the meadow. Therefore, you’ll build a versatile library that serves both storytelling and catalog-style needs.
As you refine your process, maintain a field notebook or digital log to track location, bloom stage, light conditions, and camera settings. That documentation becomes a valuable resource when you return to a site in another season. Next, Part 2 will dive deeper into Field Scouting and Location Strategy, expanding on how to locate photogenic patches and plan efficient field shoots for BloomHaven photographers.
Next, Part 2: Lighting Mastery for BloomHaven Photographers will dive into mastering light in the wild and maximizing mood in your shots.
Core Techniques for Capturing Wildflower Photo Spots: Composition, Light, and Timing
Capturing compelling images of wildflower photo spots demands more than point‑and‑shoot familiarity. It requires a deliberate balance of composition, light, and timing that respects the habitat while translating bloom into a visual story readers will remember. In this section we translate these three elements into practical, field‑tested strategies you can apply from meadow to roadside verge. The result is images that feel intentional, vibrant, and true to the season, without sacrificing the health of the flowers or the integrity of the landscape.
Composition: Building a Narrative in the Frame
Composition is the backbone of any successful wildflower shot, because it determines what the viewer reads first, second, and third. When you shoot across a patch of wildflowers, you are not merely capturing color; you are guiding the viewer through a scene. Start by identifying a clear focal point—an individual bloom, a seed head, or a cluster that forms a natural anchor. In wildflower photo spots this anchor becomes the story’s starting point, while the surrounding flora frames and enriches that narrative. Specifically, the rule of thirds remains a dependable compass, but you can bend it when a diagonal line or a curved margin of blossoms offers a stronger journey for the eye. In practice, aim to place the most expressive bloom off center, with secondary details stepping into view along the frame’s edges. Furthermore, look for a simple path for the gaze: a line of stems, a row of petals, or a petal shadow that leads toward the focal bloom. This approach helps you avoid a flat composition and turns a field into a canvas with movement and depth, which is essential for wildflower photo spots that feel lived‑in rather than photographed. A strong foreground layer adds context and scale. A blade of grass, a leaf, or a nearby rock can become a supportive frame that reinforces the bloom’s color without stealing attention. If your foreground reads as busy, simplify by choosing a shallow depth of field that blurs the clutter while keeping the subject crisp. In this way composition unfolds as a quiet conversation between the viewer and the flowers, not a crowded catalog of petals. When you’re working with backgrounds, seek colors that complement or contrast. Complementary greens, purples, and yellows can intensify the bloom’s hue, while avoiding clashing patterns prevents distraction. The art of framing also extends to environmental elements: wind, shadows, and even distant hills can provide a setting that amplifies the mood of the wildflower photo spots you’re documenting. Always measure the distance between your camera and the subject, because depth of field shapes how many layers come forward in the scene. If your goal is a painterly, soft background that places the subject in a dreamlike field, open the aperture—use a wide setting—and focus narrowly on the most expressive portion of the bloom. If you want more context—stems bending toward the sun, the stretch of meadow, or the texture of the soil—tighten the depth of field for a crisper, more documentary feel. The best wildflower photo spots reward patient observation; take a moment to study the movement of petals and leaves with the light, then choose your composition to preserve that intimate detail while telling a broader story of place. For BloomHaven readers, this means framing images that invite the viewer to linger, almost as if they are standing in the field themselves.
Rule of Thirds and Focal Points
Applying the rule of thirds helps you place the bloom or the main cluster at or near one of the intersecting points. It creates a natural sense of balance, allowing the eye to travel through the frame without feeling pulled to a single center. When shooting wildflower photo spots, experiment with placing a bright bloom on the left third while a secondary bloom sits toward the right third, creating a rhythm that guides attention across the field. If you prefer a single focal point, position it where one of the main lines converges, and let the rest of the frame fall into supportive tones and textures. In both cases, ensure the subject remains clearly readable; avoid crowding the focal area with competing elements that might confuse the viewer about where to look first. A well‑placed focal point also strengthens the story you tell about the wildflower’s role in the environment, whether as a beacon for pollinators or as a seasonal symbol of renewal.
Framing with Foreground Interest and Depth
Foreground elements—such as a softly blurred leaf, a stem in partial shade, or a tilt of grass—ground the bloom in space and give the image tangible depth. They create a layered landscape that feels three‑dimensional, drawing the viewer into the scene. When you compose, think of the frame as a multi‑layered stage: foreground, middle ground, and background should all contribute to the narrative. Use the foreground to point toward the focal bloom, not to obscure it. A simple, unobtrusive blade of grass can work wonders when it leads the eye toward the primary subject. Depth can also be achieved by including multiple planes of color—cool greens in the foreground, warm yellows and pinks in the middle ground, and a soft, atmospheric backdrop. The result is a lifelike rendering of wildflower photo spots that feels immersive rather than posed. If you shoot with a longer lens, compression can tighten the composition and emphasize the relationship between the subject and its surroundings, creating a strong sense of place that remains true to the meadow or field you’re visiting.
Leading Lines and Eye Movement
Leading lines are powerful devices in wildflower photography because they guide the viewer through the scene and toward the bloom that anchors the story. Lines can be natural—rows of stems, a path through the meadow, the edge of a riverbank—or man‑made, such as a fence line or a footpath that runs along the field. Use these lines to invite the eye to move with intention, not to rush past. When you position leading lines, consider their direction relative to the bloom: lines that converge toward the subject create a sense of arrival, while lines that travel away from the subject can imply distance and scale. For wildflower photo spots, this technique adds narrative momentum and helps convert a simple floral snapshot into a scene with purpose and mood. The aim is to keep the movement subtle enough to feel natural, so the image remains calm and readable.
Light: Capturing Mood and Color
Light is the sculptor of texture and color in wildflower photography. The same patch of blooms can look dazzling in one hour and flat in the next, depending on sun position, sky brightness, and atmospheric conditions. Understanding light quality, direction, and color temperature empowers you to craft images that mirror the moment you experienced in the wildflower photo spots. Begin by noticing how light interacts with petals: some flowers glow with a soft, translucent shimmer, while others take on a sharper sheen when the sun catches their edges. The goal is to translate this tactile sensation into a photographic voice that readers recognize as authentic. Specifically, the morning light often brings gentle shadows and a creamy color palette that flatters pinks, lavenders, and yellows. In contrast, mid‑day light tends to be harsher, which can be used creatively to produce high‑contrast detail or to isolate a single bloom against a bright sky. In all cases, avoid flattening contrast by over‑exposure; instead, aim to preserve texture in petal veins and leaf surfaces so the wildflower photo spots you capture retain tactile depth.
Light Quality: Hard vs Soft
Soft light, such as a cloudy sky or shade from a tree canopy, wraps petals evenly and minimizes hard shadows. This is ideal for macro or close‑up work where texture matters, and it helps maintain true color without blown highlights. Conversely, hard light—bright sun with minimal diffusion—can produce crisp edges, strong silhouettes, and dramatic color separation that suits more artistic, high‑impact frames. When you’re documenting wildflower photo spots, choose soft light for delicate petals and intricate textures, and reserve hard light for bold, graphic compositions that emphasize shape and form. In either case, monitor your histogram to avoid clipping in the brightest petals. Color accuracy matters too; consider a white balance setting that preserves the flower’s natural hue, rather than leaning into a偏 warmer or cooler look that might misrepresent the scene.
Direction and Backlight
Directionality determines how shadows fall and how the bloom stands out from its surroundings. Front lighting tends to illuminate color vividly but can flatten texture. Side lighting reveals vein structure and depth, making petals look tactile and alive. Backlighting, where light streams from behind the bloom, can transform petals into stained glass, especially when you position a wide, hazy glow behind a field of blossoms. Backlight is particularly effective for wildflower photo spots where transparency and color saturation are key. If backlighting you must avoid losing the subject to silhouette; use a reflector or a fill card to add just enough light to the front of the bloom to preserve detail. In real field conditions, a translucent petal often becomes a small stage for sunlit edges, and the resulting glow adds a magical quality to your wildflower photography.
Color Temperature and White Balance
Wildflowers present a spectrum of hues that can shift with lighting. Aim to capture colors faithfully by matching white balance to the dominant light source. When shooting after sunrise or before sunset, you’ll frequently encounter warmer tones that enrich yellows, pinks, and oranges. In cooler morning light, greens and purples can appear crisper and more saturated. A practical approach is to shoot RAW so you can adjust white balance during post‑processing without sacrificing detail in petals and leaves. If you’re working quickly in the field, use automatic white balance as a baseline, then switch to a daylight or cloudy preset if your scene leans toward a particular mood. Reading the light and adjusting your WB on the fly ensures your wildflower photo spots read true to life and feel inviting to readers seeking floral inspiration.
Timing: Scheduling the Shot for Peak Bloom
Timing is the third pillar of successful wildflower photography. The same meadow can offer vastly different visual stories depending on bloom stage, weather, and pollinator presence. The most memorable images often arise when you catch a window of optimal fullness, where color saturation, petal structure, and insect activity align. Timing is not solely about bloom peak; it also encompasses cloud movement, wind pace, and the cadence of light through the field. In BloomHaven’s ecosystem, the best wildflower photo spots become living calendars of the season, and capturing them requires patience and observant pacing. By planning around bloom calendars and weather patterns, you can align your shoot with moments that feel spontaneous yet are, in fact, deliberately chosen for their impact.
Bloom Timing and Seasonal Windows
Bloom timing is a moving target that varies by species, elevation, and microclimate. When you approach a wildflower field, begin with a quick survey of which blooms are at their peak. A patch of daisies may dominate in early spring, while later in the season a mix of coneflowers and coreopsis could take center stage. The idea is to map the field’s rhythm: note a cluster that looks vibrant today and compare it with neighboring patches that may reach brightness tomorrow or next week. This planning helps you align your shoot with what you want readers to feel—freshness, abundance, or quiet reverie. Also, be mindful of staggered bloom times within the same field; sometimes the most dynamic compositions involve flowers at different stages, creating a layered tapestry that adds depth to your wildflower photo spots.
Weather Windows and Lighting Consistency
Weather conditions shape the mood and accessibility of fields. A gentle breeze can tease petals into motion, adding a sense of life, while a calm day preserves silhouettes and crisp textures. Forecasts help you anticipate lighting shifts; a passing cloud bank can deliver a temporary softbox for even illumination. If you find a promising scene but the light is too strong, wait for a brief cloud break or reposition to capture the soft, wraparound glow that makes wildflower photo spots feel intimate. Conversely, when wind is calm, you can exploit the opportunity for precise, crisp petals and clean backgrounds. In short, align your timing with both bloom peak and favorable light to maximize the emotional resonance of your images.
Pollinator Activity and Interaction
Pollinator movement is a vital temporal cue in wildflower photography. Bees, butterflies, and other pollinators often appear in bursts of activity when the sun is warm and the plants are in their prime. Capturing a bee hovering over a bloom or a butterfly resting on a petal can elevate an image from pretty to compelling, because it adds a layer of life and purpose. Plan your timing around pollinator activity by observing field rhythms and, when possible, staying out for longer sessions to catch those fleeting moments. Do not chase insects aggressively; rather, position yourself to invite their presence with subtlety—soft, natural light, a quiet stance, and blooms that aren’t disturbed by your movement. This mindful timing approach helps you produce wildflower photo spots that feel authentic and energized by life in the meadow.
Equipment and Settings for Focused Wildflower Photography
Beyond composition, light, and timing, the right gear and camera settings empower you to realize your creative intent in wildflower photo spots. You don’t need the most expensive kit, but you do benefit from choosing lenses that deliver both detail and context. A versatile macro or a short telephoto lens can capture intimate petal textures while still revealing the surrounding flora. When selecting gear, consider how you want to trade off background blur against environmental storytelling. The lens choice should align with your vision for the field, whether you want a soft, dreamy background or a crisp panorama of color. In practice, keep your camera ready to capture quick moments of movement or color shifts as the meadow breathes with the breeze. A reliable tripod supports long exposures when the light is delicate and enables precise framing for still, quiet compositions in wildflower photo spots. A carry kit with a small reflector or diffuser can help you adjust light in tight spaces or shaded pockets, ensuring your subject remains luminous without harsh shadows.
Lenses for Detail and Context
Macro lenses excel for close‑up studies of petal texture, vein patterns, and dew drops that sparkle in morning light. When you want to tell a broader story about the meadow, a standard zoom or a short telephoto lets you isolate a compelling bloom while including a swath of supporting flora. The key is to balance macro detail with context; a purely tight shot can feel clinical, while a too‑wide frame may wash out the subject. If you are new to wildflower photo spots, practice with a 60–105mm macro or a 70–200mm zoom to understand how distance affects perspective and depth. Each choice shapes how readers experience the scene and influences how you compose to maintain visual harmony across the frame.
Aperture, Shutter, ISO, and Focus
In the field, you will frequently adjust aperture to control depth of field. A wide aperture is ideal for isolating a single bloom and turning the background into a creamy blur that emphasizes color and form. For broader scenes where you want several blooms in focus, a smaller aperture preserves texture across the frame. Shutter speed should reflect movement; gentle breeze requires faster speeds to prevent motion blur, whereas slower speeds can convey a sense of calm when petals drift subtly in the wind. ISO should stay as low as possible to retain detail and reduce noise, but you may raise it a notch or two in dim light to preserve a clean exposure. Autofocus modes matter as well: single‑point focus helps fix on the exact bloom, while a small dynamic area can keep the subject sharp if wind moves the flowers. This practical balance of settings enables you to capture wildflower photo spots with clarity, color fidelity, and a sense of place that resonates with readers.
Tripods, Filters, and In‑Field Techniques
Tripods stabilize shooting at slow shutter speeds or when you deliberately slow the scene for artistic effect. Lightweight tripods are ideal for fieldwork, allowing you to frame precisely and maintain consistent perspective across multiple frames. Reflectors and diffusers offer practical ways to adjust light in shadowed meadows; a white reflector can bounce light into a shaded bloom without making the scene feel staged, while a diffuser softens harsh sun on petals. If you frequently shoot in variable conditions, a simple polarizing filter can reduce glare on leaves and petals, deepen greens, and improve color saturation where it serves the scene. In practice, prepare for quick changes: swap lenses, adjust exposure, or switch to manual focus as wind shifts the focal point. With this gear mindset, you can consistently deliver high‑quality wildflower photo spots even in challenging field conditions.
For a broader perspective on foundational photography principles that enhance field work, see this practical overview of composition and framing: Photography tips.
In every shoot, remember that the comfort of the meadow and the health of the blooms come first. Respect for habitat should guide your choices about where to stand, how long to shoot, and how you move through the field. This mindful approach ensures you preserve wildflower photo spots for future seasons while building a strong portfolio that readers will trust and revisit.
Looking ahead, Part 3 will deepen these fundamentals by exploring post‑processing workflows that enhance color, texture, and tonal balance without compromising natural authenticity. In Part 3: Post‑Processing Your Wildflower Photos, we will translate field captures into polished images you can publish with confidence and care.
Advanced Strategies for Wildflower Photo Spots: Scaling, Variation, and Community Engagement
In this final section, we translate passion into scale. You will learn how to grow a reliable library of wildflower photo spots, introduce variation that keeps readers returning, and build a thriving community around your images. The strategies blend practical field work with thoughtful content planning, ensuring that wildflower photo spots remain fresh, searchable, and shareable across 2026 audiences.
Scaling Your Wildflower Photo Spots Network
Scaling is not about chasing volume alone. It is about creating a repeatable system that expands your library without eroding quality. Start with a clear workflow, then extend your reach through smart collaboration and disciplined cataloging.
Establishing a Scalable Field Kit and Workflow
Build a field kit that serves multiple locations and conditions. Pack a lightweight tripod, a macro lens, a wide-angle option, spare batteries, and weather-ready filters. Keep a compact notebook or a digital log for quick notes about each location. Use preset shooting templates to speed up processing while preserving a consistent look. A scalable workflow means you can shoot 20 spots in a single morning and still produce polished images for publication.
- Prepare a location brief for each site that includes best times, access notes, and photography targets (macro details, landscapes, pollinator shots).
- Adopt a routine: arrive early, scout, shoot in three passes (wide, medium, close-up), and review on-site to plan a second pass if needed.
- Vary your gear by weather and season. A macro lens works in a meadow; a telephoto can capture distant blooms in a field without disturbing soil or plants.
Automation helps too. Use metadata tags and standardized file naming. Create a shared lightroom catalog or a cloud-based drive so collaborators can access the same keywords and presets. By systematizing these steps, you multiply your output without sacrificing quality.
Systematic Location Mapping and Access
Map your spots with a simple, scalable system. Record GPS coordinates, seasonal bloom windows, access points, and any permit requirements. Create a color-coded map for quick reference. Maintain a calendar that highlights peak bloom periods and weather windows for each site. When you build a map-based library, you unlock efficient planning for current shoots and future seasons.
Respect access rules and privacy. Always obtain permission when required. Leave no trace: stay on trails, avoid trampling sensitive flora, and minimize disturbance to pollinators. A disciplined approach keeps spots open and trustworthy for future shoots.
Scale comes with partnerships. Collaborate with local park rangers, botanical gardens, and land managers who can offer access to lesser-known patches. Mutual value proves you are a responsible collaborator, not just a photographer chasing clicks.
Variation in Shooting: Seasons, Light, and Subjects
The core of compelling wildflower photography is variation. Readers crave fresh perspectives across seasons, lighting conditions, and subject focus. Plan variations as a deliberate content strategy, not as an afterthought.
Time-of-Day and Weather Windows to Maximize Color
Early morning and late afternoon light flatters petals and creates soft shadows. Overcast days can yield even color without harsh highlights, ideal for close-ups of texture. Use golden hour for drama in landscape shots and pollinator interactions. Record a few quick notes on each location about the light angles and wind conditions. Small adjustments to timing translate into striking differences in the final image.
Weather opens stories too. A light rain can reveal saturated colors and new textures. Dew on petals in morning shoots adds shimmer. When you see dramatic skies or dramatic cloud cover, prioritize wide shots that capture mood and scale as well as detail.
Shooting Techniques for Variations
Develop a toolkit of shot types to illustrate variation. Combine macro close-ups of nectar guides and stamens with sweeping portraits of entire fields. Include pollinator interactions to show ecological value. Use a shallow depth of field for floral portraits, then switch to a panoramic view for context. Alternate between vertical and horizontal compositions to suit different platforms.
Experiment with movement: a slow pan across a meadow or a gentle drift of petals in a breeze can convey life in a still image. Use bracketing for exposure to preserve highlight detail in bright sun or reflective petals. When possible, shoot with a reflector or a white card to lift shadows without altering color balance.
Post-Processing Variations: Consistent Styles vs Seasonal Palettes
Consistency builds recognizability. Maintain a core processing style for the site while allowing seasonal palettes to shift subtly. For example, spring blooms can lean toward cool greens and fresh yellows; summer palettes may warm toward golds and ambers; autumn shots can embrace richer browns and crimson hues. Use targeted tonal adjustments to bring out petal texture, leaf vein details, and background separation. Maintain careful color calibration to keep wildflower hues natural and not oversaturated.
Preserve the integrity of the bloom. Clarity and vibrance are useful, but avoid oversaturation that makes flowers look unnatural. Always check skin tones? For flowers, use color-aware adjustments that respect the flower’s natural palette. A fast pre-set can be your baseline, with on-the-spot tweaks for each scene.
Building Community Engagement Around Wildflower Photo Spots
Community builds long-term engagement. When readers see real people enjoying wildflower photo spots, they connect more deeply with your content. Structure your community strategy around education, collaboration, and fair credit.
Collaborations with Local Guides, Parks, and Florists
Partner with local guides who know seasonal patterns and accessible routes. Work with parks to gain access to guided tours or permission-based shoots. Florists and plant shops can provide practical context about the blooms you photograph and may share audience channels for cross-promotion. These partnerships extend your reach while elevating the educational value of your images.
Document these collaborations in a dedicated gallery. Publicly credit partners and link to their resources. The collaboration story adds depth to your content and builds trust with your audience.
Hosting Photo Walks and Workshops
Organize light, beginner-friendly photo walks at sunrise or sunset when wildflowers glow in warmer light. Offer short, practical workshops on composition, light, and field ethics. A well-run workshop becomes a focal point for community growth and content generation. Recurse the event into galleries, recap posts, and follow-up tutorials so participants become repeat readers.
Use workshops to gather user-generated content. Encourage attendees to share their shots with a dedicated hashtag and to credit BloomHaven.com as a reference. This expands your reach and creates a living map of spots photographed by others.
User-Generated Content and Photo Credits; Attribution and Licensing
Encourage readers to contribute their best wildflower photo spots images. Create clear guidelines for credits and licensing. A simple attribution system—name, location, and date—supports a sense of community and keeps the content trustworthy.
Offer options for licensing, including rights management for commercial use. When you celebrate contributors, you foster loyalty and ongoing engagement. Regularly feature top submissions in a dedicated gallery or weekly roundup to sustain momentum.
Social Proof: Featuring Reader Submissions, Galleries
Turn reader photos into a weekly or monthly gallery. Provide context for each shot: bloom type, location, season, and a short tip from the photographer. This social proof increases time on page and encourages others to participate. It also creates a sense of belonging—readers see themselves as part of the BloomHaven photography community.
SEO and Analytics for Scale
Search optimization and data insights guide your scale strategy. In 2026, search behavior rewards depth, structure, and real-world value. Translate that into practical on-page SEO that helps wildflower photo spots rise in search results without sacrificing user experience.
Content Strategy for 2026: Relevance Signals
Develop topic clusters around wildflower photo spots. Create pillar articles about core locations, seasonal guides, and gear lists. Support them with detailed cluster posts about individual sites, season-specific shoots, and pollinator interactions. Use semantic keywords related to wildflowers, meadow photography, pollinators, and plant habitats to widen your reach. Align these topics with Pinterest trends like wildflowers and pollinator plants to capture visual search momentum.
Use the focus keyword naturally in headings, meta descriptions, and image alt texts to reinforce relevance. Maintain a balanced density that feels organic and helpful rather than forced. In addition, ensure your internal links guide readers to category pages and relevant posts, strengthening site structure for both users and search engines.
On-Page Optimization and Internal Linking
Every page should have a clear purpose, a single primary focus, and related subtopics. Use descriptive, user-friendly headings that incorporate the focus keyword where it fits naturally. Place internal links in the first paragraph of a section and near closing sentences to guide readers toward deeper content. Build a content map that connects location guides, seasonality insights, and community features. For images, use descriptive alt text that includes the focus keyword when appropriate, but avoid stuffing keywords. A well-structured schema markup for articles and image galleries helps search engines understand your content and display rich results for visually driven queries like wildflower photo spots.
Outbound Authority and Resource Links
Include one relevant outbound link to a credible, non-competitive resource. For example, the National Park Service provides authoritative context on wildflowers and habitat types. Linking to such resources enhances trust and demonstrates a commitment to reader education. National Park Service Wildflowers Overview complements your site’s practical guidance with ecological context and ongoing learning opportunities. Always choose outbound links that add substantive value and avoid steering readers away from your own content unless the offset is clearly beneficial to their learning journey.
Ultimately, this final section ties together scalable systems, creative variation, and community-driven momentum. By scaling your field workflow, embracing variation in light, season, and subject, and inviting readers to participate, you create a durable ecosystem around wildflower photo spots. Your content becomes more than a collection of pretty images; it becomes a living map of blooms, habitats, and shared experiences that draw photographers back again and again.
In summary, the key to sustainable growth lies in a repeatable process that favors preparation, ethical access, and collaborative opportunities. You should scale thoughtfully, vary purposefully, and engage authentically with a community that values beauty, ecology, and craft. As you illuminate wildflower photo spots through consistent technique and open storytelling, your audience will grow along with your library. Ready to deepen your impact with wildflower photo spots? Start by refining your field-kit workflow, planning seasonal shoots, and inviting the community to contribute. The flowers are waiting—and so are your readers.
Conclusion: Wildflower photo spots are more than destinations; they are stories told through color, light, and community. By scaling your workflow, embracing variation, and inviting collaboration, you transform fleeting blooms into lasting content value. Explore new sites, refine your craft, and encourage others to share their perspectives. The result is a thriving, searchable archive that showcases wildflower photo spots at their most inspiring. The journey starts now with purposeful planning, ethical practice, and open collaboration—your audience awaits.
Focus keyword restated for emphasis and SEO reinforcement: wildflower photo spots. For ongoing engagement, consider inviting readers to submit their own discoveries and photos, helping BloomHaven.com become a living gallery of wildflower photo spots that grows with every season.