Pollinator Plant Calendar Zone 6: A Gardener’s Guide
Welcome to BloomHaven.com’s expert guide for Zone 6 gardeners who want to harmonize beauty with ecological benefit. In 2026, a thoughtful pollinator plant calendar becomes less about chasing trend and more about reliable bloom rhythms, soil health, and resilient habitats. The focus here is practical, visible results: vibrant beds that sustain bees, butterflies, and other critical pollinators while delivering color and texture throughout the growing season. The concept of a pollinator plant calendar helps you choreograph planting, maintenance, and seasonal tasks around when pollinators need nectar and pollen most. Whether you are starting a new bed, renovating a tired border, or filling gaps in a mixed perennial garden, this article lays a planning foundation you can adapt year after year. Read on to discover how to map microclimates, choose compatible plant communities, and create a zone 6 calendar that yields steady bloom and healthier soil in 2026 and beyond.
Pollinator Plant Calendar Zone 6 Essentials: Planning, Planting, and Seasonal Bloom
pollinator plant calendar: Planning essentials for Zone 6
Planning is the backbone of a successful pollinator-friendly garden. In Zone 6, you experience distinct frost patterns, winter chill, and relatively long growing seasons compared with warmer zones. A robust calendar starts with a simple map: when frost dangers end, when soil thaws, and which plants can anchor early, mid, and late-season nectar sources. The aim is continuous bloom, which means thinking in windows rather than single moments of color. A well-crafted plan helps you synchronize soil prep, plant acquisition, and seasonal maintenance so nothing slips through the cracks.
To begin, identify your microclimates: south-facing slopes, sheltered courtyards, and the shady edge near a woodland margin all offer different heat, moisture, and light regimes. Record your soil texture and drainage, since Zone 6 soils range from heavy clays to sandy loams. With that baseline, you can assemble a starter list that covers early spring bloom for queen bees, midsummer nectar for butterflies, and late-season pollen for emerging pollinators before winter settles in.
With a focus on the pollinator plant calendar, you’ll want to balance native and well-adapted non-native species. Native plants support local pollinators most reliably, while selected ornamentals add extended color and nectar diversity. The objective is resilient, low-maintenance plant communities that attract a broad range of pollinators across the season. In addition, group plants by bloom time so you can plan consistent nectar sources without overwhelming any one area with a single bloom window.
For those seeking factual guidance, a trusted agricultural extension resource can provide timing benchmarks and local substitutions. See a practical reference at University Extension guidance for region-specific planting windows and pollinator-friendly options.
Core components of the pollinator plant calendar
The calendar rests on five pillars: bloom windows, nectar sources, habitat diversity, soil and moisture management, and maintenance cadence. First, map bloom windows from early spring to late fall. Second, select nectar and pollen sources that suit pollinator needs across life stages. Third, ensure habitat diversity by mixing plant types—perennials, annuals, and short-lived fills—to cover different times and pollinator preferences. Fourth, optimize soil health and moisture management to sustain root systems and microbial life. Fifth, establish a maintenance cadence that aligns pruning, deadheading, and division with plant life cycles. Each pillar reinforces the others, creating a durable, low-stress system that yields reliable color and ecological value season after season.
As you build the initial list, aim for 12–18 plants per 100 square feet for a dense, nectar-rich payoff, then scale up or down to fit your space. A strong start includes 2–3 early bloom crops (late winter to early spring), 4–6 mid-season bloomers (spring through midsummer), and 2–4 late-blooming varieties (late summer to fall). This distribution keeps nectar sources flowing and avoids gaps that could stress pollinators.
Now let’s move to how to set bloom windows that reflect your microclimate and sun exposure, so you can time planting and maintenance with precision.
Setting bloom windows by microclimate and sun exposure
Zone 6 offers a spectrum of microclimates inside a single garden. South-facing beds warm earlier and favor sun-loving nectar plants. Shady borders extend bloom by relying on cool-season varieties and woodland natives. Edge habitats near water or reflection from a house wall may extend heat and alter growth rates. A practical approach is to categorize beds into three zones: sun, partial shade, and shade. For each zone, assign a core set of species with known bloom times. Then layer in companion plants that fill in early or late-season gaps. The goal is a staircase of bloom that progresses through the calendar rather than peaking in a narrow window.
Map your frost-free dates and soil temperatures to fine-tune your planting schedule. Early-season crops might need frost protection or cold stratification, while midsummer favorites demand consistent moisture. Late-season growers should tolerate shorter days and cooler nights while providing essential pollen in late summer and early fall. By aligning planting times with observed local conditions, you reduce waste and improve success rates, especially for newly established beds.
Consider recording a simple bloom calendar in a notebook or digital tool. Note the actual bloom dates, pollinator activity, and any maintenance tasks that affected performance. Over time, your calendar becomes a practical forecast you can adjust each season based on weather patterns and plant performance.
Seasonal rhythm: spring, summer, and fall bloom patterns
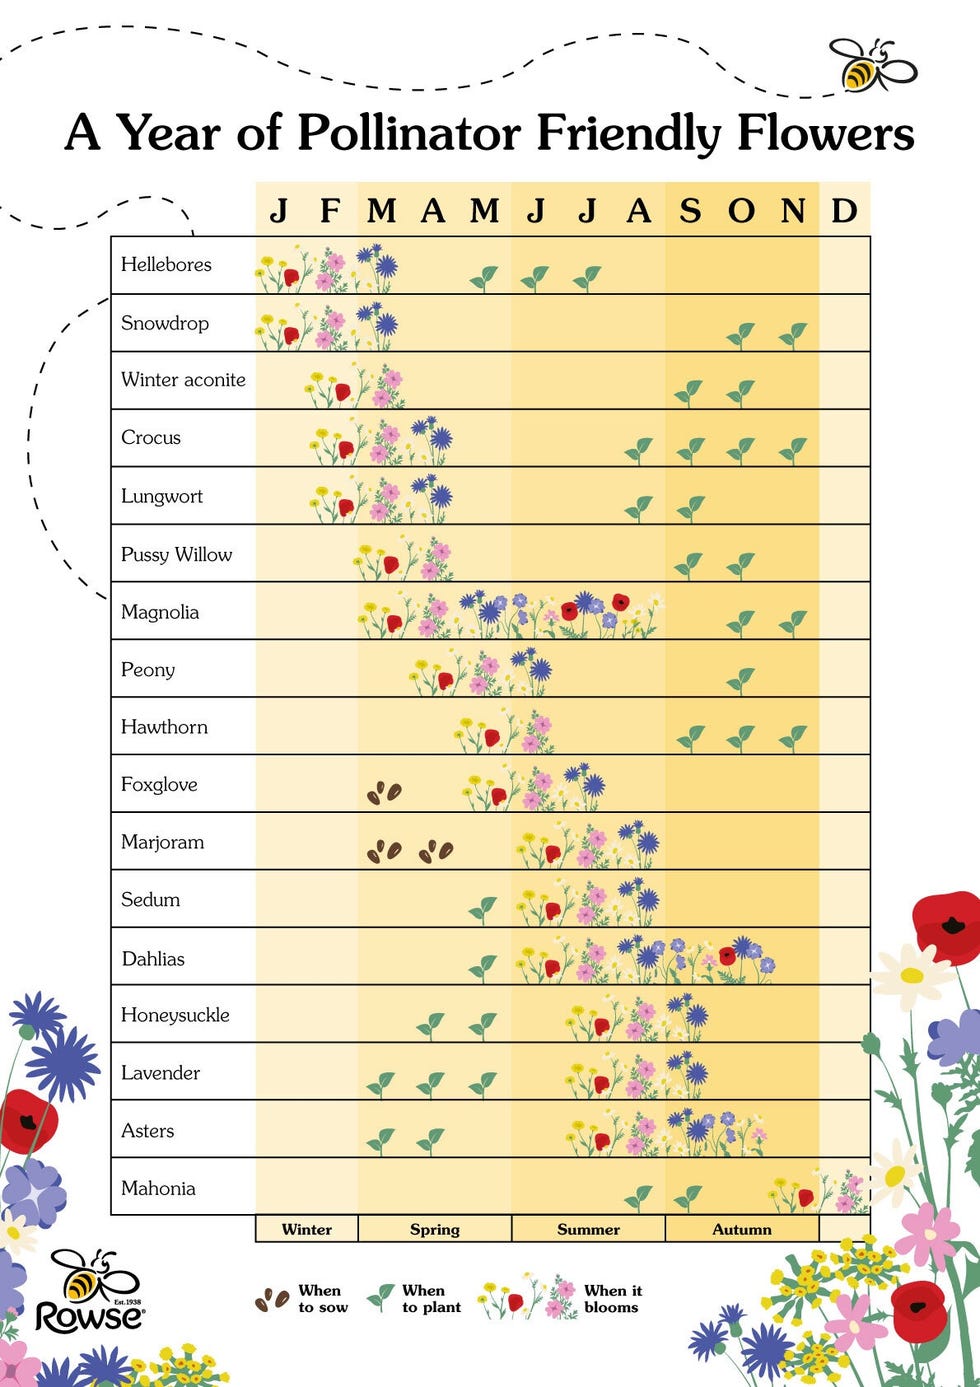
In spring, prioritize early nectar sources such as crocus, hellebores, and native woodland anemones. These warm up pollinator activity as queen bees emerge from winter diapause. In midsummer, move toward flowering perennials and tall sedges that provide tall nectar sources visible from a distance. Finally, in fall, highlight late-blooming asters, goldenrods, and nectar-rich grasses that sustain pollinators before winter dormancy. A well-paced calendar ensures a continuous supply of nectar and pollen while keeping maintenance manageable.
To keep the plan practical, pair each bloom window with practical tasks: soil amendments before spring, mulching in late summer to preserve moisture, and deadheading to extend blooming in some species. These steps maximize both pollinator benefits and garden aesthetics.
Selecting nectar and pollen sources for ongoing blooms
Pollinators rely on a mosaic of nectar-rich flowers and pollen providers. For Zone 6, prioritize plants with multiple bloom cycles or long-lasting blooms. Native wildflowers such as solidago (goldenrod), echinacea (coneflower), and echinacea purpurea, plus long-bloom perennials like salvia and asclepias (milkweed), create dependable nectar corridors. When choosing non-native ornamentals, select varieties with extended bloom times and drought tolerance to reduce maintenance pressure while maintaining ecological value. Remember that diversity matters: by mixing color, height, and bloom duration, you create a tapestry that attracts a broader pollinator community, including bees, butterflies, and hoverflies.
In this section, the focus is on practical plant selection that supports many pollinators across the season. Keep a balance of tall and low-growing species to ensure visibility for foraging insects and to avoid shading important groundcovers. Pair early bloomers with mid-season workhorses, and finish with late bloomers that provide late-season nectar and pollen.
To support ongoing learning, consult local extension resources for zone-appropriate species lists and planting times. The link above provides a regional framework you can adapt to your garden’s microclimates and soil conditions.
Soil health and habitat preparation for Zone 6 pollinators
Soil health underpins every other element of a pollinator-friendly garden. Zone 6 soils vary widely, but common challenges include compaction, drainage issues, and variable organic matter. Start with a soil test to determine pH, nutrient levels, and texture. Based on results, plan soil amendments that improve structure and microbial life. Incorporate compost to boost organic matter, and use mulch to regulate moisture and temperature. While you’re beautifying the space, maintain healthy roots by avoiding heavy bottom-end pruning in late summer and ensuring adequate aeration for perennials with dense root systems.
Mulch is your ally for moisture retention and weed suppression, but avoid thick coatings that smother emerging roots. A 2-3 inch mulch layer is usually sufficient, with a lighter layer around shallow-rooted species. Water deeply and less often to encourage resilient roots, and use drip irrigation or soaker hoses to minimize leaf wetness and disease risk. Healthy soil also supports a thriving soil food web, which in turn bolsters plant health and pollinator success.
Row crops, cuttings, and container plantings each have unique soil needs. In containers, provide a balanced potting mix with perlite or pine bark to maintain drainage, and monitor moisture closely during hot spells. For in-ground beds, maintain a gentle, well-structured transition from bare soil to layered mulch and organic amendments. A well-prepared site reduces maintenance in subsequent seasons and supports a robust pollinator calendar that remains productive through temperature swings and wet years.
Implementation cadence: winter to early spring actions
Turn the calendar into action with a clear cadence. In late winter, finalize plant orders, base color palettes, and spacing plans. Early spring is pruning and division time for many perennials, followed by soil amendment incorporation and mulch application. Mid-spring brings planting and ongoing monitoring of soil moisture as beds begin to wake. Late spring to early summer should focus on deadheading and seasonal maintenance, with attention to pollinator-friendly mulch habitats and nesting sites. Summer requires steady irrigation and support for heat-sensitive varieties. Finally, late summer frames the transition to late-bloomers, seed collection for some species, and preparation for fall color and nectar supply. A steady cadence reduces last-minute emergencies and yields a more reliable pollinator garden overall.
In addition to the practical steps above, keep a simple log of what works and what doesn’t. Note plant performance, pollinator visits, and any pest pressure you observe. This ongoing record becomes your personal guide for refining the pollinator plant calendar in future seasons.
As you plan and plant, remember that the goal is not only beauty but also ecological resilience. A zone 6 pollinator plant calendar that is well designed will deliver repeated rewards each season and help you build a living, breathing habitat that supports pollinators and your garden aesthetic alike.
Next, in Part 2, we will explore Seasonal Bloom and Planting Windows in greater depth, focusing on concrete monthly timelines, plant pairings, and practical maintenance routines that keep the calendar humming through the growing year.
For more on planning and planting strategies, you may want to explore additional guidance on pollinator habitats and sustainable gardening practices to complement your Zone 6 calendar.
Executing the Pollinator Plant Calendar Zone 6 Essentials: Step-by-Step Planting and Maintenance
In Zone 6, the pollinator plant calendar is not a single date on a page; it is a living plan that translates frost dates, rainfall patterns, and seasonal sun into a sequence of planting and care. This section converts that calendar into a practical, step-by-step approach you can implement this year. The goal is twofold: deliver continuous nectar and pollen for pollinators across the growing season, and build soil health and garden resilience that reduce maintenance over time. Expect this guidance to feel precise, actionable, and rooted in the real conditions most Zone 6 gardens face in 2026.
For additional background on pollinator-friendly practices, explore the guidance from Pollinator Partnership. This resource helps you align your Zone 6 garden with pollinator needs while staying aligned with sustainable gardening principles.
Step 1: Groundwork and soil health for a Zone 6 pollinator plant calendar
Healthy soil is the quiet engine of a thriving pollinator garden. Specifically, start with a soil test to determine pH and nutrient baseline. In Zone 6, most nectar-rich perennials prefer a slightly acidic to neutral pH, roughly between 6.0 and 7.0. If your soil skews acidic or alkaline, amend gradually with well-aged compost, leaf mold, or finely ground lime or sulfur as recommended by a local extension. Remember, pollinator plants are heavily dependent on robust roots, so drainage matters. Compacted beds trap moisture and reduce root oxygen, which limits root growth and bloom production. Therefore, prioritize beds that drain well and retain moisture without waterlogging for deep-rooted perennials that sustain pollinators through hot days.
Next, improve soil biology by incorporating a slow-release organic mulch and compost. Specifically, apply 2 to 3 inches of finished compost across seedbeds and new beds, then work it into the top 6 to 8 inches of soil. This builds a living mulch that feeds beneficial microbes and earthworms, which in turn support drought tolerance and nutrient uptake. After soil work, install a simple irrigation plan with drip lines or soaker hoses to prevent wet foliage and reduce disease pressure. A stable moisture baseline helps pollinator plants establish quickly and keeps blooms coming through late spring or early summer when pollinators emerge in force.
Step 2: Sunlight, site selection, and bed design for Zone 6
Most pollinator-friendly plants thrive in full sun, but Zone 6 gardens often include microclimates with pockets of shade. In general, aim for at least 6 hours of direct sun for nectar-rich perennials. If you have shade, select pollinator-attracting species that tolerate it, such as Astilbe or Heuchera. When designing beds, group plants by bloom time rather than by color alone. This helps you craft a continuous nectar corridor and avoids gaps that reduce pollinator activity. Create layered planting with taller species at the back and mid-height plants forward, so bees and butterflies can easily move from bloom to bloom without needing to travel long distances. In addition, incorporate structural elements like small brush piles or a shallow water feature to support a wider range of pollinators, including native bees and butterflies that rely on microhabitat features in Zone 6 landscapes.
Part of the design is selecting plant mixes that suit your soil type and moisture regime. For sandy soil, emphasize drought-tolerant natives and sturdy perennials with deep root systems. For heavier soils, focus on plants tolerant of periodic wetness and good drainage. The pollinator plant calendar becomes a living guide when you tailor it to your specific site, ensuring that every bed contributes blooms from early spring through autumn. The result is a garden that supports pollinators during critical life stages and reduces the need for frequent, high-input maintenance.
Step 3: Selecting species for the pollinator plant calendar in Zone 6
The core of a successful pollinator garden is a diverse roster of plants that offer nectar, pollen, and larval resources across seasons. In Zone 6, plan for early, mid, and late-season bloomers to create a continuous forage pathway. For early spring, consider bulbs and stoloniferous perennials such as crocus, hyacinth, and Scilla, followed by robust perennials like Salvia nemorosa, Echinacea purpurea, and Monarda didyma that provide nectar through late spring and into summer. Mid-season plants such as Coreopsis, Penstemon, and Gaillardia sustain a strong nectar flow during peak pollinator activity. Late-season performers, including asters, asters hybrids, and Helianthus, extend bloom into autumn. When choosing varieties, favor nectar-rich flowers with flat or tubular blossoms that are easy for a range of pollinators to access. Also, include some nectar-rich annuals like Zinnias or Cosmos for quick color and rapid bloom cycles that fill small gaps in the calendar. This careful curation makes the pollinator plant calendar responsive to year-to-year climate variation while keeping blooms abundant for your pollinators all season long.
To illustrate a practical mix, you might blend ornamental grasses for structure with mid-season perennials and a few late-season flowering shrubs. The result is a dynamic, insect-friendly tapestry where bees, butterflies, and beneficials can locate nectar and safe habitats. Remember, diversity matters: a wider genetic and color palette reduces pest pressure and improves seasonal visual interest, which in turn keeps pollinators visiting your garden for longer periods. If you want a reliable source of regionally appropriate options, start with a Zone 6 plant list from your local extension and compare it against the pollinator plant calendar you’re building. This approach minimizes guesswork and aligns your planting plan with regional climate patterns observed in 2026.
Step 4: Planting technique and bed layout for Zone 6
Once you have selected species, plan your planting technique to maximize establishment speed and long-term health. For bare-root trees or shrubs, plant at the same soil level as in the container and water deeply to settle soil around the roots. For herbaceous perennials, set plants at roughly their crown height and space them according to mature width. In all cases, place taller plants toward the back or center of your beds, with shorter species in front to create a natural, pollinator-friendly mosaic. Resist the urge to cram plants into a single bed; overcrowding reduces air circulation and increases disease risk, which can deter pollinators from lingering. Use mulch to insulate roots, suppress weeds, and regulate soil temperature. A 2 to 3 inch layer of organic mulch not only stabilizes moisture but also supports soil life that helps pollinator plants thrive over multiple seasons. Finally, incorporate a few structural elements such as a small rock wall or log pile to create microhabitats for shelter, overwintering beneficials, and ground-nesting bees during the warmer months.
Step 5: Seasonal planting steps by season in Zone 6
In Zone 6, you most commonly plant cool-season ornamentals in early spring, then transition to warm-season perennials after the last frost. January and February are ideal for planning and reading seed catalogs, improving soil structure, and selecting varieties that fit your pollinator plant calendar. In March and April, when soil warms, plant hardy perennials and divide overgrown clumps to refresh your beds. By May, most perennials are establishing and starting to bloom, while massing similar bloom times near a central nectar hub makes it easier for pollinators to locate resources quickly. Summer demands steady maintenance: regular watering during dry spells, deadheading faded blossoms to encourage rebloom, and a careful eye for heat stress. In late summer, begin sowing fall-blooming annuals and late-season perennials to maintain nectar flow into autumn. Finally, in fall, prepare for winter by applying a light mulch and cutting back perennials only after frost to reduce moisture loss and protect overwintering pollinators that may use the stems for shelter. Throughout these steps, keep your pollinator plant calendar flexible so you can adjust for unexpected weather patterns while preserving bloom continuity.
Step 6: Watering strategy and mulch for Zone 6 pollinator health
Water is the tempo that ties together your pollinator plant calendar. In Zone 6, aim for a deep, infrequent watering approach that encourages deep root systems. A drip irrigation system or soaker hoses evenly distribute moisture at the root zone while keeping foliage dry, which reduces powdery mildew and other foliar diseases that can deter pollinators. Mulching remains essential; a 2 to 3 inch layer of organic mulch helps moderate soil temperature, conserve moisture, and feed soil organisms that support plant health. Replenish mulch as needed, and avoid piling mulch against stems where crown rot can develop. By keeping the soil consistently moist but never waterlogged during critical flowering periods, you ensure the blossoms hold nectar longer and become more attractive to pollinators throughout the season. If you notice water stress in mid-summer, adjust your irrigation schedule quickly rather than waiting for symptoms to worsen.
Step 7: Fertilization and soil nutrition for Zone 6 gardens
Pollinator plants typically require modest fertilization compared to crops. Therefore, focus on soil-building amendments rather than heavy topdressings. Apply a light side-dress of compost or a slow-release organic fertilizer in early spring to support vigorous bloom. Avoid high-nitrogen feeds that promote lush foliage at the expense of flowers, as this reduces nectar production and may deter pollinators. If you test soil and find specific nutrient deficiencies, address them with targeted amendments based on local extension recommendations. After flowering, consider a light organic side-dress to sustain plant vigor for late-season blooms. By fertilizing judiciously, you maintain a steady supply of nectar while keeping plant stress low, which benefits both pollinators and gardeners in the long run.
Step 8: Pest and disease management with pollinators in mind
Integrate an IPM mindset that emphasizes prevention and natural controls. Start with healthy soil, diverse plantings, and adequate spacing to improve air circulation and reduce fungal issues. Regularly inspect leaves for signs of aphids, spider mites, or caterpillars, and employ mechanical or biological controls when needed. Encourage beneficials by providing habitat features, such as a nearby shallow water source and a variety of flowering plants that bloom at different times. When pesticides are necessary, choose targeted, pollinator-safe products and apply them at times when pollinators are least active, typically in cooler morning hours or late in the day. By prioritizing prevention and using chemicals responsibly, you support a robust pollinator plant calendar that remains productive across seasons.
Step 9: Habitat microhabitats and shelter for pollinators
Beyond blooms, pollinators need shelter, nesting sites, and overwintering options. Create microhabitats with small log piles, stone piles, and a mix of evergreen and deciduous foliage to shelter bees and butterflies during cooler weather. A simple insect hotel can attract mason bees and solitary pollinators that do not compete with honeybees. Provide a shallow, clean water source such as a saucer with pebbles where pollinators can perch. By combining nectar-rich plants with habitat features, you build a resilient pollinator plant calendar that supports a wider range of species and increases visitation throughout the year.
Step 10: Record-keeping and updating your pollinator plant calendar
Keep a simple garden journal that tracks bloom times, weather conditions, and pollinator visits. Specifically, note the dates when major blooms begin and end, any pest pressures, and how well a given plant performed in year over year. Use this data to refine your pollinator plant calendar for the next season. Recording changes in performance helps you fine-tune plant selections, adjust spacing, and re-sequence plantings to ensure a smooth nectar flow from early spring through late autumn. If you discover an excellent new variety or a reliable annual you want to trial, document its performance and sustainability within your calendar. The goal is to create a dynamic tool that grows with your garden and your climate realities.
Case Study: A practical Zone 6 garden plan aligned to the pollinator plant calendar
In a typical Zone 6 yard, a mixed bed that prioritizes early spring bulbs, mid-season perennials, and late-season natives delivers consistent forage. A practical plan might begin with crocus, Scilla, and snowdrops to anchor the bed before the soil warms. These are followed by Echinacea, Monarda, and Salvia in late spring and early summer, then Coreopsis and Gaillardia through mid-summer. Late-season nectar is provided by asters, Helianthus, and Sedum, with a small annual display of Zinnias to fill any remaining gaps. This approach minimizes soil disturbance, promotes soil health, and supports a diverse pollinator community. Integrated with mulch, proper watering, and IPM practices, the garden remains attractive to pollinators while staying manageable for the gardener.
In practice, you may want to couple this calendar with a simple seasonal maintenance routine: a light spring cleanup to remove winter debris, a mid-summer inspection for heat stress and drought signs, and a fall tidy that leaves seedheads that feed late-season birds and pollinators. The result is a Zone 6 pollinator-friendly landscape that stays productive across years, with bloom timing closely aligned to your local climate reality.
Next, in Part 3: Designing for Season-Long Blooms in Pollinator Plant Calendar Zone 6, we explore design refinements, microclimate tricks, and seasonal maintenance tactics that maximize pollinator activity through every change of season.
Advanced Pollinator Plant Calendar Zone 6 Strategies: Troubleshooting, Scaling, and Engagement
In this final, strategy‑driven section, we synthesize troubleshooting, scaling, and engagement into a practical blueprint for Zone 6 gardeners. The goal is a resilient, productive pollinator plant calendar that sustains nectar and pollen supplies across the entire growing season. You’ll find concrete tactics that address microclimates, shifting weather, and changing pollinator patterns while keeping your garden visually vibrant and biologically diverse. Ultimately, the most effective approach blends proactive planning with responsive adjustments, so your pollinator garden stays productive from early spring through late fall.
Zone 6 landscapes are dynamic. Cool spells can arrive after warm spells, new pests emerge, and pollinators respond to even small shifts in bloom timing. The strategies below are designed to help you troubleshoot quickly, scale thoughtfully, and engage a broader audience in your pollinator conservation effort. We’ll cover practical fixes, scalable design choices, and methods to deepen community involvement, all anchored in the concept of a living, responsive pollinator plant calendar.
Troubleshooting Common Zone 6 Challenges in Your Pollinator Plant Calendar
There are several recurring hurdles in Zone 6 gardens that can disrupt your pollinator plant calendar. The key is to anticipate timing gaps, protect vulnerable blooms, and preserve nectar sources when they’re needed most. The following points outline actionable fixes you can implement this season and onward. To conclude this subsection, adapt quickly and document results so your calendar improves year after year.
- Erratic bloom times due to late frosts or early heat waves. Protect early and mid‑season blossoms with lightweight row covers, cloches, or seasonal plant selection that buffers against sudden cold snaps. Favor a mix of early, mid, and late bloomers so there’s always nectar available, even if weather shifts compress the calendar.
- Soil drainage and moisture swings. Test soil structure and amend with organic matter to improve drainage in heavy soils. In droughty soils, layer mulch to conserve moisture and install a simple drip irrigation system to provide consistent nectar sources without overwatering. In all cases, aim for even moisture without soggy roots, which can collapse bloom quality and pollen production.
- Persistent pests and disease pressures. Emphasize integrated pest management: encourage beneficial insects, plant resistant varieties, and limit broad‑spectrum sprays. Regularly scout for aphids, caterpillars, and fungal issues. Use targeted interventions when needed and keep nectar sources available by staggering plantings so attacked areas recover quickly without creating large nectar gaps.
- Pollinator gaps in mid‑season or between bloom windows. Round out your calendar with filler plantings that bloom during off‑peak times. Use succession planting and interplanting with nectar‑rich herbs and perennials to maintain continuous resources for bees, butterflies, and other pollinators.
- Competition and crowding that shade desirable blooms. Thin or relocate aggressive species to maintain air circulation and light. Group plants with similar water needs to reduce stress, which can shorten bloom duration and nectar quality.
- Wildlife browsing and plant loss in high‑pressure areas. Install physical barriers or choose deer‑resistant species for vulnerable sections while preserving key nectar plants in protected beds or containers.
In each case, document the problem, record the corrective action, and monitor results. A simple tracker—date, symptom, action taken, and observed pollinator activity—turns isolated fixes into a data‑driven evolution of your pollinator plant calendar. For broader guidance on pollinator stewardship, visit the Pollinator Partnership for standards and best practices that align with homeowner gardens.
Scaling Your Pollinator Plant Calendar: From Patch to Plot in Zone 6
Scaling means translating a single successful patch into a broader, climate‑aware landscape that supports pollinators across multiple microclimates and seasons. The Zone 6 gardener can grow from a small, beautiful patch to a well‑structured garden that sustains nectar and pollen supplies year round. The core ideas are dosage, timing, and diversity, all geared toward a scalable pollinator plant calendar. Ultimately, scale is not just about size—it’s about producing reliable, staggered nectar waterfalls that bees, butterflies, and other pollinators can exploit day after day.
Begin with a precise audit of your current plantings. Map bloom windows, nectar quality, and pollinator visitation patterns. This audit reveals gaps and helps you prioritize where to expand first. Use a grid or zoning approach to plan plant clusters by bloom period, sun exposure, and water needs. A deliberate, scalable layout ensures you aren’t overcommitting to a single season at the expense of another. The aim is continuity: a near‑constant supply of nectar from early spring through late fall, across every microclimate your property includes.
- Plan by bloom window. Create a calendar that stacks early, mid, and late season flowers in contiguous blocks so nectar is never far away. This approach reduces reliance on a single species and cushions the calendar against weather quirks.
- Layer vertical and horizontal space. Use groundcovers, low perennials, tall stems, and trellised vines to maximize floral density without crowding, supporting a wider range of pollinators and creating visual interest.
- Incorporate containers for rapid scaling. Portable planters allow you to relocate high‑value nectar sources to microclimates or around high‑traffic areas, extending bloom windows and enabling quick experimentation with new species.
- Plan for succession and redundancy. Plant multiple cultivars with overlapping bloom periods and include backups for each major nectar season. Redundancy protects the calendar when a favorite cultivar underperforms in a given year.
- Develop a budget‑friendly expansion strategy. Start with a core group of long‑blooming natives and then phase in additional species as budget and space permit. Prioritize plants with low maintenance but high nectar output.
As you scale, maintain data discipline. Track changes in pollinator visitation, adjust spacing to reduce competition, and refine irrigation to preserve bloom quality. The result is a more resilient pollinator plant calendar that remains productive across multiple years and seasonal cycles.
Engagement and Education: Building Community Around the Pollinator Plant Calendar
Engagement transforms a garden plan into a living movement. When neighbors, clubs, and schools join your pollinator plant calendar, you extend the garden’s influence, accelerate learning, and create a shared sense of stewardship. Engagement also helps you gather diverse feedback, which can refine plant choices, timing, and maintenance routines. Use storytelling, progress updates, and practical demonstrations to connect people with the science and joy of pollinator gardening. In summary, engagement amplifies impact by turning calendar planning into ongoing collaboration.
Practical engagement strategies include seasonal open houses, plant swaps, and collaborative planting days. Document bloom progress with photos and simple bloom calendars that visitors can take home. Encourage participants to track their own pollinator observations and share results. While you keep to a single outbound resource for quality guidance, you can point readers toward broader communities and credible references through context rather than links. The aim is to invite participation, not overload with competing resources.
To deepen learning and align with nationally recognized initiatives, consider linking your efforts to established pollinator campaigns and guidelines. For authoritative standards and collaborative opportunities, visit Pollinator Partnership and incorporate their recommended practices into your calendar planning. This approach keeps your work credible and helps you recruit volunteers and collaborators who value evidence‑based gardening.
Monitoring, Data Tracking, and Adaptive Management for the Pollinator Plant Calendar
Data is the compass for ongoing improvement. A disciplined data flow helps you identify what works, forecast nectar gaps, and adjust planting plans before critical windows close. The focus is practical: keep a simple system that captures bloom timing, pollinator activity, and resource availability. With routine review, your pollinator plant calendar becomes more accurate, more dependable, and more enjoyable to manage.
Key data streams include daily or weekly bloom logs, pollinator visitation counts (direct observation or simple counts), nectar and pollen quality notes, and microclimate observations (temperature, rainfall, afternoon shade). Use these data points to refine plant selections, adjust pruning schedules, and tweak irrigation. Regular data reviews—monthly or at season ends—support proactive changes rather than reactive fixes, ensuring your calendar remains effective across years and weather cycles.
Tracking Bloom Windows and Pollinator Visits – Keep a dedicated sheet or digital log. Record the first and last bloom dates for each species, note any shortfalls in nectar, and tally pollinator visits by type. This granular data helps you see patterns, such as which late‑season blooms reliably attract monarchs or which mid‑season staples fail to perform after a drought. By correlating bloom data with weather, you can forecast nectar liquidity and pre‑plan replacements or supplements for the next season.
Tools for Season Extension in Zone 6 – Season extension is a force multiplier for the calendar. Cold frames, row covers, and simple low tunnels extend flowering into cooler weeks and protect sensitive varieties from frost. Use season extension tools strategically—target high‑value nectar sources during shoulder seasons and keep them in locations that maximize beneficiary visits from pollinators during those windows.
Resource Optimization: Budget‑Smart Scaling – As you scale, prioritize plants that deliver long bloom periods and reliable nectar production with minimal maintenance. Group high‑value plants together to simplify irrigation and care, and rotate plant beds to keep soil life active. A budget‑smart approach balances upfront costs with ongoing maintenance savings, ensuring your pollinator plant calendar remains sustainable year after year.
Season Extension and Production: Tools and Techniques for Zone 6
Season extension is one of the most powerful levers for a zone 6 pollinator plant calendar. The combination of cold frames, low tunnels, row covers, and strategic mulching can push peak nectar windows outward. This section provides practical methods to stretch bloom times without sacrificing plant health or pollinator access. Ultimately, effective extension maximizes nectar availability during critical pollination periods and smooths the calendar’s seasonal rhythm.
Cold frames and row covers. Use inexpensive cold frames to protect early flushes and late frosts. Row covers can shield new plantings during cool nights while allowing light and airflow, reducing injury to fragile blossoms and preserving early nectar. Position protection to minimize shade on sun‑loving pollinator plants, maintaining bloom quality throughout the calendar.
Mulching and soil warmth. A thick mulch layer moderates soil temperature, conserves moisture, and reduces weed competition that competes with nectar production. In Zone 6, conservative mulching helps roots stay warm in late winter and early spring, encouraging earlier flowering for your calendar. Pair mulch with drip irrigation to sustain consistent moisture without oversaturation, which can dampen bloom vigor.
Seasonal pruning and deadheading. Timely pruning refreshes bloom potential and prevents energy from being wasted on spent flowers. Deadheading extends the productivity of many nectar sources and keeps plants visually pleasing while maintaining calendar reliability.
Resource Optimization and Budget Considerations for Zone 6
Efficient resource use is essential to sustaining a pollinator plant calendar over multiple seasons. The aim is to maximize nectar output per dollar spent while reducing maintenance burdens that can derail long‑term engagement. This section outlines practical strategies for budgeting, plant selection, and maintenance routines that align with Zone 6 realities. In summary, prudent resource management ensures your calendar remains vibrant and dependable without exhausting your time or wallet.
Begin with a prioritized plant list based on bloom duration, nectar quality, and climate tolerance. Favor native or well‑adapted species with drought resilience and long bloom windows. Group plants with similar water needs to simplify irrigation, cut waste, and ensure consistent nectar availability. Consider a phased expansion plan: establish a core calendar of evergreen or winter‑hard nectar sources, then layer in mid‑season and late‑season diversity as budgets permit. This phased approach keeps your calendar productive while you learn what works best in your microclimates.
Maintenance costs accumulate if you overplant or overwater. Apply a minimalist maintenance philosophy: prune, fertilize lightly based on soil tests, and remove plants that consistently underperform. When possible, choose plants that thrive with minimal inputs. The combination of smart plant selection and lean maintenance creates a durable pollinator plant calendar that thrives despite weather variability each season.
Community, Collaboration, and Outreach: Expanding Impact of the Pollinator Plant Calendar
Community is the multiplier that makes a garden more than a personal space. By inviting neighbors, schools, and local clubs to participate in your pollinator plant calendar, you extend education, accelerate pollinator benefits, and create a shared sense of stewardship. Collaboration also provides feedback you can apply to future seasons, helping you refine plant choices, schedules, and maintenance routines. To conclude this section, collaboration turns a garden into a platform for learning and shared action.
Effective collaboration looks like co‑planning planting days, hosting seed and plant swaps, and inviting others to track bloom progress in their own plots. Encourage participants to document pollinator sightings and share insights about which nectar sources are most reliable in Zone 6. This collective effort strengthens the calendar’s resilience and broadens its reach—making pollinator support a community norm rather than a lone hobby.
Conclusion: Your Definitive Guide to Mastering the Pollinator Plant Calendar in Zone 6
In closing, a robust Advanced Pollinator Plant Calendar for Zone 6 blends troubleshooting, scaling, and engagement into a cohesive system that adapts to weather, wildlife, and human participation. Troubleshooting provides rapid fixes to keep nectar flowing; scaling expands impact from a single bed to a landscape that supports diverse pollinators throughout the growing season; and engagement sustains momentum through education, collaboration, and shared ownership. The practical steps—from protecting early blooms with season extension to auditing bloom windows and planning succession—create a living blueprint that improves year after year. The focus remains clear: build a resilient pollinator plant calendar that serves pollinators, beautifies the garden, and inspires your community. If you’re ready to take action, start with a simple bloom map today, track your results, and invite a neighbor to join the next planting day. Your pollinator plant calendar is not a static plan; it is a living, evolving strategy that rewards careful observation, deliberate design, and active participation. Remember, every additional nectar source you add helps pollinators thrive and your garden flourish—so commit to the process, share your progress, and nurture pollinators all season long.