Rudbeckia Seed Saving for Autumn Blooms
Rudbeckia Seed Saving Essentials for Autumn Blooms
Practicing rudbeckia seed saving helps you save money, preserve color, and support pollinators as autumn colors begin to glow. In BloomHaven’s 2026 landscape, this skill turns spent blooms into future vibrance, giving you an annual ritual that strengthens borders, containers, and mood in the garden. You will learn to recognize seed maturity, collect without damage, dry properly, and store seeds so they germinate reliably next season. Whether you grow a single variety or a mosaic of yellows and bronzes, rudbeckia seed saving is accessible, rewarding, and surprisingly straightforward when you follow a clear process.
In this Part 1, we cover the essentials: selecting seed-worthy heads, knowing when to collect, drying and storing techniques, and basic troubleshooting to keep seed viable for 2–3 seasons. By following the steps, you can build a resilient, color-saturated autumn display year after year, with fewer shopping trips and more homegrown color to savor alongside your pollinator-friendly plants.
Why Rudbeckia Seed Saving Matters for Autumn Color
Rudbeckias bloom late into the season, often after most annuals have faded. Saving seeds allows you to extend that late-summer glow into autumn and beyond. By choosing plants with sturdy stems, disease resistance, and reliable seed set, you can create a clump that renews itself each year with minimal effort. Because rudbeckia seed saving supports genetic diversity, you also have a better chance of finding varieties that self-seed true to your garden’s climate. This practice reduces waste, supports biodiversity, and keeps your borders vibrant as the light shifts toward cooler days.
In addition, rudbeckia seed saving is an intimate way to observe plant lifecycles. You’ll see which heads produce robust offspring and which do not, enabling smarter plant selection for future seasons. For gardeners who love a sustainable, hands-on approach, saving your own seeds is both practical and deeply satisfying. For extra inspiration and practical guidelines, you can explore trusted resources like Seed Savers Exchange to compare seed-saving techniques and seed life expectations.
Timing and Selection: When to Harvest and What to Save
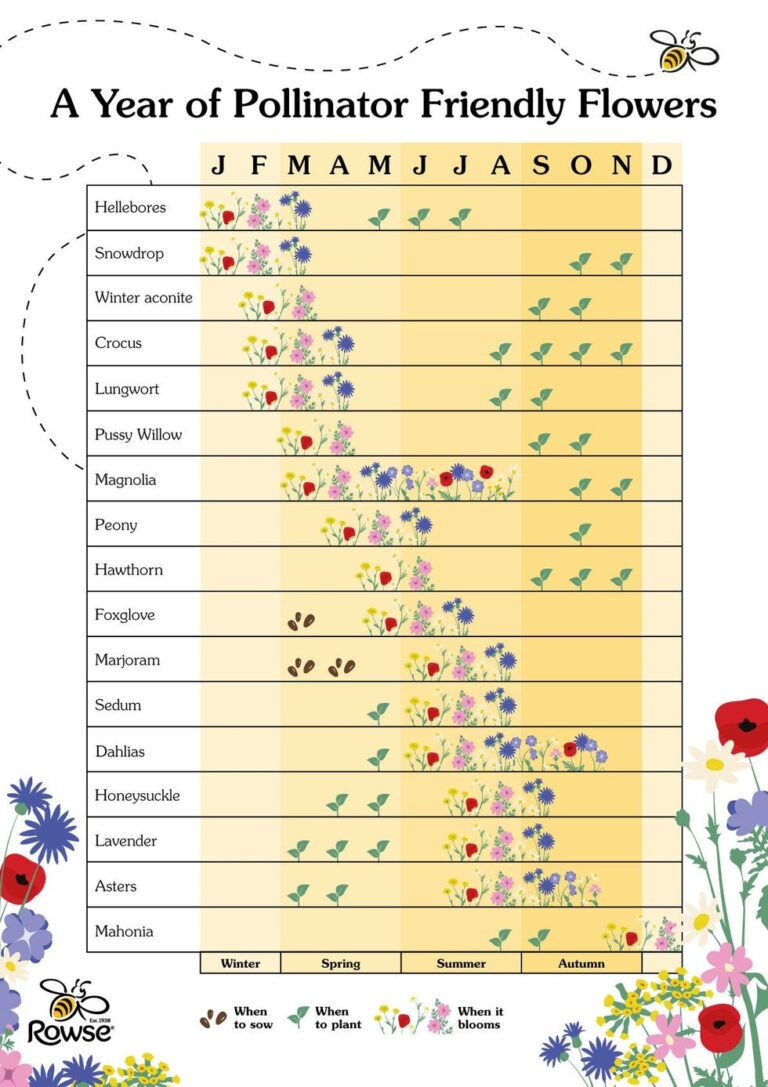
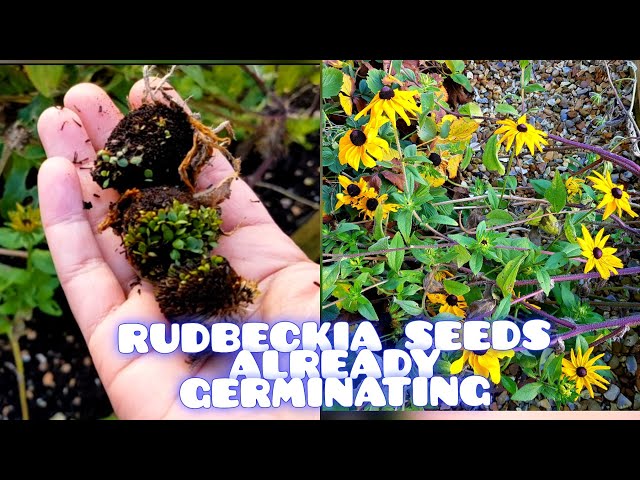
Timing is everything in rudbeckia seed saving. Wait for the seed heads to dry on the plant and for the backs of the heads to turn papery and brown. In most temperate gardens, seeds mature from late summer through early autumn. If you shake a head and hear seeds rattling, you’re likely at the right stage. Do not harvest when heads are still damp, as moisture invites mold and reduces viability.
Selection matters as well. Choose plants that performed well in your garden with strong stems, good vigor, and reliable seed set. Avoid gathering from diseased or heavily pest-infested plants, because problems can transfer to the next generation. Consider saving seeds from a small sample of plants first to gauge germination rates before committing to larger harvests. For a quick viability check, place a few seeds on a damp paper towel and observe germination over 7–14 days; if a decent percentage sprout, you’re on the right track for bigger batches.
Practical note: the seeds you save from rudbeckia seed saving may vary in appearance depending on cultivar and growing conditions. Document your observations in a garden journal or a simple labeling system so you know which seeds came from which heads. This helps you refine your selections over multiple seasons and build a reliable seed bank for autumn color year after year.
Harvest Timing Checklist
- Identify heads at the dry, papery stage; seeds should rattle slightly when gently tapped.
- Avoid harvesting in wet or dewy conditions to prevent mold.
- Mark heads with a date and the plant source for easy reference.
- Test germination on a small sample before saving large quantities.
Choosing Seed Sources
Favor plants that showed vigor, upright habit, and resistance to common diseases. Save from multiple plants when possible to maximize genetic diversity and resilience. If you notice a plant consistently produces robust offspring, consider saving from its seed head as a primary source, while still collecting a few seeds from other plants to maintain variety.
Tools, Materials, and Setup for Easy Seed Saving
Gather a clean, simple workspace and a few basic tools: a sharp pair of pruning shears, paper bags or envelopes, labeling markers, a shallow drying tray or mat, and a small scoop or stiff brush for seed separation. In addition, a quiet, dry area with good air movement speeds up drying and minimizes mold risk. A fan on a low setting can help, as long as seeds aren’t exposed to direct heat or sunlight. A dedicated seed-drying corner keeps your harvest organized and less prone to contamination. For beginners, start with a single variety and a modest harvest to practice the process before scaling up.
Once the seeds are dry, use a light hand to separate them from chaff and residual plant matter. You can do this by gently rubbing the head with your hands or using a soft brush to dislodge loose debris. A small sieve or mesh can help, but start simple and only add tools as you gain confidence. For added convenience, keep a notebook or digital note close by to record harvest dates, seed sources, and germination results. The more consistently you label, the easier it is to manage your seed bank in 2027 and beyond.
Drying, Bagging, and Labeling Methods
Spread seed heads on a clean cloth in a warm, dry spot with good air movement. In well-ventilated spaces, rudbeckia seeds dry within 1–3 weeks; in more humid areas, you may need a gentle fan to keep air moving and prevent mold. When heads are thoroughly dry, clip the heads and place them into paper bags or envelopes labeled with the plant name, year, and source. Store the bags in a cool, dark place with low humidity. Avoid plastic bags for long-term storage, as moisture can accumulate and reduce viability. This is a simple, reliable routine that scales nicely with your garden size.
As you refine your routine, link your seed-saving efforts to a broader home-garden calendar. A little planning goes a long way toward achieving consistent autumn color across years. If you’d like more detailed standards or examples from other gardeners, visit Seed Savers Exchange for resources, articles, and seed-saving checklists.
Storage and Longevity: How to Keep Seeds Viable
Store Rudbeckia seeds in a cool, dry, dark place. The preferred range is around 32–41°F (0–5°C) with low humidity; many gardeners find that a standard unused refrigerator shelf works well for short-term storage. In general, rudbeckia seeds retain good viability for about 2–3 years under stable conditions, with some varieties lasting longer when kept perfectly dry. Avoid exposure to heat or direct sunlight, which can shorten viability rapidly. If you plan to keep seeds for a longer horizon, consider desiccants or airtight containers placed in a dark cabinet, but always monitor humidity and temperature to prevent mold.
Labeling is essential for long-term seed health. Include the plant name, year of harvest, source, and any germination notes. A simple coding system helps you quickly sort fresh harvests from older batches. For example, you might label as SR-2026-01 for a seed head from a particular cultivar harvested in 2026. This system reduces confusion and improves germination outcomes in subsequent seasons.
Labeling, Dating, and Seed Viability Testing
Maintain a small, ongoing seed-viability log. Each year, test a sample (10–20 seeds) from several batches by germinating them on a damp paper towel or in a seed-starting mix. Record germination percentages and note any color or vigor differences among batches. With data over time, you’ll be able to forecast your success rate, optimize your harvest sources, and fine-tune storage conditions for the best autumn blooms.
Common Pitfalls and Troubleshooting
Even experienced gardeners encounter a few snags. The most common issues are mold, poor germination, and accidental hybrid contamination. Prevent mold by ensuring seeds are thoroughly dry before bagging and storing in a cool, dry place. Improve germination by testing viability annually and by selecting robust heads that perform well in your climate. Hybrid contamination is tricky; if you collect seeds from a plant that’s the product of prior seed-saved generations, you risk shifting traits over time. To minimize this risk, keep lots of variety in your seed pool and clearly label each batch.
Other challenges include seed predation by rodents or insects and fungal growth in humid environments. If you face pests, harvest promptly, secure your storage area, and consider sealed containers with desiccants. For mold, increase airflow during drying, reduce humidity, and discard any batch showing signs of spoilage. Crucially, avoid mixing seeds from different species or hybrids, as cross-pollination can alter traits in unpredictable ways.
From Seed to Seedling: Planting Guidelines for a Strong Start
When you’re ready to sow, start with clean, labeled seeds in well-draining soil. Rudbeckia typically prefers full sun and moderate moisture; in warm climates, mulching helps conserve moisture and suppresses weeds that compete for nutrients. If you’re sowing indoors, use a seed-starting mix and transplant after seedlings develop true leaves. If direct sowing, scatter seeds on the soil surface and lightly press them in, keeping soil moist until germination occurs. In both cases, maintain even moisture and avoid overwatering, which can stunt germination and seedling vigor.
Direct sowing works well in autumn for spring blooming, while indoor starts can give you earlier color in late winter or early spring. As seedlings grow, provide support for taller rudbeckia varieties and monitor for pests. With careful timing and consistent care, your saved seeds become robust plants that carry forward the autumn palette you love. Direct sowing and transplanting approaches each have advantages, so choose the method that fits your climate and gardening rhythm.
Quick Reference: Timelines and Checklists
To help you plan, keep a simple timeline: harvest heads when dry in late summer to early autumn; dry for 1–3 weeks; bag and label; store in a cool, dark place; conduct a germination test in winter; plant saved seeds in spring or early summer. Use a checklist for each batch: harvest date, seed source, drying status, bag label, storage location, and germination results. A consistent routine reduces guesswork and yields reliable autumn color year after year. Because this is a cyclical practice, you’ll discover small improvements with each season.
Conclusion: the basics are set, and your rudbeckia seed saving routine is ready to scale. In Part 2: Seed Germination and Storage for Continuous Autumn Blooms, we will explore advanced viability testing, storage optimization, and germination strategies to maximize success for next season.
Master the Rudbeckia Seed Harvest: Step-By-Step for Quality Seeds
Rudbeckia seed saving is more than a clever garden habit—it’s a deliberate, season-to-season practice that strengthens your autumn borders and supports pollinators. In this section, we translate practical field knowledge into a repeatable workflow you can trust. You will learn how to identify the right heads, time the harvest, and handle seeds so they retain vigor. Specifically, the aim is to maximize germination, protect genetic integrity, and simplify storage for reuse year after year. This approach aligns with BloomHaven’s focus on sustainable gardening and vibrant, pollinator-friendly landscapes.
Overview of Rudbeckia Seed Saving: Why It Matters
Rudbeckia seed saving matters because it preserves traits you value in your garden, such as robust growth, reliable flowering, and the characteristic bold, sunny faces that mark an autumn panorama. By selecting seeds from the hardiest plants, you amplify resilience against varying weather, pests, and planting conditions. This is especially important in a garden design that champions long-lasting bloom, naturalistic plantings, and sustainable gardening practices. With rudbeckia seed saving, you create a seed line that naturally pares back maintenance while still delivering dependable color and nectar for pollinators. The practice also reduces waste and costs, enabling you to expand your garden’s ecological footprint without compromising bloom quality. As you proceed, keep in mind that seed quality is a function of both plant health and careful post-harvest handling. When you combine careful selection with careful drying and storage, the result is seeds that germinate reliably and produce vigorous plants with the same traits you admired this season.
For a broader understanding of rudbeckia varieties and seed characteristics, consult the University of Minnesota Extension resources. This external guide complements practical steps with species-specific notes and regional considerations, helping you tailor the process to your climate. The link is a useful reference point, but the core steps here are designed to be adaptable to most garden settings while keeping seed quality front and center.
Timing and Preparation: When to Harvest Rudbeckia Seeds
Timing is everything in rudbeckia seed saving. Harvest too early, and germination may be uneven or poor, because seeds are not fully mature. Harvest too late, and seeds may shatter, be exposed to moisture, or lose viability. The sweet spot is when seed heads have dried on the plant enough to show a crisp, woody structure, yet before the first major rain or heavy dew jeopardizes them. In practice, you look for heads that have turned from green to tan or light brown and emit a faint crackling sound when gently pressed. At this stage, a portion of the seeds will rattle inside, indicating maturity. In the weeks leading up to harvest, monitor weather forecasts and adjust your plan accordingly. If an unexpected rain threatens your harvest window, allow the heads to dry indoors briefly on a clean surface or screen to avoid moisture uptake that could compromise germination. This careful timing helps ensure high-quality rudbeckia seed saving and sets you up for a strong germination rate in the following season.
Preparation begins long before you touch a single seed head. Gather a clean container, such as a paper bag or a shallow cardboard box, and prepare a quiet workspace with good air circulation. You may also want a soft brush to remove stray petals later, but avoid aggressive cleaning while seeds are still damp. The goal is to minimize physical damage and maintain seed coat integrity. If your garden includes other rudbeckia varieties or similar-looking heads, consider isolating your targeted variety to preserve genetic consistency. In addition, labeling is essential from the outset. As soon as you pick a seed head, place it in its own labeled container, noting the variety name, location in the garden, and date of harvest. This record-keeping becomes invaluable when you evaluate germination results later and want to refine your selections for future seasons.
Selecting Seed Heads: Which Flowers Yield the Best Seeds
Not all rudbeckia seed heads are equally valuable for saving. Start by choosing sturdy plants that produced robust blooms, with a history of consistent flowering and strong disease resistance. Avoid heads from plants that showed signs of pest damage, mold, or extreme drought stress, since these traits can be carried into the next generation. Look for heads with a dry, well-formed central disk and a uniform seed appearance. Seeds from these heads tend to germinate more reliably and produce plants with uniform growth habits, which is important when you want predictable autumn color in your borders. If you notice color drift or unusual petal shapes in a particular head, consider excluding that head from your seed pool to maintain consistency in your saved lots. By selecting carefully, you strengthen your rudbeckia seed saving program and improve long-term outcomes for seed viability.
Alongside quality, consider seed count and seedling vigor. Heavier, plumper seeds usually carry more energy for successful germination, though small seeds can still germinate vigorously if conditions are optimal. The critical factor is the health of the parent plant: good nutrition, consistent watering, and minimal stress translate into more vigorous seeds. If you manage a collection, document the seed source and the observed performance of the resulting plants. This practice not only helps with future planning but also enhances your garden’s narrative—showing how you selectively saved seed from your strongest performers to build a routine of dependable blooms year after year.
The Step-By-Step Harvest Process
The harvest process itself is straightforward, but attention to detail matters. You approach each seed head with respect for the plant and with a plan to minimize seed loss. First, bring your prepared containers to the field or allocate a clean workspace in the garden where you can handle the seed heads with minimal disturbance. Next, gently rub or tap the heads to encourage seeds to loosen, and then set aside the immature portions. In warm, dry conditions, the seeds should begin to separate easily from the chaff. If you notice any moisture, pause and let the material air-dry before continuing. Persistence pays off here, because careful harvesting reduces seed breakage and preserves the integrity of each seed, which in turn improves germination potential. Finally, once seeds are separated, transfer them to labeled, dry containers and store them away from direct sunlight until you’re ready for drying and curing. This methodical approach to harvesting supports consistent results and aligns with the goal of high-quality rudbeckia seed saving.
Gather Tools and Prepare
Tools are simple but essential. You need a clean surface, a small brush or your gloved hands, and a shallow tray or bag to collect seeds. A soft brush helps you separate seeds from the surrounding chaff without damaging the seed coats. You want to minimize moisture exposure at every stage, especially after harvest. In addition, keep a pencil and labels handy to record the harvest origin and date. The preparation phase is a quiet, deliberate ritual that signals you value seed quality as much as bloom color or form. With everything in place, you proceed with confidence, knowing your workflow reduces waste and preserves vigor for next season’s plants.
Harvesting Technique for Quality Seeds
When you harvest, aim for undamaged heads with fully formed seeds. Hold the head gently and give it a light shake to release loose seeds into your container. Then, inspect the material and remove any obviously damaged seeds or debris. If you are harvesting from a windy site, consider covering the area with a fine mesh to catch seeds that might otherwise drift away. After you’ve collected a sufficient amount, bring the seeds to a shaded, well-ventilated space to begin the initial drying phase. The key is to keep seeds away from moisture and direct heat, which can degrade viability. Throughout this stage, maintain careful labeling so you can track which seeds came from which head and variety. This methodical approach contributes to a reliable rudbeckia seed saving program and sets the stage for successful drying and storage later in the process.
Post-Harvest Handling
Post-harvest handling is where seed quality is truly protected. It begins with proper drying and curing, then continues with careful cleaning and precise storage. The goal is to bring seeds to a stable moisture level, prevent mold, and maintain viability for as long as possible. Handle every seed with care, and avoid rough prying or excessive handling that could crack or misalign the seed coats. This phase is critical for achieving long-term germination success and ensuring that your saved rudbeckia seeds will perform reliably in future plantings. When in doubt, err on the side of gentleness and patience, because the worst moment for seed quality is rush and haste. The more deliberate your handling, the more consistent your results will be in the years ahead.
Drying and Curing Seeds
Drying is the cornerstone of post-harvest quality. Spread seeds in a thin, even layer on a clean screen or parchment, and place them in a warm, ventilated space away from direct sun. The airflow is crucial; it helps dissipate residual moisture that could otherwise promote mold or rot. You want seeds to become uniformly dry to the touch, with the outer coat intact and no soft spots. Drying times vary with climate, but a typical window is several days to a couple of weeks. Check seeds regularly and stir them gently to promote even drying. If you live in a humid region, consider using a dehumidified environment or a small desiccant chamber to aid the process. While it may be tempting to speed things up with heat, resist this urge—heat can damage seed vigor and shorten viability. This patient approach is the best guarantee of high germination rates and robust plants next season.
Cleaning and Sorting
After drying, you proceed to cleaning and sorting. Remove any broken seeds, larger debris, or discolored material. This stage enhances seed purity and improves storage outcomes. A simple method is to sift seeds by hand and by texture, discarding anything that feels unusually soft or brittle. The result is a clean lot of rudbeckia seeds that you can confidently label and store. Remember, accurate labeling is as important as any cleaning step. Tie the record to the seed container and include the variety, harvest date, and any notes on plant performance. A clean, well-labeled seed lot makes future germination tests easier and gives you a dependable baseline for comparing year-to-year results.
Storage Essentials for Longevity
Storage is where germination viability is preserved. Store seeds in airtight containers with bright, dry, cool conditions—ideally a consistent 32 to 41 degrees Fahrenheit in a dedicated seed cabinet or refrigerator, away from strong odors. Silica gel packets or other desiccants can help maintain a stable moisture level, especially in fluctuating climates. Label each container with clear identifiers and keep a master list of all saved lots for quick reference. Avoid exposure to light and heat, which can gradually degrade seed vigor. By controlling moisture and temperature, you maximize the time your rudbeckia seeds remain viable and ready for planting. When you prepare for next spring, you’ll appreciate the resilience of well-stored seeds and the predictable germination you planned for at the outset of this process.
Viability Testing and Labeling
Before you tuck seeds away for storage, a quick viability check helps you gauge what to expect in spring. A simple germination test can be arranged by placing a small sample on a damp paper towel in a warm, bright spot and watching for sprouting over a week or two. This lightweight check gives you a practical estimate of germination rates without committing to display-level tests. If germination is lower than anticipated, you can adjust future seed-saving choices or harvest timing in your garden. Labeling remains essential in this phase. For every seed lot, record the variety, origin, harvest date, and germination result. These records guide future decision-making, helping you refine your techniques and build a reliable seed bank across seasons.
To keep your records consistent, create a simple labeling system from the start. Use a durable tag or marker on the container and a corresponding entry in your garden notebook or digital log. When you combine precise labeling with a germination snapshot, you gain actionable insights about which heads produced the strongest progeny and how storage influenced viability. This systematic approach underpins successful rudbeckia seed saving and supports your long-term garden planning.
Troubleshooting and Common Issues
Even with a careful workflow, problems can arise. Mold during drying usually signals excess moisture or poor air movement, so adjust humidity and airflow accordingly. If you see spoilage, isolate the affected seeds and discard them to prevent cross-contamination with healthy lots. Cross-pollination is a risk in mixed beds; isolation distances and strategic placement help protect seed quality. Finally, pests may target stored seeds, especially if containers are not fully sealed. Inspect containers regularly, and address any signs of intrusion promptly. By anticipating these issues and applying proactive safeguards, you maintain higher germination rates and healthier plants for the next season.
In addition to practical safeguards, consider environmental factors that influence seed reliability. Temperature fluctuations, high humidity, and variable daylight can stress seeds during drying and storage. To mitigate these effects, keep a stable environment and avoid placing seeds in areas susceptible to temperature swings or moisture intrusion. Consistency is your ally in reducing seed degeneration and promoting vitality in future plantings. If you ever question the integrity of a batch, err on the side of cautious disposal rather than risking poor germination in spring. A disciplined approach today pays dividends in spring performance and garden resilience.
Seed Quality Checklist for Season-Forward Plantings
Before you label and store your rudbeckia seeds, run through a quick mental checklist. Are the seeds mature and dry to the touch? Do you have clear, legible labels for each batch? Is the storage environment cool, dry, and protected from light? Are your records complete, including variety and harvest date? If you can answer yes to these questions, you are well on your way to a dependable seed bank that supports perennial color and pollinator-friendly blooms. A robust seed quality routine not only ensures germination but also preserves the genetic integrity of your favorite rudbeckia varieties for years to come. Taken together, these practices form a comprehensive approach to seed saving that yields reliable spring blooms and strong autumn color for many seasons ahead.
As you implement these steps, remember that patience and consistency are the silent cornerstones of success. The more consistently you apply the process, the more predictable your outcomes become. Over time, your rudbeckia seed saving workflow will become almost automatic, allowing you to focus more on garden design and less on seed logistics. The result is a thriving seed bank that fuels your BloomHaven-inspired aesthetic while maintaining ecological health and pollinator support in your landscape.
In Part 3: Seed Processing, Storage, and Germination Testing, we continue the seed-saving journey with advanced techniques to maximize longevity and reliability of your rudbeckia seeds.
Advanced Rudbeckia Seed Saving Strategies for Consistent Germination
In this final section, we build on earlier steps and deliver actionable, field-tested techniques to maximize germination rates and uniformity in your rudbeckia seed saving efforts. The goal is simple: achieve predictable emergence, robust seedling vigor, and reliable autumn blooms year after year.
Timing the Harvest for Mature Seeds
Rudbeckia seed viability peaks when the seed heads are fully mature but not weathered. Begin by monitoring heads as they dry from green to tan. The bracts will become papery and the central disc will darken. A practical cue is the sound: if you cup the head and shake gently, you should hear seeds rattling inside. Avoid waiting so long that birds strip seeds or weather erodes viability. In regions with heavy humidity, harvest a few days earlier and finish drying indoors to prevent mold. If you plan to collect seed from multiple plants, stagger harvest times to capture a range of robust phenotypes.
Verifying Seed Maturation and Viability
Visual cues are helpful but not sufficient. Conduct a quick viability check. Grab a handful of seeds from a sample head and place them in tepid water; viable seeds typically sink. For a more concrete assessment, perform a small germination trial: place 10-20 seeds on moistened paper towels inside a plastic bag or covered dish, keep warm (around 70°F / 21°C), and observe for 7-14 days. Record germination percentage and note any patterns related to date, plant source, or storage conditions. This information helps you plan how many seeds to sow, how to store excess, and which seed lots need early replacement.
Cleaning, Threshing, and Labelling
After harvest, thresh carefully to release seeds from the seed heads. Many rudbeckia seeds ride in a small tuft; instead of aggressively beating heads, use a gentle rubbing method or a softly pitched thresh with a clean container. Sift to remove chaff, using a kitchen sieve or a coffee grinder set to a coarse setting (remove actual grains or other matter). Label every batch immediately with cultivar name, date, location, source plant age, and pollination notes. If you have multiple collectors, group seeds by mother plant to maintain clarity in tracking performance and potential trait variation. A photograph of the seed head with a ruler for scale can become a quick reference in future seasons.
Drying, Curing, and Storage
Drying prevents mold and maintains germination viability. Spread seeds on a clean tray, screen, or paper in a warm room with good air movement. Turn the batch every 12 hours to promote even drying. The goal is cracker-dry seeds that crack when pressed with a thumbnail but do not crumble. Once thoroughly dry, move seeds to airtight containers. Store away from light in a cool place. A stable environment is critical; aim for 32-40°F (0-4°C) and humidity below 40% for long-term storage. Using desiccant packets inside jars helps keep humidity down. If you need to store more seeds than your container can hold, divide into multiple small containers to reduce condensation risk and improve airflow.
4.1 Ideal Drying Conditions
Ideal drying strikes a balance between warmth and dryness. Target temperatures around 60-75°F (15-24°C) with relative humidity in the 35-50% range during the final drying window. Avoid direct sun, which can degrade seed quality. If your house is humid, consider a simple DIY dehydrator system: a screened tray placed on a low-heat setting with a small fan can expedite even drying. Check seeds daily for signs of mold, unusual odors, or thawing condensation in storage jars. These processes reduce storage losses and keep germination rates higher over time.
4.2 Storage Materials and Environment
Use durable, airtight containers such as amber glass jars, metal tins, or food-grade plastic containers. Label carefully with cultivar, collection date, and germination notes. Add a desiccant pack or a small amount of dry rice to help maintain dryness. Store in a dark, cool place: a dedicated seed cabinet, freezer chest, or cool basement shelf works well. For long-term seed-saving, consider a controlled environment with a small freezer or a dedicated refrigerator where you can precisely manage humidity and temperature. Regularly rotate stock and maintain a simple inventory so you can replace weak lots before they fail in a spring planting.
5. Ensuring Genetic Diversity and Controlled Crosses
Genetic diversity is the backbone of vigorous rudbeckia populations and reliable germination. Plan your crosses with a goal: maintain vigor, adapt to your garden conditions, and avoid genetic bottlenecks that cause lower germination or poor emergence in some years.
5.1 Isolation and Cross-Pollination
Rudbeckia is a prolific pollinator magnet; however, uncontrolled crosses can blur trait stability. If you’re saving seed from a limited set of plants, isolate flowers to reduce unwanted pollen flow. Simple isolation methods include bagging seed heads with fine mesh or keeping plants well separated by garden distance. If you must share beds with other rudbeckia, label the seed heads clearly and plan your saving to reflect known crosses. Documentation matters when interpreting germination outcomes later.
5.2 Selecting Seed Parents
Choose mother plants that exhibited strong vigor, pest resistance, and consistent bloom timing. When crossing, select seed parents that complement each other—one with sturdy stems and good branching, another with larger seed heads or deeper color. Write down the parent pairings and the outcomes, so you can reproduce successful combinations in future seasons. If you save seeds from several siblings, you’ll gradually develop a population that carries desirable traits with stable germination profiles.
6. Improving Germination Consistency
Even with careful handling, single seed lots can display variation in germination. The following strategies help reduce that variance and improve emergence across batches.
6.1 Pretreatment and Scarification
While rudbeckia seeds typically germinate readily, a light pretreatment can speed up germination for stubborn lots. Gently nick the seed coat with very fine sandpaper or a clean file, then sow seeds promptly so the seed coat doesn’t reseal. Alternatively, a three-hour soak in warm water can loosen the coat slightly for faster radicle emergence. Do not over-scarify; excessive abrasion reduces viability and increases seed loss. Track which lots benefit from pretreatment to tailor future practices.
6.2 Germination Environment and Seedling Care
Keep germination beds evenly moist and warm. Use a soilless tray mix with fine texture for good drainage. Maintain consistent temperatures around 70-75°F (21-24°C) for optimum germination. When seedlings emerge, provide bright light and gentle air movement to prevent leggy growth. Transplant strong seedlings at the two- to three-leaf stage into a well-draining soil mix. Harden off gradually before moving outdoors to avoid sunburn or transplant shock.
7. Testing Germination and Longevity
Regular testing helps you gauge seed lot viability and plan production. Compare germination rates across seasons and storage conditions to identify improvements and anticipate replacements before shortages occur.
7.1 Germination Tests and Seed Viability
Annual germination tests are a best practice. Use consistent conditions: warm temperatures, even moisture, and a fixed test duration in your environment. Record the percent germination for each seed lot and note any decline over time. If a lot drops below a target threshold (for example, 60-70%), consider discarding or using the seeds for cut flowers rather than planting quality transplants.
7.2 Recording and Predicting Seed Longevity
Maintain a simple seed ledger: batch origin, year collected, storage temperature, relative humidity, and observed germination. Graph trends over time to forecast longevity and to schedule replenishment. A well-kept record helps you balance supply across multiple growing zones, ensuring you always have seeds with strong germination when you need them.
8. Troubleshooting Common Issues and FAQs
With any seed-saving program there are common hurdles. The following quick references help you troubleshoot and stay on track.
8.1 Common Problems and Remedies
Moisture and mold signal high humidity in storage. Improve ventilation, confirm thoroughly dried seeds before sealing, and check that jars are truly airtight. If germination is lackluster, revisit whether seeds are too old, or if storage conditions drifted toward warmth or light. Inconsistent germination often traces back to a storage misstep, so a reset in the climate can restore performance.
8.2 Common Misconceptions
One common myth is that all seeds require cold stratification. Rudbeckia seeds typically do not need stratification, and any mistaken attempt at forcing stratification can waste viable seeds. In very dry climates, minor cooling during storage can help preserve viability, but it is not a substitute for proper drying and sealing.
9. Quick Reference Checklist
- Harvest at full maturity; seeds sink in viability checks.
- Dry completely before storage; aim for cracker-dry seeds.
- Use airtight, labeled containers; store cool and dark.
- Record parentage and batch details for future crosses.
- Test germination yearly and track longevity.
- Use isolation and cross-pollination planning to maintain diversity.
- Consider pretreatment for stubborn lots; monitor results and adapt.
For further reading on seed saving and general horticultural best practices, see Seed Savers Exchange.
Conclusion
Ultimately, advanced rudbeckia seed saving strategies empower gardeners to achieve consistent germination across seasons. By timing harvests, cleaning meticulously, drying properly, preserving genetic diversity, and validating viability through simple tests, you build a reliable seed program for vibrant autumn blooms. Remember to label and record every batch, experiment with minimal crosses to refine traits, and keep storage conditions steady. To conclude, rudbeckia seed saving is a practical, repeatable practice that rewards your beds year after year. Ready to put these strategies to work? Start saving rudbeckia seeds this autumn and share your results in the BloomHaven community. Subscribe for more expert tips on rudbeckia seed saving and autumn blooms.