Bouquet Preservation Techniques: A Practical Guide
Welcome to Bouquet Preservation Essentials for Lasting Blooms, the opening guide in BloomHaven’s Practical Guide series for 2026. If you cherish the scent, color, and structure of your florals, bouquet preservation is a skill worth mastering. This guide blends actionable steps, science-backed tips, and practical equipment to help your blooms endure longer, whether you’re saving a wedding bouquet, garden-picked stems, or seasonal arrangements. In short, bouquet preservation turns fleeting beauty into lasting memories and home decor.
In this Part 1, we cover the core principles, selection criteria, and the most reliable methods to preserve blooms with color, texture, and form intact. You’ll learn how to choose the right flowers, prepare stems, and execute classic air-drying, pressing, and silica-gel drying with confidence. By the end, you’ll have a practical workflow you can apply to any bouquet, from peony stems to wildflowers.
Bouquet Preservation Essentials: Tools, Timing, and Setup
Start with a compact toolkit: sharp scissors, clean glass jars or hangers, floral tape, and optional silica gel. Timing matters: harvest in the cool, early morning if possible. Remove excess foliage that would stay wet in storage, and re-cut stems at an angle to maximize water uptake (if you plan to use water-based methods). Crucially, moisture management and airflow determine results as much as the method you choose. Therefore, you’ll want a dedicated, dry, well-ventilated space for drying and curing.
Bouquet Preservation: Choosing Flowers for Lasting Impact
Some blooms dry best with sturdy stems and good structure, while others color-shift or shed petals. To maximize success, select varieties known for reliable drying and color retention. For long-lasting results, aim for flowers harvested at the right stage—buds that have just opened or blooms that are fully opened but not past peak. Consider fragrance goals: some flowers retain scent after drying, while others fade quickly. When in doubt, test a small bouquet before committing the entire arrangement.
Preparing Stems for Bouquet Preservation
Once you’ve chosen your blooms, prepare stems properly to maximize uptake and minimize rot. Trim stems to even lengths, cut at a fresh angle, and remove leaves below the water line. Clean equipment prevents bacteria growth. For air-drying, bundle several stems together loosely, tie them with string, and hang upside-down in a dark, airy spot.
Air-Drying Basics for Bouquet Preservation
Air-drying is the simplest method and works best for flowers with sturdy stems and low moisture. Choose a dry, well-ventilated space away from direct sun. Remove bottom leaves, secure stems, and hang them upside-down. Expect color to fade slightly, but many blooms retain shape well. Drying times vary by species and humidity; check weekly and avoid over-drying, which causes brittleness or browning. For additional guidance on flower drying, see The Old Farmer’s Almanac’s guide to How to Dry Flowers: How to Dry Flowers.
Step-by-step Air-Drying Process for Bouquet Preservation
Harvest in the cool morning to minimize moisture. Trim stems to 10–15 cm length after removing excess leaves. Group 3–5 stems per bundle and secure with twine. Hang bundles upside down in a dark, airy place. Wait until stems snap when bent, indicating dryness. After drying, store out of direct light in a dust-free container to protect color and texture.
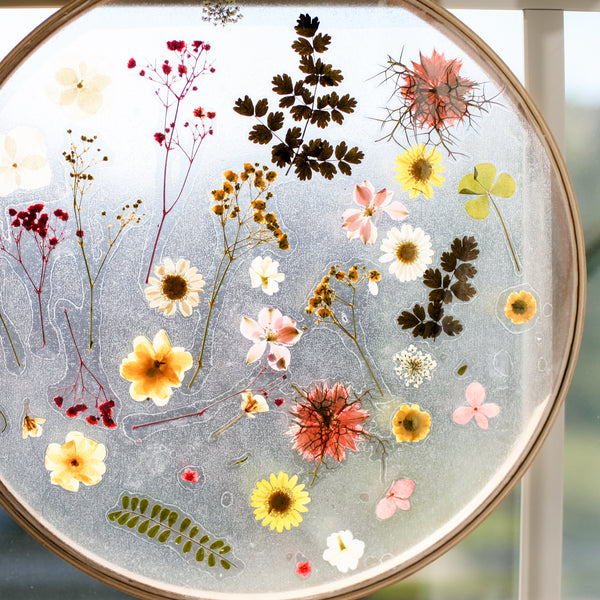
Pressing Flowers for Flat Bouquets and Bouquet Preservation
Pressing creates crisp, mural-ready pieces for framed art and flat bouquets. Use parchment paper between flowers and a sturdy weight or a purpose-built flower press. Change papers if moisture appears, and store finished pieces in a cool, dark place. Colors may shift toward pastel hues, but lines and silhouettes stay sharp for display.
Step-by-step Pressing for Bouquet Preservation
Arrange blooms between sheets of parchment, adding weight or placing in a press. Leave enough space for petals to lie flat. Check after 1–2 weeks; once dry, carefully remove petals and seal in acid-free folders or frames. Keep pressed pieces away from humidity to avoid curling or smudging.
Silica Gel Drying: Fast, Color-Retaining Bouquet Preservation
Silica gel dries flowers quickly and helps retain vivid color and form. Use fresh silica grains with a non-reactive container. Gently pour a layer to fully cover the blooms, place flowers in, and slowly add more gel until the petals are embedded. Seal the container and check after 24–72 hours. Remove carefully and brush off gel residue. Store in a sealed, moisture-free environment. Note that delicate petals require careful handling to avoid bruising.
How to Use Silica Gel for Bouquet Preservation
For best results, place blooms face-up or face-down depending on preferred orientation. Avoid overpacking; ensure a bit of space for air to circulate. After drying, gently shake off gel and set the pieces in a dust-free box with silica gel packs to maintain dryness.
Glycerin and Other Alternatives for Bouquet Preservation
Glycerin replaces water in stems and tissues, creating pliable, longer-lasting displays. This method suits evergreen foliage and some delicate leaves. Expect color shifts and softer textures. The process takes longer and requires careful monitoring of stems, solution concentration, and humidity. For best results, test on a small sample before treating an entire bouquet.
Preserving with Glycerin: When to Choose This Route for Bouquet Preservation
Glycerin preservation works well for greenery and woody stems, delivering a natural, leather-like finish. Submerge stems in a mixture of glycerin and water (roughly 1:2 by volume) until the stems feel flexible and fully hydrated. Remove, blot, and allow to dry in a well-ventilated area. Colors may dull slightly but texture can be rich and lasting.
Color Retention and Fragrance: Managing Bouquet Preservation
Color retention varies by species and method. Air-drying tends to preserve silhouettes; silica gel offers brighter hues; glycerin yields different tones. Fragrance generally fades with drying, but some varieties retain a hint of scent. To maximize color and scent, keep heat low, humidity controlled, and light minimal during storage. Store preserved stems away from heat, sun, and moisture to maintain vibrancy.
Time and Storage Conditions for Bouquet Preservation
Ideal storage is a cool, dark space with stable humidity. Use acid-free boxes or frames to prevent chemical reactions. If you plan to display, avoid direct sunlight and extreme temperature swings. Regularly inspect and dust preserved bouquets to extend life. The right environment can double or triple the longevity of your bouquet preservation pieces.
Finishing and Display Options for Bouquet Preservation
Seal or varnish options can help protect delicate petals; however, many purists prefer natural finishes for a velvet, matte look. Consider framing, shadow boxes, or glass domes. Use UV-filtering glass to reduce color fade and avoid high humidity that causes mold.
Sealing and Protecting Preserved Bouquets
Light sealants or spray coatings can lock in color but may alter texture. Always test on a small sample first. For long-term display, pair with inert storage materials and keep away from heat sources. Reevaluate monthly to catch any early signs of damage.
Common Pitfalls in Bouquet Preservation
Over-drying wrecks petals, while under-drying leads to mold risk. Direct sunlight fades color; humidity causes mold or stickiness; improper trimming invites rot. In addition, use clean tools and avoid chemical cleaners that can transfer to petals. Correct early mistakes with gentle handling, fresh materials, and appropriate drying times.
Troubleshooting Over-Drying and Mold in Bouquet Preservation
Handle dried blooms gently; if curling occurs after drying, you can recondition with light misting and rest in a dry space. If you notice mold, discard affected pieces and re-dry the rest using proper airflow and sanitized tools.
Long-Term Care and Storage for Bouquet Preservation
Preserved bouquets thrive with routine dusting and a climate-controlled display area. Rotate displays to reduce light exposure on sensitive colors. Store backups in acid-free tissue and containers; maintain humidity around 40–50% for best results. Periodically check adhesives and frames for degradation and replace packs as needed.
Storage Solutions for Longevity in Bouquet Preservation
Use archival boxes, silica gel packs, and humidity monitors to keep your collection safe. Label each piece with the flower type and date so you can track aging and plan future refreshes. A well-organized archive helps you enjoy blooms for years to come.
In Part 2: Advanced Techniques for Specific Flower Types and Finishes, we’ll tailor methods to peonies, dahlias, wildflowers, and more, with finishing touches for gallery-worthy displays.
Bouquet Preservation Workflow: Step-by-Step from Fresh Cut to Display
Fresh-cut flowers begin vibrant and fragrant, but their life hinges on how quickly you convert them into a display-ready bouquet. This workflow keeps the focus on bouquet preservation by guiding you from harvest through final placement. Each step is designed to optimize water uptake, prevent bacterial growth, and extend the life of your blooms without sacrificing color or scent.
Step 1: Harvesting at the Right Stage for bouquet preservation
Harvesting at the right stage matters more than you might think. For most garden varieties, collect stems when buds are just starting to open or when petals are showing color but have not yet unfurled fully. This timing preserves fragrance and prevents petals from cracking in warm air. Specifically, it ensures you have a full, vase-friendly bouquet that will last longer once hydrated. By choosing the right stage, you improve water uptake and reduce stress on the plant. After cutting, recut in the shade and bring stems to a cool space as quickly as possible.
Ideal Harvest Window
The ideal window varies by species, but a simple rule of thumb is to harvest in the morning when temperatures are cooler and the plant tissues are turgid. Specifically, this minimizes wilting and optimizes later hydration. If you can’t harvest right away, place cut stems in a clean container of cool water to reduce transpiration until you can process them further. For cut-flower lovers, having a small, dedicated harvest kit with a sharp knife, pruning shears, and a clean vase makes this quick and reliable.
Step 2: Immediate Post-Harvest Care
Time matters after harvest. Immediately place stems in clean water or a shallow submersion to prevent air embolisms from forming in the xylem. In a controlled workflow, you would trim the stems first (see Step 3) and then set aside for a few minutes to rehydrate. This early hydration step reduces stress and sets the stage for stronger vase life. The goal is to limit microbial growth right from the start, so keep tools and containers clean and cool. If you have multiple varieties, keep them separate during this stage to prevent cross-contamination of bacterial colonies.
Why Hydration First Makes a Difference
Hydration first helps ensure the plant can uptake water when you actually immerse it in vase water. It also reduces the risk of clogging the vasculature with air. In practice, you’ll notice that stems appear stiff and ready for processing after a short hydration window. Hydration also helps preserve color intensity by stabilizing pigments during the first hours after harvest.
Step 3: Prepping the Stems and Leaves
As you prepare stems, remove any foliage that would be below the waterline in the final arrangement. This limits bacterial growth and keeps water clear. Also inspect for damaged or bruised stems; discard any that show signs of rot or soft spots. Specifically, clean cuts prevent wounding, and removing leaves helps keep the water clean and reduces ethylene production from decaying leaves, which can shorten the life of the bouquet preservation. For roses and peonies, handle gently to avoid bruising the petals, which can accelerate browning.
Leaf Management and Stem Health
Keep the clean, fresh portions of stems pointing upward. Do not crush stems or bend them sharply, as this can impede water uptake. Finally, pre-clean all tools with alcohol or a sanitizing solution to minimize contamination. If a stem is stubborn about drawing water, give it a few extra strokes with a sharp knife to open the xylem further, but avoid tearing or tearing the tissue.
Step 4: Hydration and Conditioning
Hydration is the foundation of your bouquet preservation. Place stems in a clean container with lukewarm water and a floral preservative if available. The warmth helps the water move quickly through the stem; cooler water slows uptake. Specifically, avoid direct sunlight on the water surface to prevent bacterial growth. After a brief conditioning period, you’ll notice stems firming up and capillaries reactivating, which means you’re ready for the next step in the workflow. Conditioning also helps to reset the turgor pressure in delicate flowers like lisianthus or ranunculus, which improves overall display quality.
Choosing the Right Solution
Commercial floral preservatives are designed to supply energy, maintain pH, and retard bacterial growth. If you don’t have the commercial mix on hand, you can substitute a dilute sugar solution with a pinch of lemon juice to balance pH, but be aware this alternative may lead to faster bacterial buildup if not changed frequently. In any case, always label containers to avoid confusion and ensure you keep the solution clean and fresh.
Step 5: Cutting Techniques and Water Quality
Next you cut stems to a fresh angle to maximize water uptake. Use a sharp, clean knife, cut at a 45-degree angle, and make sure to recut under water if possible to prevent air from entering. The color and strength of the bloom are largely determined by this cut. Ensure water is clean; change water when it becomes cloudy, and rinse the vase if necessary. Specifically, maintain a water temperature that matches the preservative solution for optimal results. The consistent correct cutting and water quality support a stronger bouquet preservation life span in display. If you notice sap buildup on certain stems, rinse them gently before re-cutting to avoid clogging the vessels.
Angle, Length, and Placement
The angle matters; a diagonal cut increases surface area for water uptake. As you adjust stem length, consider the final arrangement and vase size. Shorter stems may be better for a compact display, while longer stems create a more dramatic bouquet. The right length improves stability and overall visual appeal. Also consider how many stems your vase can accommodate without crowding, which reduces airflow and increases the risk of mold. After cutting, immediately place stems into the preservative solution to minimize exposure to air.
Step 6: Floral Food and Preservatives
Floral preservatives are an essential ally in bouquet preservation. They feed the blooms, suppress bacterial growth, and help regulate pH to keep water clearer. If you don’t have commercial floral food on hand, a simple DIY mix of sugar and lemon juice can be used, but the commercial option tends to deliver more consistent results. Specifically, always follow the manufacturer’s instructions or the recipe carefully to avoid adverse reactions. For best practices, keep the preservative water fresh and maintain routine water changes to prevent stagnation. Remember, clean containers and fresh blades are critical to maintaining a disease-free stem environment.
For more detailed guidance on care practices and preservatives, see this reliable guide: Fine Gardening: How to Cut Flowers.
Step 7: Transport and Display Readiness
Transportation is part of the bouquet preservation workflow. When moving your stems from the prep area to the display, keep roots and water intact and avoid jostling. If you must transport a longer distance, consider a water-filled container or wrap the stems in damp paper towels to prevent moisture loss. Once you have the arrangement, place it in a cool, draft-free area away from direct sunlight or heat sources. Specifically, temperature consistency helps the blooms hold their shape and color as you progress from harvest to display, which is a core component of bouquet preservation best practice. If air travel is involved, choose containers with secure lids and extra padding to cushion movement.
Step 8: Post-Display Maintenance
After on-display, your care routine continues. Change the water daily or every other day, trim a little off the stems each time, and remove any wilted flowers promptly. Note that after a day or two, some blooms may peak and others begin to close. In such cases, a fresh cut can resurrect the display and extend life. The key is to maintain a clean vase, avoid overcrowding, and keep the bouquet away from ripening fruit and vegetables, which release ethylene that can accelerate aging. Furthermore, rotate the vase periodically to ensure even exposure to light, which helps maintain color and structure of your bouquet preservation.
Step 9: Common Pitfalls and Troubleshooting
Understanding the common pitfalls helps you prevent losses during bouquet preservation. Ethylene exposure from fruit, overabundant heat, and poor sanitation can drastically shorten vase life. If stems appear soft or discolored, recheck the cut angle and water quality and consider a brief rest in fresh water with preservative. Mold or bacterial growth is typically addressed by cleaning the vase, changing the water, and ensuring the stems are trimmed correctly. Specifically, watch for drooping, browning tips, and wilting leaves, which indicate hydration problems or poor air circulation in the display area. If you encounter stubborn browning at the tips, test the water quality and adjust preservative concentration accordingly.
With the step-by-step workflow complete, you are ready to bring your bouquet preservation routine to 2026 standards and beyond. In Part 3: Advanced Bouquet Preservation Techniques, we explore drying, pressing, and silica gel methods to extend display life and create keepsakes.
Advanced Bouquet Preservation Techniques for Longevity and Visual Impact
Advanced bouquet preservation is about more than just drying flowers. It blends science with artistry to extend color, form, and texture while preserving the bouquet’s original charm. In this final section, we explore techniques that optimize longevity and visual impact across bloom types, layouts, and display environments. Follow these methods to turn seasonal harvests and special occasions into lasting memories through thoughtful preservation strategies. The goal is clear: maximize bouquet preservation without sacrificing natural beauty.
Choosing the right technique by bloom type and desired outcome
Different flowers respond to preservation in distinct ways. Delicate petals, like peonies and ranunculus, can brown or crush if mishandled, while sturdy stems and foliage hold shape better through rigorous processes. Start by cataloging each stem’s weakest link: petals, colors, or stems. Then pick a preservation method that aligns with your goal—archival display, framed art, or a functional keepsake. Ultimately, aligning technique with bloom biology yields the best bouquet preservation results.
Air-drying for graceful, natural-looking bouquets
Air-drying is the gentlest path to preserve the natural silhouette. Begin with clean, dry stems and a well-ventilated space. Group stems in small bunches, tie with twine, and hang them upside down. Position them away from direct sunlight to minimize color fading. Maintain moderate humidity and steady airflow to avoid mold or uneven drying. For best outcomes, select blooms with low moisture content and strong structure. This method emphasizes texture and organic charm, making it ideal for rustic displays and wildflower-inspired arrangements.
Silica gel drying for vibrant color retention
Silica gel drying locks in color and shape, especially for blooms with thin petals that tend to flatten or curl during air-drying. Use fresh silica gel crystals, not damp or clumped material. Bury the flowers in a container layered with gel, with petals facing upward to avoid crushing. Seal the container to create a microclimate, and check frequently for the cure progress. Timing depends on flower type, usually ranging from 24 to 72 hours. When finished, gently remove from gel and let residual moisture evaporate in a dry environment. Silica gel techniques are excellent for preserving the vivid hues of dahlias, cosmos, and roses while maintaining a lifelike presence in your bouquet preservation collection.
Pressing and frame-drying for flat, display-ready art
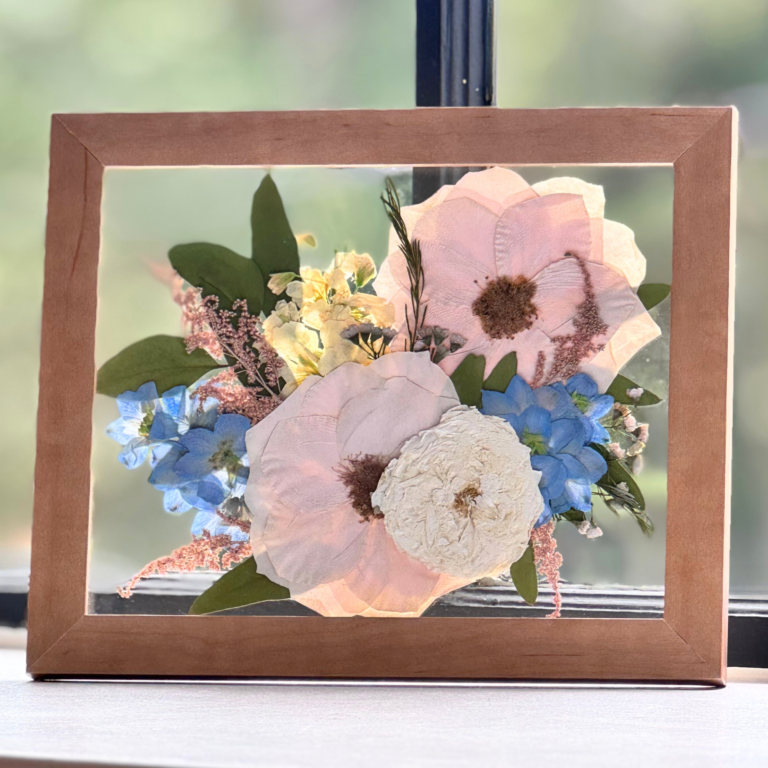
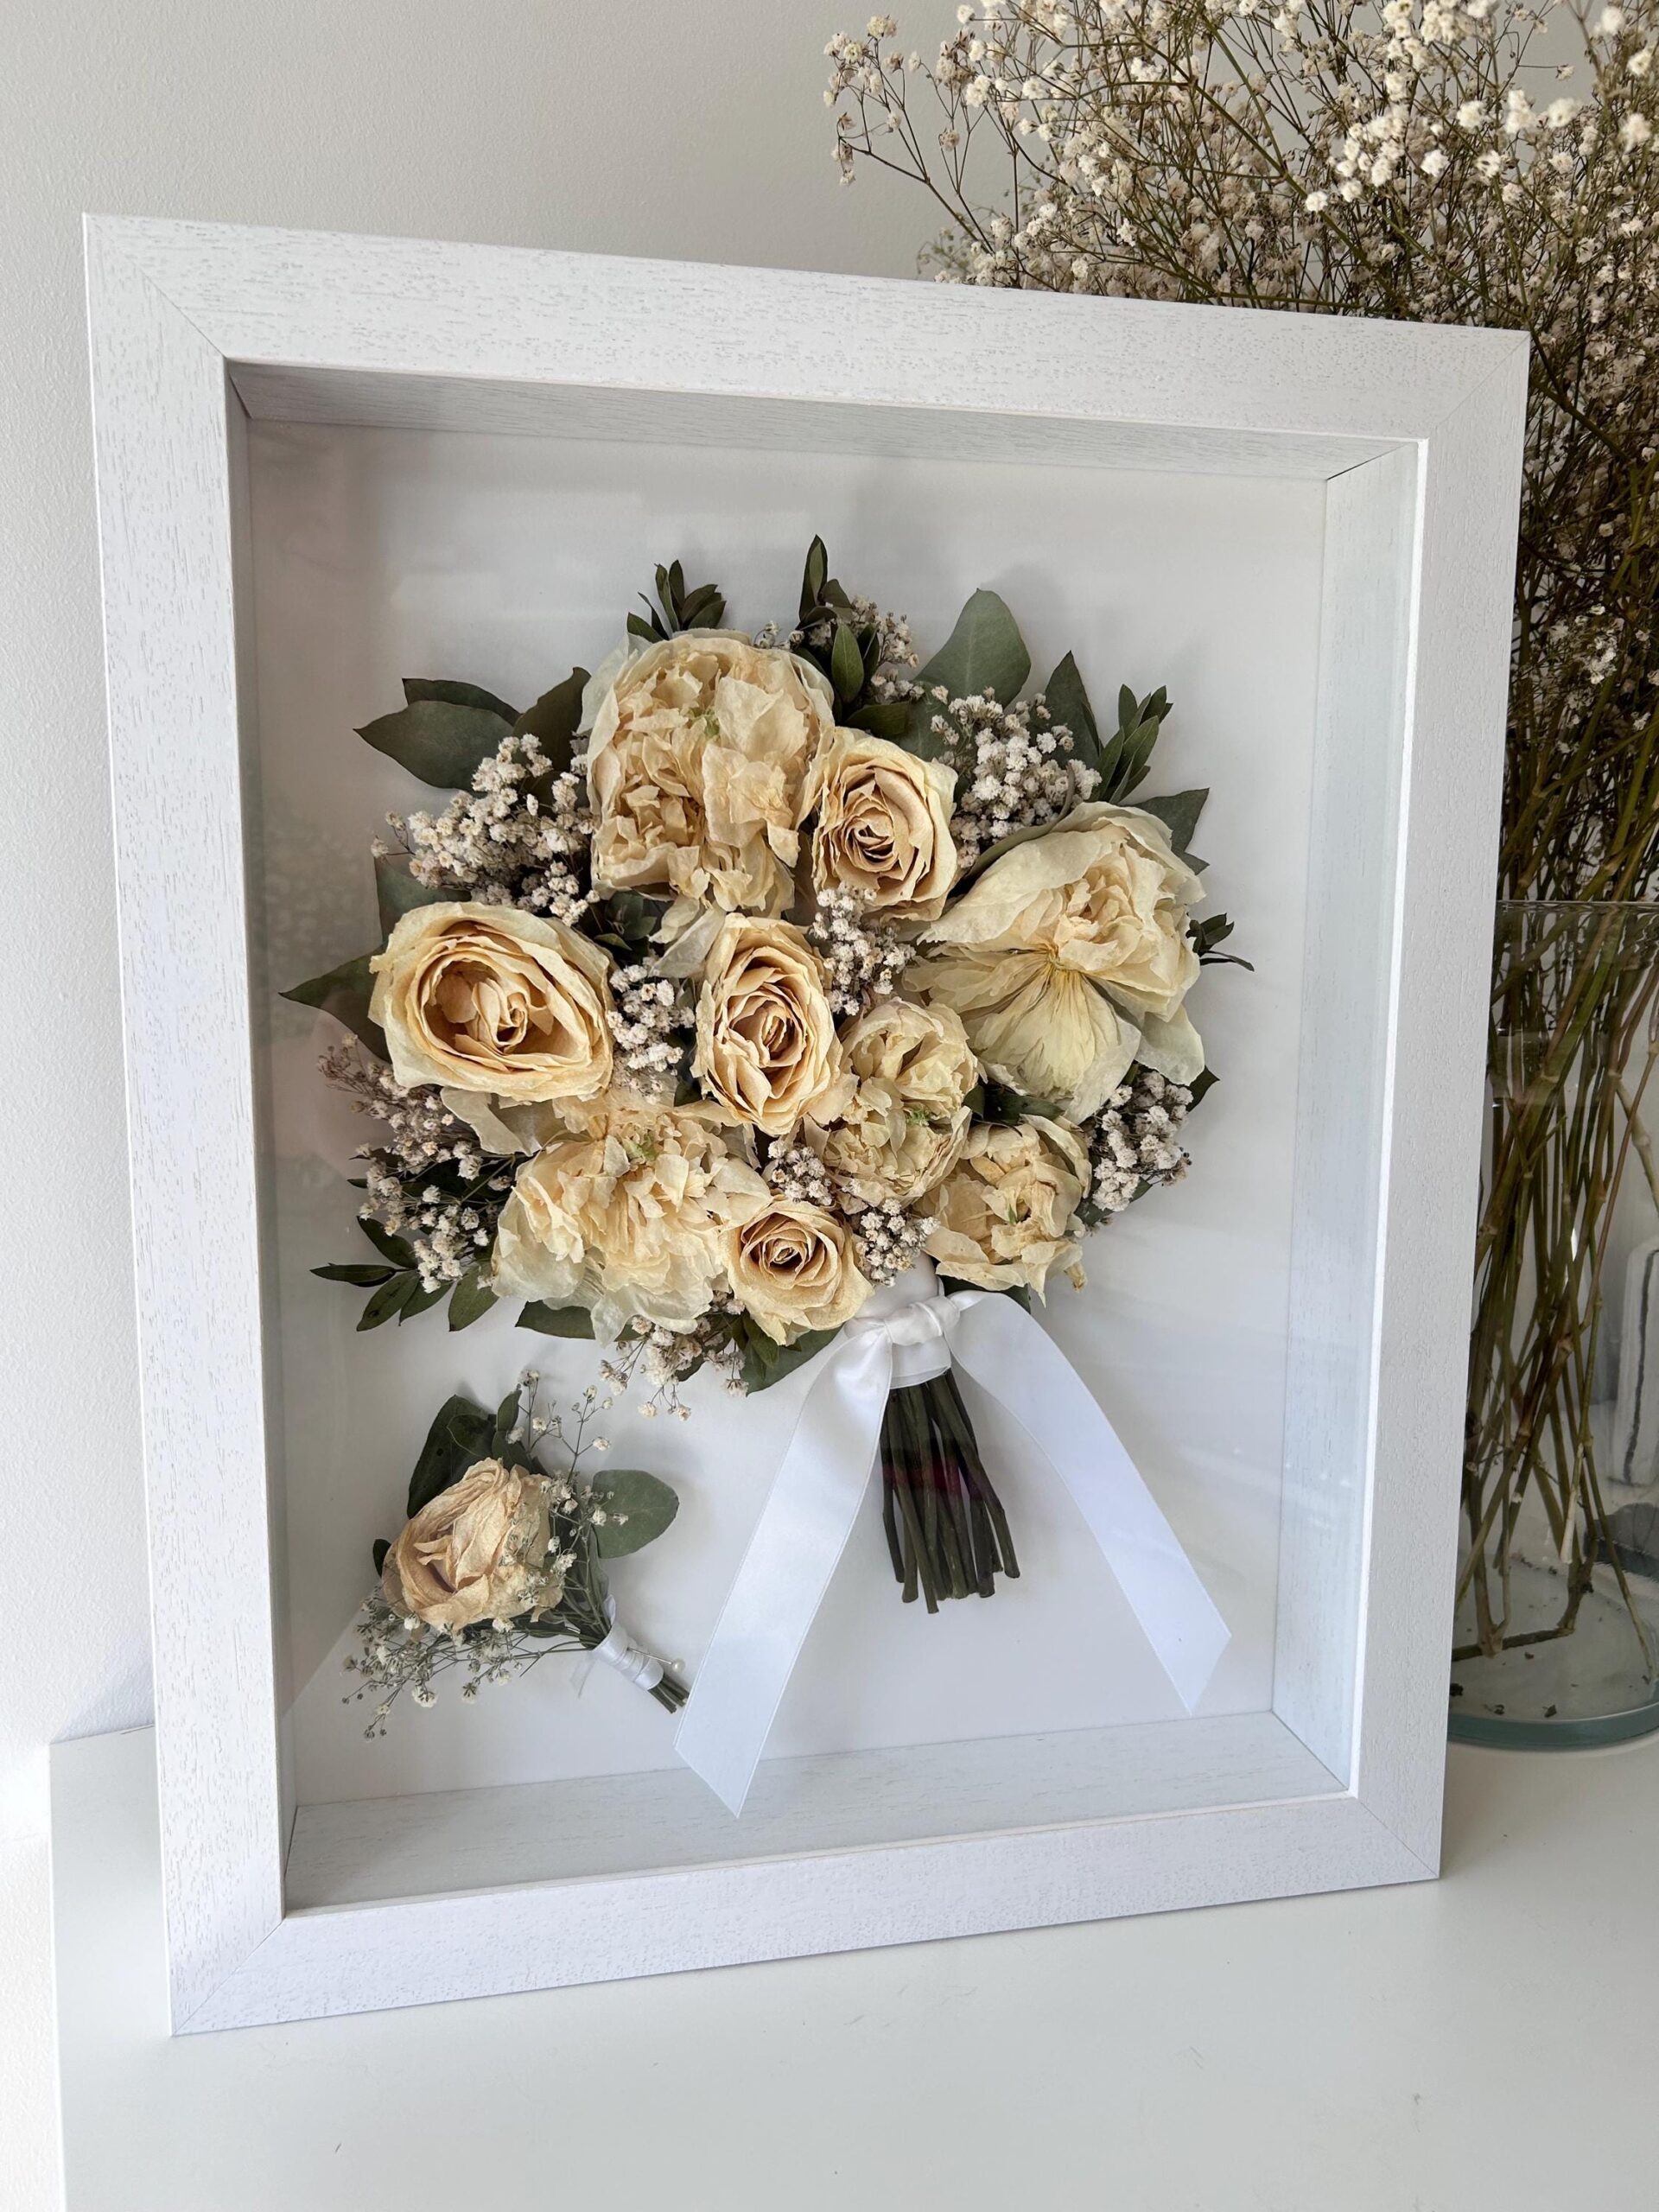
Preserving via pressing yields flat, easily framed petals that become works of art. Use heavyweight books or a proper flower press. Place petals between parchment to prevent sticking, then apply even pressure for two to four weeks. For thicker blooms, press only the outer petals and allow internal moisture to dissipate through air drying prior to pressing. When completed, mount the pressed bouquet on archival paper and frame under UV-protective glass. This approach suits contemporary displays, botanically inspired wall art, and small-scape arrangements that benefit from a pressed, two-dimensional aesthetic.
Preserving color, texture, and flexibility with conditioning and glycerin methods
Color and texture can be preserved beyond standard drying by introducing conditioning steps. Glycerin-based preservation replaces water in the plant tissues, producing supple leaves and stems. This method works best for foliage and woody stems, not delicate petals. Submerge cut stems in a glycerin solution, gradually replacing the water in the plant with glycerin over several weeks. This technique yields flexible, lifelike stems that remain resilient in display vases or mounted arrangements. Note that glycerin can alter slightly the natural color; test on a small batch first to ensure it achieves your desired bouquet preservation outcome.
Combining methods for multi-variety bouquets
Real-world bouquets blend a spectrum of bloom types. A practical approach is to dry or press some components while glycerin-treating others. For example, air-dry sturdy daisies and eucalyptus for structure, silica-dry roses for color, and glycerin-treat foliage for flexibility. After drying, reassemble the bouquet preserving the original balance and form. This hybrid strategy is particularly effective for preserved arrangements intended as long-term keepsakes or display pieces that must retain both color and shape. Ultimately, multi-method preservation gives you flexibility without compromising visual impact.
Maintaining form and structure after drying
Preserved bouquets often begin to slacken as moisture exits and plant tissues become brittle. To maintain form, reinforce stems with discreet armatures or fine wires where needed. Use archival floral tape to secure joints and prevent movement. For heavy blooms, consider a lightweight internal support from clean, inert materials that won’t react with the preserved petals. By stabilizing architecture early, you preserve your bouquet’s visual integrity for months or even years, depending on storage conditions and handling.
Storage conditions that maximize longevity
Environmental stability matters as much as the preservation method. Keep preserved bouquets away from direct sunlight, excessive heat, and high humidity. For long-term display, place arrangements in cool, dry rooms with minimal fluctuations in temperature. Use desiccants in storage rooms to moderate humidity. If you plan to showcase pieces in a bright living area, UV-protective glass and anti-reflective coatings can dramatically extend life. Ultimately, careful storage is a critical component of bouquet preservation strategy, ensuring colors stay vivid and forms stay intact.
Display strategies: framing, clusters, and lighting
Display choices impact perceived longevity and beauty. Framed and mounted pieces should be viewed away from direct sunlight. Group preserved bouquets in galleries or shelves with consistent lighting to highlight texture and color. Consider a cohesive color story or botanical theme to unify a display. When possible, rotate pieces seasonally to minimize exposure to the harsh elements while keeping your collection fresh and engaging. A well-thought-out display enhances visual impact and extends the life of your bouquet preservation investments.
Color retention techniques and safe finishing touches
Color retention is central to bouquet preservation. Avoid sprays or finishes that dull tones or add sticky residues. Instead, use archival matte fixatives or light sealing designed for dried florals if you need a bit of stiffness or sheen. Test any finish on a small sample before applying to the entire piece. For mixed media, ensure coatings are compatible with all materials in the bouquet. These finishing touches can elevate the final display while keeping the bouquet preservation authentic and long-lasting.
Ethical and environmental considerations
Preservation choices can affect sustainability. Opt for locally sourced blooms and environmentally friendly drying agents whenever possible. Reuse or recycle materials like kraft paper, glass jars, and frames. If you sell or gift preserved arrangements, clearly communicate care instructions to recipients. Ethical bouquet preservation also means handling delicate blooms with care to minimize waste and extend the life of your floral keepsakes for years to come.
DIY preservation kits and product recommendations
DIY kits can simplify advanced bouquet preservation for home enthusiasts. Look for kits that include silica gel, archival paper, and guidance on bloom-specific timing. A well-chosen kit helps you achieve consistent results across different bouquet types and preservation methods. When selecting products, prioritize purity, low moisture absorption, and food-grade or archival-grade materials to avoid staining or chemical reactions that could degrade your blooms.
Additional expert tips for consistent results
Consistency comes from preparation, patience, and routine checks. Always start with clean tools and sanitized hands to minimize contamination. Document bloom type, method, and curing time for future reference. If a batch shows unexpected browning or curling, identify the step that went awry and adjust the technique accordingly. In practice, meticulous notes and controlled experiments lead to reliable bouquet preservation outcomes that you can repeat with confidence.
Practical troubleshooting at a glance
Common issues include color fading, brittleness, and off-gassing that causes odor. Color fading is often due to prolonged light exposure; store in darker spaces. Brittleness can indicate over-drying or insufficient conditioning; rehydrate carefully or adjust humidity in the drying environment. Odor issues may arise from residual moisture or improper storage; ensure blooms are fully dried before framing or storage. By tackling these challenges with methodical steps, you protect your bouquet preservation investment and ensure ongoing visual impact.
Important considerations for final presentation
When the preservation process is complete, consider final presentation choices. A consistent frame style, careful mounting, and protective coatings contribute to lasting visual impact. Display plans should align with the home or gallery space’s lighting and color palette. A well-planned presentation reinforces the value of bouquet preservation as both a decorative practice and a lasting memory.
For a deeper dive into practical drying science and method selection, you can explore detailed guides such as The Spruce: How to Dry Flowers. This resource provides step-by-step comparisons of air-drying, silica gel, pressing, and glycerin methods that complement the techniques outlined here.
Conclusion
In summary, advanced bouquet preservation combines tailored techniques with thoughtful display and storage to maximize longevity and visual impact. By selecting the right method for each bloom, conditioning when appropriate, and providing stable environmental conditions, you achieve durable, beautiful preserved bouquets that honor the original arrangement. The recurring thread across all methods is deliberate care—care in selection, care in handling, and care in display. bouquet preservation isn’t a single trick; it’s a suite of interrelated practices that, when applied consistently, yield heirloom-like keepsakes. To take the next step, consider integrating these techniques into a dedicated preservation routine and schedule. Start with one bouquet, document results, and expand your practice from there. If you’re ready to elevate your preserved collections, subscribe for more expert tips and exclusive guides on bouquet preservation, and explore our illustrated workflows to streamline your process.
Note: The strategies above are designed for practical home use and small studio projects. For professional installations or archival-grade preservation, consult a floral conservator who can tailor methods to your specific materials and display goals.